Introduction
What exit code 137 means for Kubernetes
Exit code 137 is a signal that occurs when a container's memory exceeds the memory limit provided in the pod specification. When a container consumes too much memory, Kubernetes kills it to protect it from consuming too many resources on the node. This ensures that other containers on the same node are able to keep running normally.
Steps we'll cover:
- Dive into Exit Code 137
- Kubernetes and Exit Code 137
- Common Causes for Memory Issues in Containers
- Steps to Mitigate Memory Issues
- Techniques to Investigate Application Memory Consumption
Importance of troubleshooting this exit code for maintaining a stable environment
Troubleshooting this issue will reduce your maintenance overhead and help prevent inconsistencies caused by unexpected service interruptions. However, there are some causes of exit code 137 that may be specific to your environment, but most of the time, you can solve it using a simple troubleshooting procedure. Always remember that any problem that causes disruption is a business loss. We must be vigilant about this issue and attempt to permanently resolve it.
Background: Exit Codes Explained
What are exit codes and their significance?
When a container terminates, container engines utilize exit codes to report why it was terminated. Exit codes serve as a way to inform the user, operating system, and other applications about why the process was terminated. Each code is a number ranging from 0 to 255. Codes below 125 have application-specific meanings, whereas higher values have special meanings.
Common exit codes and what they generally indicate
Container failures are one of the most common causes of Kubernetes pod exceptions, and understanding container exit codes will assist you in determining the root cause of pod failures while troubleshooting. Containers most commonly utilize the following exit codes:
| Error Codes | What they indicate |
|---|---|
| Exit Code 0 | This Exit Code is triggered by developers when they terminate their container on purpose once a task is completed. Exit Code 0 technically indicates that the foreground process is not associated with a specific container. |
| Exit Code 1 | This Exit Code indicates that the container stopped due to an application error or an incorrect image specification reference. |
| Exit Code 125 | Exit Code 125 indicates that the container is being run by the command. In the system shell, for example, the docker run was invoked but did not execute correctly. |
| Exit Code 126 | Exit Code 126 indicates that the command used for a container specification could not be invoked. In a continuous integration script used to run a container, this is often the cause of a missing dependency or error. |
| Exit Code 127 | Exit Code 127 shows that a command used in the container specification points to a file or directory that doesn't exist. |
| Exit Code 128 | Exit Code 128 refers to the fact that the code running from your container has successfully completed an exit command but was not able to produce a valid exit code. |
Dive into Exit Code 137
Meaning and implications of exit code 137
The out-of-memory (OOM) killer is an operating system's mechanism used to terminate running processes when there is not enough available memory, and thus, it generates the exit code 137. Different implications are associated with an application or service in a pod when it is terminated with exit code 137, and these implications include the following:
- Termination of a pod may have impacts on the service that is being provided by the pod.
- Data can be lost if the process running inside a container doesn't checkpoint properly when the container is terminated.
- The pod is not terminated, but the performance of the application or service that is running in the pod might be affected when too much memory is utilized.
How it reflects the operating system's intervention due to memory concerns
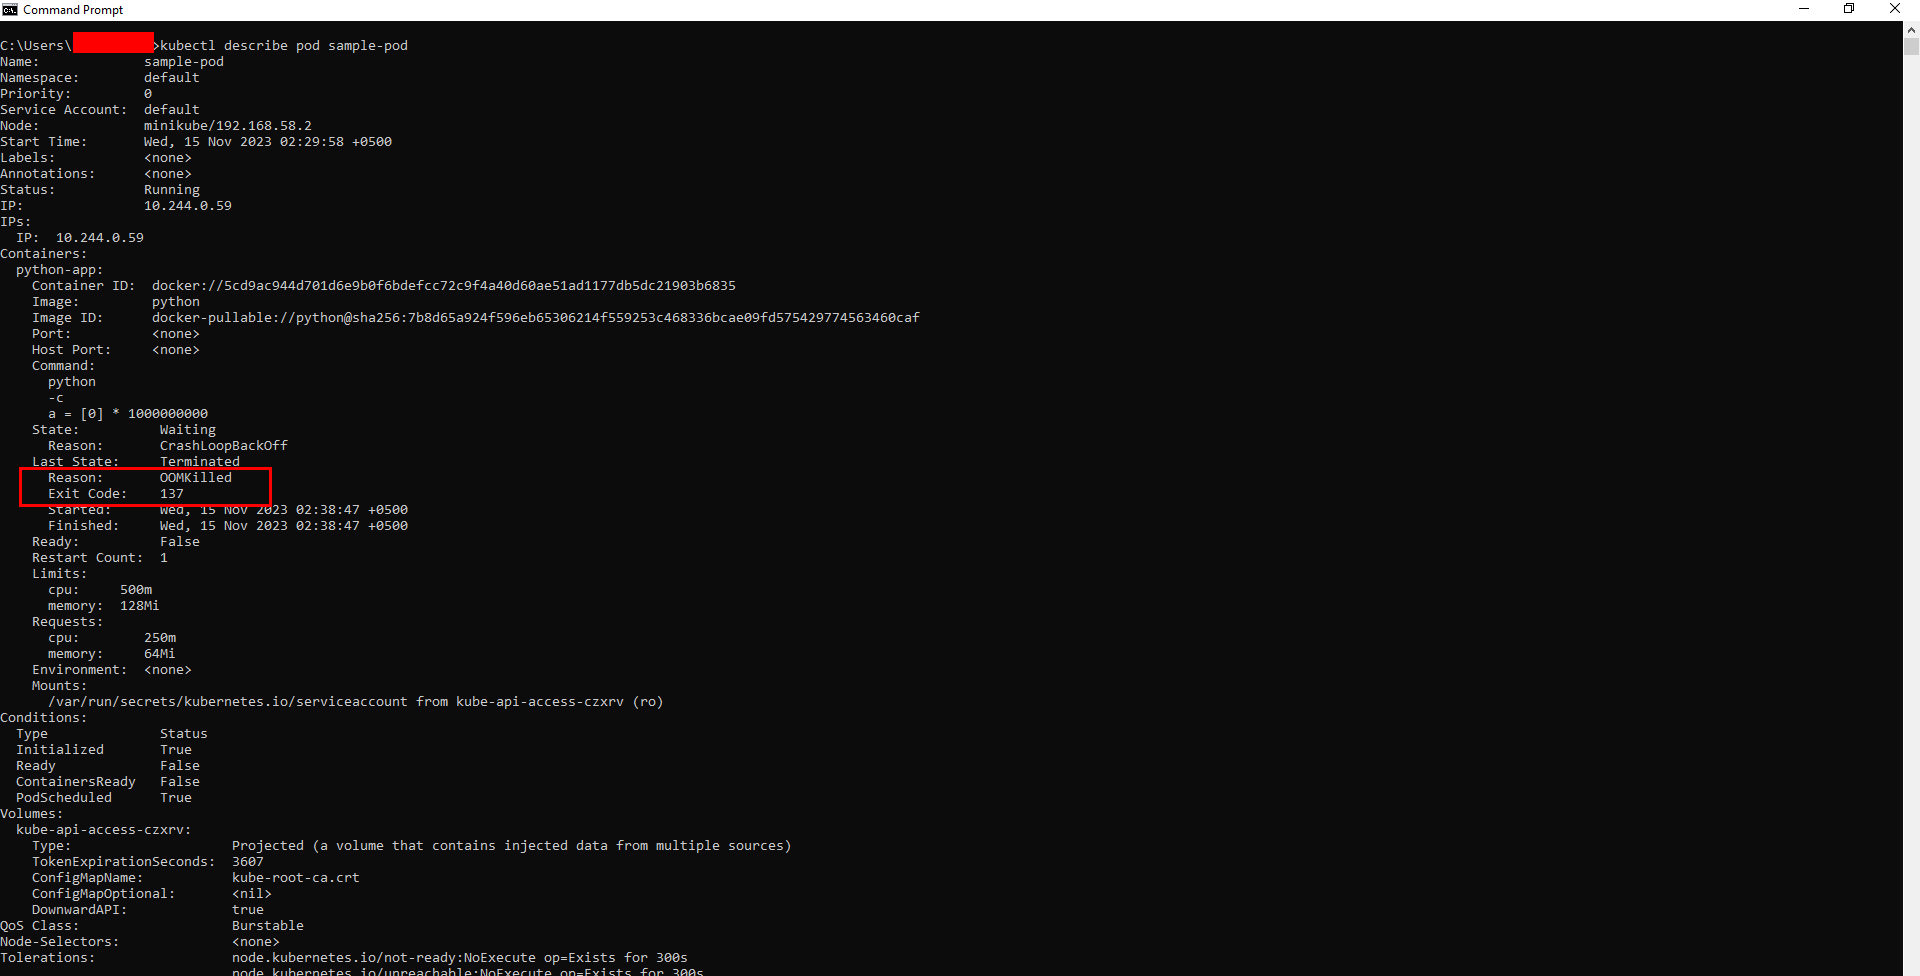
When an operating system kills a process in the background, it sends a signal to the process requesting it to terminate safely. In OOM, there is a signal with number 9 that is alternatively referred to as SIGKILL. By adding signal number 9 to 128, the exit code will become 137. That's why exit code 137 reflects the OS intervention triggered due to memory issues. The below output shows that the 'sample-pod' has been terminated with exit code 137:

Kubernetes and Exit Code 137
How Kubernetes pods display this exit code
Kubernetes can kill any container in the cluster when it reaches its memory limit and mark it with the 'OOMKilled' status, which means that the process was killed due to an 'out-of-memory' condition. The exit code for this error is 137. Your pods may experience this issue with their status labeled as 'OOMKilled' that can be viewed using the command kubectl get pods.
Importance of the OOMKilled status in Kubernetes
- 'OOMKilled' status allows one to find out if pods are occupying more memory space than required. Providing such a type of data is very important in diagnosing performance bottlenecks and may also avoid future OOM kills.
- This, in turn, will help you identify the cause of service interruption. If a pod ends up being terminated because it is running out of memory, then the service from that pod will also be affected. This status enables problem identification and rectification.
- It also helps in more efficient use of resources. For Example, it allows you to identify which pods take up a lot of space, and that enables better distribution of resources for smoother operations.
The output below shows the 'OOMKilled' Status after running the 'kubectl get pods' command:

Common Causes for Memory Issues in Containers
Inappropriately configured memory requests and limits
One common cause is an inappropriate setting of the memory limit value that is defined in the container's manifest. This shows the size of the container's maximum usable memory. If a pod gets assigned lesser memory than it would require, it tries to exceed its limits by using some additional amount of memory, and that results in an OOMKilled event. Additionally, there is a memory request value used to specify the minimum amount of memory required for a pod initialization and then run it. If the node doesn't have enough memory for pod requests to be fulfilled, it will not schedule a pod on that node.
Presence of an application memory leak
A memory leak in applications is another big reason for an OOMKilled event. Memory leaks happen when an application uses up memory but then does not release it to the system after it has finished using it. It can cause the application's memory usage to increase over time, ultimately terminating the pod with exit code 137.
Surging user demands leading to increased memory consumption
At times, when a pod is getting more user requests or traffic than usual, its memory usage may shoot up unexpectedly. This situation will make the pod use more memory than allowed, and after that, it will start experiencing memory issues.
The Configuration below highlights memory requests and limits:

Steps to Mitigate Memory Issues
Importance of setting memory limits
The application may need more memory than it was initially provided to accommodate a heavier load. Therefore, increasing the container's memory limit in the pod specification can help solve the OOMKilled status. In this case, if you set memory allocations that are too high, this error will not occur. Nevertheless, memory is a limited resource. A balance of memory allocations across different containers and nodes fulfilling various purposes is necessary. Despite having infinite memory available, it remains imperative to examine where the memory is going to be used and determine exactly how much is needed – minimum and maximum values, depending on what applications might consume it.
Example of a Kubernetes pod configuration with appropriate memory settings
As an example, we have the pod named 'my-demo-pod' having an nginx container, and we added the following memory settings in the pod specification:
Below is the sample pod manifest demonstrating memory limit configurations:

Techniques to Investigate Application Memory Consumption
Monitoring and correlating memory usage with traffic loads
For Each pod, Kibana, DataDog or Heapster are third-party tools that can be used to identify the pods' memory resources and container performance. As mentioned before, the command kubectl get pods provides information on the current amount of occupied memory by the pod as well as its containers. It is important to understand how memory usage changes over time and how an application behaves under different load conditions.
Differentiating between memory spikes and consistent memory growth
To know the last state of a container that exited on code 137, you would use the kubectl describe pod command. This may lead you to the problematic pod, causing the OOM error and allowing you to adjust resource allocation accordingly. Besides, you can run the kubectl get events command to see if there are events associated with the OOM error, including evicted, failed or OOMkilled, that have already been logged. By examining how often and for how long this happens, one can tell if system memory has been gradually growing or not. A memory spike is a sudden increase in memory usage due to increased user demands or unexpected failures.
Approaches to identify memory leaks and high memory consumption functions
Use the kubectl exec command if you want to access a free or top command within your container so that you can see exactly how much memory is being used and available. In order to create a temporary copy of the pod and perform diagnostic operations on it while an original one is not being used, you can use kubectl debug. Use a tool like HeapTrack, Memcheck or LeakSanitizer to find and debug memory leaks in your application.
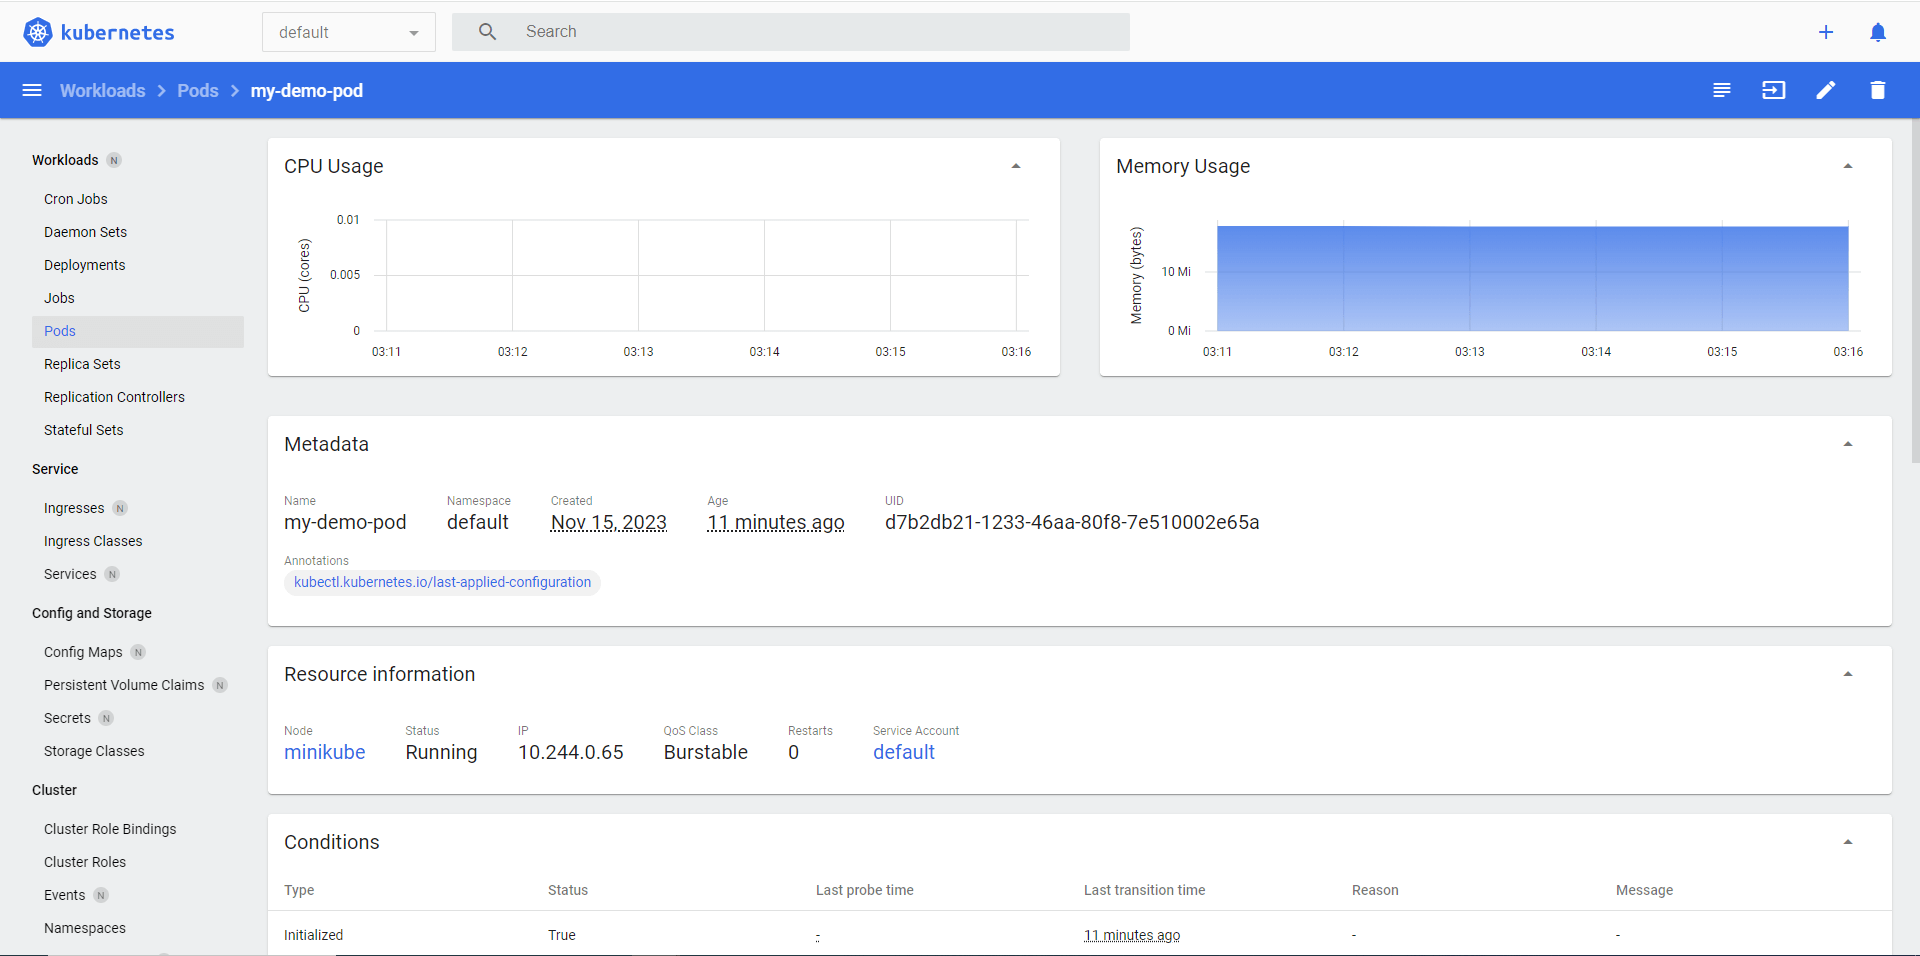
For Example, we have utilized heapster to view the Memory usage graph showing trends of 'my-demo-pod' in the Kubernetes Dashboard:

Best Practices and Recommendations
Importance of proactive monitoring
Proactive monitoring includes both monitoring and alerting. Instead of just avoiding OOMKilled (Out of Memory Killed) status, engage in monitoring and alerting practices. Regular monitoring captures the cluster's health and performance metrics. Alerts, on the other hand, alert you about potential issues before they snowball into bigger problems.
Benefits of setting appropriate memory limits and requests
When you set Kubernetes memory limits and requests in the right way, there are several benefits that come with it, including no more out-of-memory kills, fair resource allocations, optimized resource utilization, enhanced application performance, cluster stability, controlled cost spikes without any reason, effective autoscaling as well as efficient troubleshooting and even more productive development. These advantages demonstrate why this is a best practice for the smooth running of Kubernetes deployments.
Regularly auditing and optimizing application code
For you to avoid OOM killed status, it is important to regularly audit and optimize your application code. Code optimization means making your code efficient by reducing its memory footprint. This may involve refactoring complex functions, optimizing data structures or removing memory leaks.
Conclusion
For your environment stability, it's very important to identify and resolve exit code 137 with Kubernetes. It means that there are memory problems happening, which, if not fixed promptly, can result in a service failure or even loss of data. Therefore, it must be closely watched, and resources must be allocated quite effectively to avoid the OOMKilled status.
Optimizing applications and configurations would make a resilient Kubernetes environment. To avoid events such as OOMKilled, all issues that cause memory problems should be addressed, for example, insufficient memory limit values or memory leakage. So, the code should be regularly audited and optimized in order to ensure effective cluster performance; proactive monitoring should be done, and appropriate memory limits should be set.

