Introduction to NestJS Framework
Node.js is a popular environment for building complex and advanced applications. While working with Node.js on a complex application, it becomes difficult to maintain when scaling it. NestJS comes into play at this point! It is a Node.js server-side framework, which is built on the top of the typescript that allows you to efficiently build scalable and easily maintainable applications. Nest utilizes reliable HTTP Server frameworks such as Express by default, and it can be customized to use Fastify as well.
Steps we'll cover in this article:
- Introduction to NestJS Framework
- Why NestJS?
- Steps required for Installation and Setup of NestJS Project
- How to create a simple web application using NestJS?
- Step-by-Step Implementation of Components
Why NestJS?
NestJS follows a modular structure, which helps you keep your code organized, and maintainable, accelerate development, and increase efficiency. Due to its modular architecture, your team, whether working on small or large projects, can work simultaneously on different features without affecting other areas. Additionally, NestJS also provides native support for monolith as well as microservices architecture, including the integration of modern concepts and technologies such as GraphQL, CRONJobs, and WebSockets.
It equips developers with a set of tools, such as a built-in validation system, to handle errors before they occur, enforcing validation rules and reducing the chance of errors. If you have prior experience with Angular, then NestJs is a perfect choice as it requires you to start with a small learning curve. Due to its extensive features, developers are attracted to it and are actively contributing, which helps in finding solutions for most use cases and cutting down development time.
Steps required for Installation and Setup of NestJS Project
• Pre-Requisites
Before getting started with NestJS, you will be required to install:
1. NodeJS Environment 2. NPM(Node Package Manager)
You can download the installer from NodeJS Website. It will install the package that includes both of the above listed items.
• Installation
- Create a directory for your NestJS project and navigate to the desired location.
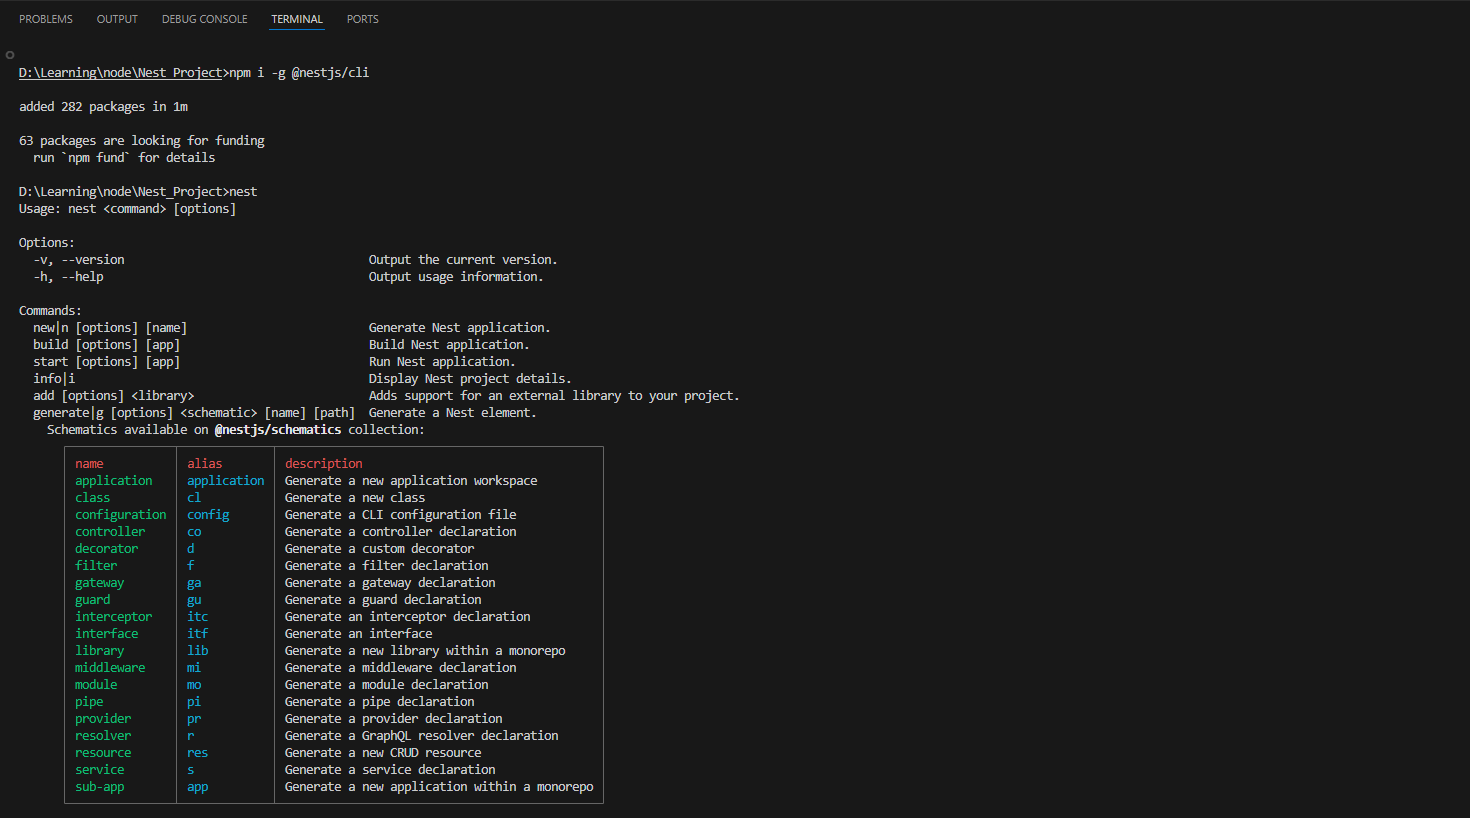
- Install Nest CLI, which will help you initialize your application. To do that, run the following command:
npm i -g @nestjs/cli - Verify the installation by typing and running “nest” command in your command line interface.
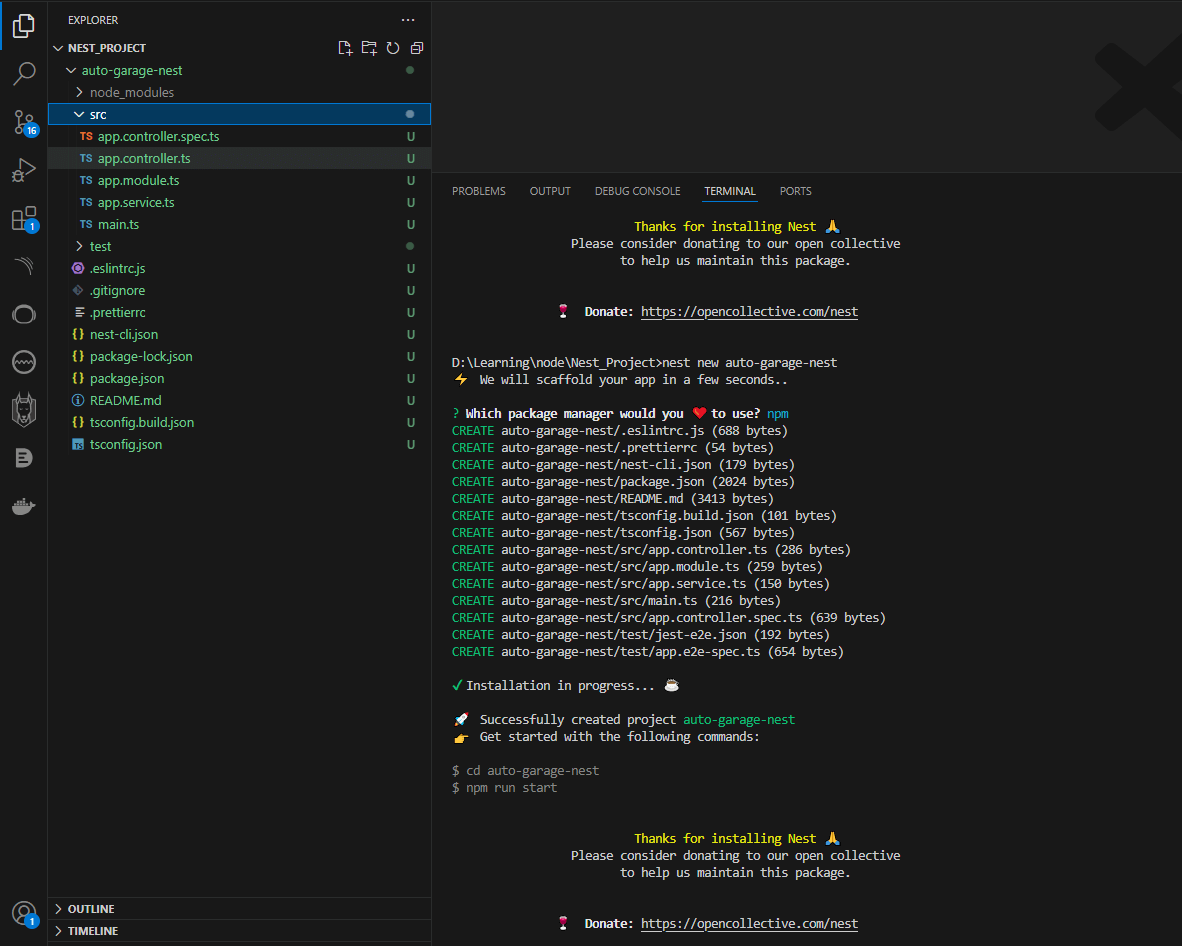
nest new auto-garage-nest
Note: Choose npm as a package manager
The above command will create a basic project folder structure as below:
How to create a simple web application using NestJS?
Major Components of Application
• Modules
By creating these modules, you are grouping services, controllers, or any other components. All the code for a single feature will be available by just importing the FeatureModule. That means a module can encapsulate the whole functionality into it, like having modules for authentication, logging, etc.
• Controllers
Controllers are the entry point of your application. They receive specific HTTP requests and send back the response to the client side. Each controller is connected to different routes and their specific HTTP methods (GET, POST, PUT, DELETE).
• Providers
The providers, also known as services, contain the business logic where the code interacts with the database, processes the data, or interacts with external APIs. A provider can create an instance of a service that contains the logic and can be reused in any other component.
Step-by-Step Implementation of Components
• Step 1: Create a Module
When we create the NestJS project above, it will automatically create app.module.ts. AppModule is a root module that contains the reference of all modules. For effective arrangement of components, we will create a vehicles module to group vehicle management features for the auto garage.
Using NestCli, we will navigate to the Nest project and then create a module with the following commands:
cd auto-garage-nest
nest generate module vehicles
The above commands will create vehicles.module.ts in the src/vehicles folder and update app.module.ts by importing vehicles.
import { Module } from "@nestjs/common";

@Module({})
export class VehiclesModule {}
• Step 2: Define Endpoints using Controllers
Now let’s create a container to define the endpoints for vehicle management. Run the following command:
nest generate controller vehicles
The above command will automatically create the vehicles.controller.ts file inside the src/vehicles folder. We will define the GET,POST,PUT,DELETE endpoints in that file like below:
import {
  Controller,
  Get,
  Post,
  Put,
  Delete,
  Body,
  Param,
} from "@nestjs/common";
import { VehiclesService } from "./vehicles.service";
import { Vehicle } from "./entities/vehicle.entity";

@Controller("vehicles")
export class VehiclesController {
  constructor(private readonly vehiclesService: VehiclesService) {}

  @Get()
  async findAll(): Promise<Vehicle[]> {
    return this.vehiclesService.findAll();
  }

  @Get(":id")
  async findOne(@Param("id") id: string): Promise<Vehicle> {
    return this.vehiclesService.findOne(+id);
  }

  @Post()
  async create(@Body() vehicle: Vehicle): Promise<Vehicle> {
    return this.vehiclesService.create(vehicle);
  }

  @Put(":id")
  async update(
    @Param("id") id: string,
    @Body() vehicle: Vehicle,
  ): Promise<Vehicle> {
    return this.vehiclesService.update(+id, vehicle);
  }

  @Delete(":id")
  async remove(@Param("id") id: string): Promise<void> {
    return this.vehiclesService.remove(+id);
  }
}
• Step 3: Create Entity
In order to create structure in the database and to interact with it, we need to create entities. To do that, we will create entities directory in src/vehicles folder, and inside it, we will create a file with the name vehicle.entity.ts
Inside the vehicle.entity.ts file, we will create an entity class and use the typeORM package to convert the entity to the table in the database.
import { Entity, PrimaryGeneratedColumn, Column } from "typeorm";

@Entity()
export class Vehicle {
  @PrimaryGeneratedColumn()
  id: number;

  @Column()
  make: string;

  @Column()
  model: string;

  @Column()
  year: number;

  @Column()
  color: string;
}
Note: If you get an error on typeorm package, then install it using the command below:
npm install typeorm
To use the SQLite database with typeORM, install the package using the following command:'
npm install @nestjs/typeorm typeorm sqlite3
After installing the package, create ormconfig.json in your root config and add the configurations below:
{
    "type": "sqlite",
    "database": "garage.sqlite",
    "entities": ["dist/**/*.entity.js"],
    "synchronize": true
  }
• Step 4: Encapsulate the business logic in Provider (Service)
We will create the services to place our business logic that will be interacting directly with the database. To do that, inside src/vehicles folder where we have our controller and module, we will create a file with the name vehicles.service.ts.
Inside that file, we have placed the logic to:
- Find all Vehicles
- Find specific vehicle
- Create a Vehicle
- Update Vehicle Details
- Remove a Vehicle
After placing our logic, the service file for the vehicle will look like this:
import { Injectable } from "@nestjs/common";
import { InjectRepository } from "@nestjs/typeorm";
import { Repository, FindOneOptions } from "typeorm"; // Import FindOneOptions
import { Vehicle } from "./entities/vehicle.entity";

@Injectable()
export class VehiclesService {
  constructor(
    @InjectRepository(Vehicle)
    private vehicleRepository: Repository<Vehicle>,
  ) {}

  async findAll(): Promise<Vehicle[]> {
    return this.vehicleRepository.find();
  }

  async findOne(id: number): Promise<Vehicle> {
    const options: FindOneOptions<Vehicle> = { where: { id } }; // Construct FindOneOptions
    return this.vehicleRepository.findOne(options);
  }

  async create(vehicle: Vehicle): Promise<Vehicle> {
    return this.vehicleRepository.save(vehicle);
  }

  async update(id: number, vehicle: Vehicle): Promise<Vehicle> {
    await this.vehicleRepository.update(id, vehicle);
    const options: FindOneOptions<Vehicle> = { where: { id } };
    return this.vehicleRepository.findOne(options);
  }

  async remove(id: number): Promise<void> {
    await this.vehicleRepository.delete(id);
  }
}
Note: If you face an error while importing @nestjs/typeorm, which is a NestJS-specific module that provides integration utilities for using TypeORM within NestJS applications. Use the following command to fix this error:
npm install @nestjs/typeorm
• Step 5: Setup Modules
In the last step, we will place all components of the vehicle feature into the module. The controller was automatically added as it was created through the command. We will add other components such as TypeORM, entities, and provide services in vehicles.module.ts file. It will look like this:
import { Module } from "@nestjs/common";
import { TypeOrmModule } from "@nestjs/typeorm";
import { Vehicle } from "./entities/vehicle.entity";
import { VehiclesController } from "./vehicles.controller";
import { VehiclesService } from "./vehicles.service";

@Module({
  imports: [TypeOrmModule.forFeature([Vehicle])],
  controllers: [VehiclesController],
  providers: [VehiclesService],
})
export class VehiclesModule {}
Add TypeOrmModule.forRoot() in app.module.ts to integrate TypeORM and create a database connection.
import { Module } from "@nestjs/common";
import { AppController } from "./app.controller";
import { AppService } from "./app.service";
import { VehiclesModule } from "./vehicles/vehicles.module";
import { TypeOrmModule } from "@nestjs/typeorm";
import { Vehicle } from "./vehicles/entities/vehicle.entity";

@Module({
  imports: [
    TypeOrmModule.forRoot({
      type: "sqlite",
      database: "garage.sqlite",
      entities: [Vehicle],
      synchronize: true,
    }),
    VehiclesModule,
  ],
  controllers: [AppController],
  providers: [AppService],
})
export class AppModule {}
• Step 6: Run and Test Application
Once we have setup all components, we will run our NestJS application by running the following command:
npm run start:dev
The application will be running at http://localhost:3000/
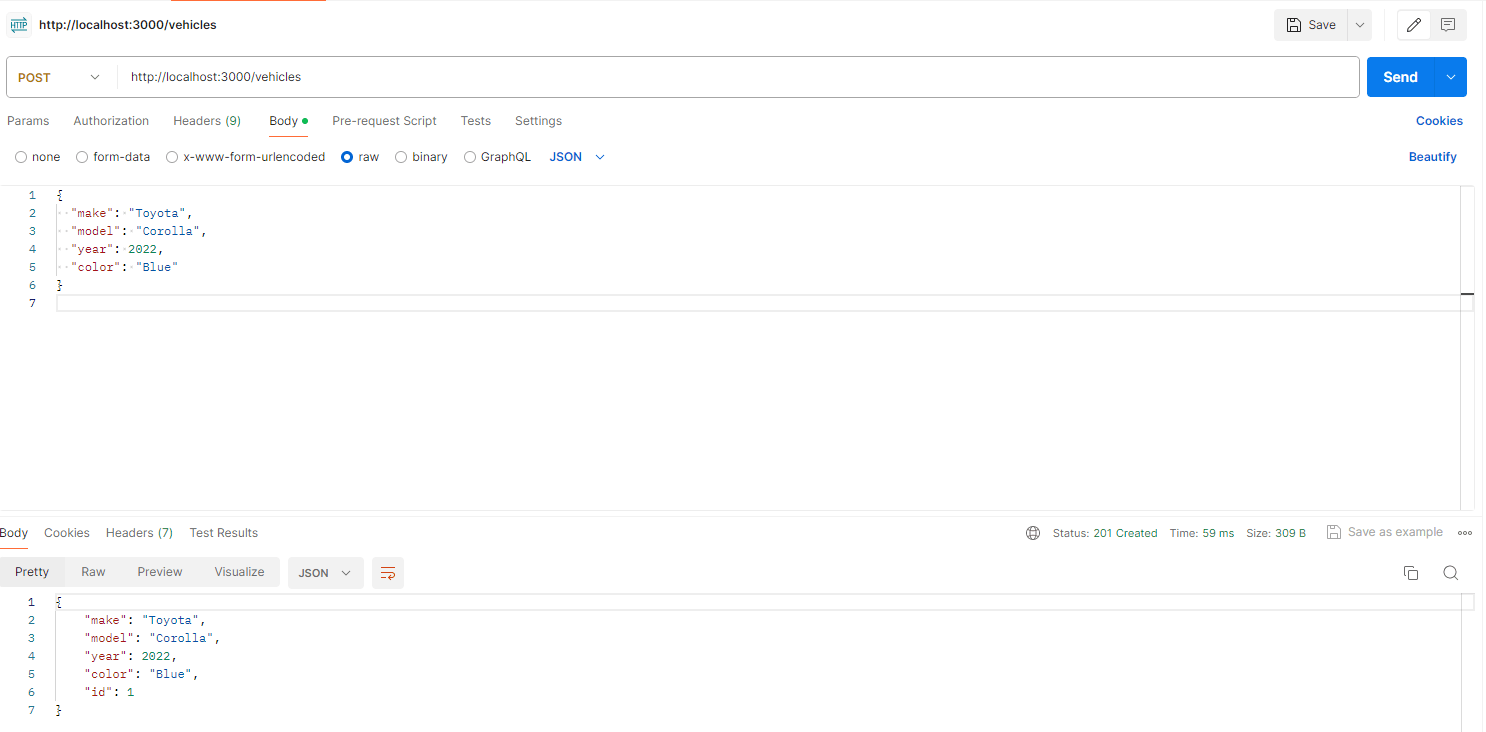
We can test the CRUD operation we created by making HTTP calls through tools like Postman etc. See the example below:

Bonus: Refine’s Support for NestJS
Finally, as a pleasant bonus, Refine has excellent support for NestJS. More specifically, Refine has data providers for APIs implemented with Nest.js CRUD and Nest.js Query as well. In case you do not know, Nest.js CRUD is a module to help you simplify creating CRUD RESTful APIs. With Refine’s data provider, you can connect your NestJS CRUD APIs to Refine and manage your data efficiently.
Similarly, you can also integrate your APIs with Refine using Refine’s Nest.js Query provider. With the help of Node.js powered GraphQL + TypeScript, you can make more efficient and independent APIs and connect them to Refine easily.
Conclusion
In this article, we have discussed NestJS, which is a powerful framework for building server-side applications. First, we understood the "what and why" of NestJS then we created a simple NestJS application step-by-step where we handled HTTP calls, applied business logic, interacted with the database, and provided the responses.
Overall, we have gained knowledge about the major components of any Nest application and the benefits each one offers. Although there is still much to learn about using NestJS to develop enterprise-ready applications but in this article, we have been able to cover the fundamental concepts that will help us get started in the right direction.

