
Refine allows you to include any UI in your project and take full advantage of all its features without worrying about compatibility. To create a project with a vintage Windows95 style using React95 UI components, we can use the Refine because it is headless.


Introduction
In this tutorial, we will use Supabase as the backend of our project. Our goal with this is to create a Windows95-style admin panel using Refine and Supabase Data Provider features.
Create a new Refine app
Let's start by creating our Refine project. We'll use the npm create refine-app command to interactively initialize the project.
npm create refine-app@latest refine-with-react95
Select the following options when prompted:
✔ Choose a project template · refine-vite
✔ What would you like to name your project?: · refine-with-react95
✔ Choose your backend service to connect: · Supabase
✔ Do you want to use a UI Framework?: · Headless
✔ Do you want to add example pages?: · No
✔ Do you need i18n (Internationalization) support?: · No
✔ Choose a package manager: · npm
That's it! After the installation process is finished, our Refine project is ready. Before we start editing our project, we need to install the react95 and styled-components packages.
npm i react95 styled-components
Also, we need to install the types for typescript support.
npm i -D @types/styled-components
Once the installation is complete, we can start editing our project.
Overview of the created project
Refine provides us with a ready-to-use project according to the options we choose during the installation process. Let's take a look at the files and folders created by Refine.
Supabase Client
By default, Refine creates a supabaseClient for you in the src/utility/supabaseClient.ts file. You can see the default code below.
src/utility/supabaseClient.ts
import { createClient } from "@refinedev/supabase";

// use env variables in production
const SUPABASE_URL = "https://iwdfzvfqbtokqetmbmbp.supabase.co";
const SUPABASE_KEY =
  "eyJhbGciOiJIUzI1NiIsInR5cCI6IkpXVCJ9.eyJyb2xlIjoiYW5vbiIsImlhdCI6MTYzMDU2NzAxMCwiZXhwIjoxOTQ2MTQzMDEwfQ._gr6kXGkQBi9BM9dx5vKaNKYj_DJN1xlkarprGpM_fU";

export const supabaseClient = createClient(SUPABASE_URL, SUPABASE_KEY, {
  db: {
    schema: "public",
  },
  auth: {
    persistSession: true,
  },
});
The supabaseClient will be used by the @refinedev/supabase package to create a dataProvider for us.
You can learn more about the it in the Data Provider section.
AuthProvider
By default, Refine also creates an authProvider for you in the src/authProvider.ts file. You can see the default code below.
src/authProvider.ts
import { AuthProvider } from "@refinedev/core";

import { supabaseClient } from "utility";

const authProvider: AuthProvider = {
  login: async ({ email, password, providerName }) => {
    // sign in with oauth
    try {
      if (providerName) {
        const { data, error } = await supabaseClient.auth.signInWithOAuth({
          provider: providerName,
        });

        if (error) {
          return {
            success: false,
            error,
          };
        }

        if (data?.url) {
          return {
            success: true,
            redirectTo: "/",
          };
        }
      }

      // sign in with email and password
      const { data, error } = await supabaseClient.auth.signInWithPassword({
        email,
        password,
      });

      if (error) {
        return {
          success: false,
          error,
        };
      }

      if (data?.user) {
        return {
          success: true,
          redirectTo: "/",
        };
      }
    } catch (error: any) {
      return {
        success: false,
        error,
      };
    }

    return {
      success: false,
      error: {
        message: "Login failed",
        name: "Invalid email or password",
      },
    };
  },
  register: async ({ email, password }) => {
    try {
      const { data, error } = await supabaseClient.auth.signUp({
        email,
        password,
      });

      if (error) {
        return {
          success: false,
          error,
        };
      }

      if (data) {
        return {
          success: true,
          redirectTo: "/",
        };
      }
    } catch (error: any) {
      return {
        success: false,
        error,
      };
    }

    return {
      success: false,
      error: {
        message: "Register failed",
        name: "Invalid email or password",
      },
    };
  },
  forgotPassword: async ({ email }) => {
    try {
      const { data, error } = await supabaseClient.auth.resetPasswordForEmail(
        email,
        {
          redirectTo: `${window.location.origin}/update-password`,
        },
      );

      if (error) {
        return {
          success: false,
          error,
        };
      }

      if (data) {
        return {
          success: true,
        };
      }
    } catch (error: any) {
      return {
        success: false,
        error,
      };
    }

    return {
      success: false,
      error: {
        message: "Forgot password failed",
        name: "Invalid email",
      },
    };
  },
  updatePassword: async ({ password }) => {
    try {
      const { data, error } = await supabaseClient.auth.updateUser({
        password,
      });

      if (error) {
        return {
          success: false,
          error,
        };
      }

      if (data) {
        return {
          success: true,
          redirectTo: "/",
        };
      }
    } catch (error: any) {
      return {
        success: false,
        error,
      };
    }
    return {
      success: false,
      error: {
        message: "Update password failed",
        name: "Invalid password",
      },
    };
  },
  logout: async () => {
    const { error } = await supabaseClient.auth.signOut();

    if (error) {
      return {
        success: false,
        error,
      };
    }

    return {
      success: true,
      redirectTo: "/",
    };
  },
  onError: async (error) => {
    console.error(error);
    return { error };
  },
  check: async () => {
    try {
      const { data } = await supabaseClient.auth.getSession();
      const { session } = data;

      if (!session) {
        return {
          authenticated: false,
          error: {
            message: "Check failed",
            name: "Session not found",
          },
          logout: true,
          redirectTo: "/login",
        };
      }
    } catch (error: any) {
      return {
        authenticated: false,
        error: error || {
          message: "Check failed",
          name: "Not authenticated",
        },
        logout: true,
        redirectTo: "/login",
      };
    }

    return {
      authenticated: true,
    };
  },
  getPermissions: async () => {
    const user = await supabaseClient.auth.getUser();

    if (user) {
      return user.data.user?.role;
    }

    return null;
  },
  getIdentity: async () => {
    const { data } = await supabaseClient.auth.getUser();

    if (data?.user) {
      return {
        ...data.user,
        name: data.user.email,
      };
    }

    return null;
  },
};

export default authProvider;
The authProvider is a simple object that contains all the functions that are used to handle authentication.
You can learn more about the it in the Auth Provider section.
Root component: App.tsx
Before we start, let's take a look at the App.tsx file. This is the root component of our application. It contains the <Refine /> component. This component is the main component of Refine. It is used to configure the application and to provide the context to all the other components.
src/App.tsx
import { Refine, WelcomePage } from "@refinedev/core";
import { RefineKbar, RefineKbarProvider } from "@refinedev/kbar";
import { dataProvider, liveProvider } from "@refinedev/supabase";
import routerProvider, {
  UnsavedChangesNotifier,
  DocumentTitleHandler,
} from "@refinedev/react-router-v6";
import { BrowserRouter, Route, Routes } from "react-router-dom";

import { supabaseClient } from "./utility";
import authProvider from "./authProvider";

import "./App.css";

function App() {
  return (
    <BrowserRouter>
      <RefineKbarProvider>
        <Refine
          dataProvider={dataProvider(supabaseClient)}
          liveProvider={liveProvider(supabaseClient)}
          authProvider={authProvider}
          routerProvider={routerProvider}
          options={{
            syncWithLocation: true,
            warnWhenUnsavedChanges: true,
          }}
        >
          <Routes>
            <Route index element={<WelcomePage />} />
          </Routes>
          <RefineKbar />
          <UnsavedChangesNotifier />
          <DocumentTitleHandler />
        </Refine>
      </RefineKbarProvider>
    </BrowserRouter>
  );
}

export default App;
In this component, Refine provides ready-to-use features with which you can easily create a CRUD application. You can find detailed information about all of them in Refine documentation.
React95 Setup
Now that we have our application ready, let's start setting up the React95 theme.
src/App.tsx
//...

import original from "react95/dist/themes/original";
import { ThemeProvider } from "styled-components";

function App() {
  return (
    <BrowserRouter>
      <RefineKbarProvider>
        <ThemeProvider theme={original}>
          <Refine
          // ...
          >
            {/* ... */}
          </Refine>
        </ThemeProvider>
      </RefineKbarProvider>
    </BrowserRouter>
  );
}

export default App;
We import the original theme from the react95 package and wrap our application with the ThemeProvider component from styled-components to provide the theme to all the components.
Login Page
We will create a simple login page to demonstrate the authentication flow. We will use the useLogin hook to handle the login process. This hook will call the login function that is defined in the authProvider.
Let's create a <LoginPage /> component in the src/pages/login/index.tsx directory with the following code:
src/pages/login/index.tsx
import { useState } from "react";
import { useLogin } from "@refinedev/core";

import {
  Window,
  WindowHeader,
  WindowContent,
  TextInput,
  Button,
} from "react95";

interface ILoginForm {
  email: string;
  password: string;
}

export const LoginPage = () => {
  const [email, setemail] = useState("info@refine.dev");
  const [password, setPassword] = useState("refine-supabase");

  const { mutate: login } = useLogin<ILoginForm>();

  return (
    <div
      style={{
        display: "flex",
        flexDirection: "column",
        justifyContent: "center",
        alignItems: "center",
        textAlign: "center",
        minHeight: "100vh",
        backgroundColor: "rgb(0, 128, 128)",
      }}
    >
      <Window>
        <WindowHeader active={true} className="window-header">
          <span> Refine Login</span>
        </WindowHeader>
        <div style={{ marginTop: 8 }}>
          <img
            src="https://raw.githubusercontent.com/refinedev/refine/main/logo.png"
            alt="Refine logo in login window"
            width={100}
          />
        </div>
        <WindowContent>
          <form
            onSubmit={(e) => {
              e.preventDefault();
              login({ email, password });
            }}
          >
            <div style={{ width: 500 }}>
              <div style={{ display: "flex" }}>
                <TextInput
                  placeholder="User Name"
                  fullWidth
                  value={email}
                  onChange={(e) => {
                    setemail(e.target.value);
                  }}
                />
              </div>
              <br />
              <TextInput
                placeholder="Password"
                fullWidth
                type="password"
                value={password}
                onChange={(e) => {
                  setPassword(e.target.value);
                }}
              />
              <br />
              <Button type="submit" value="login">
                Sign in
              </Button>
            </div>
          </form>
        </WindowContent>
      </Window>
    </div>
  );
};
Now that we've created our Login page, but we need to add it as a route to our application. Let's add it in the src/App.tsx file.
src/App.tsx
// ...

import { Refine, Authenticated } from "@refinedev/core";
import { NavigateToResource } from "@refinedev/react-router-v6";
import { Outlet, Route, Routes } from "react-router-dom";

import { LoginPage } from "./pages/login";

function App() {
    return (
        {/* ... */}
        <Refine
        // ...
        >
            <Routes>
                <Route
                    element={
                        <Authenticated fallback={<Outlet />}>
                            <NavigateToResource />
                        </Authenticated>
                    }
                >
                    <Route path="/login" element={<LoginPage />} />
                </Route>
            </Routes>
            {/* ... */}
        </Refine>
        {/* ... */}
    );
}

export default App;
We added the /login route to our application. If the user is not logged in, we will show the LoginPage component. Otherwise, the <NavigateToResource /> component will redirect the user to the first resource' list path in the resources array. Currently, we don't have any resources, so we will add them in the next steps.
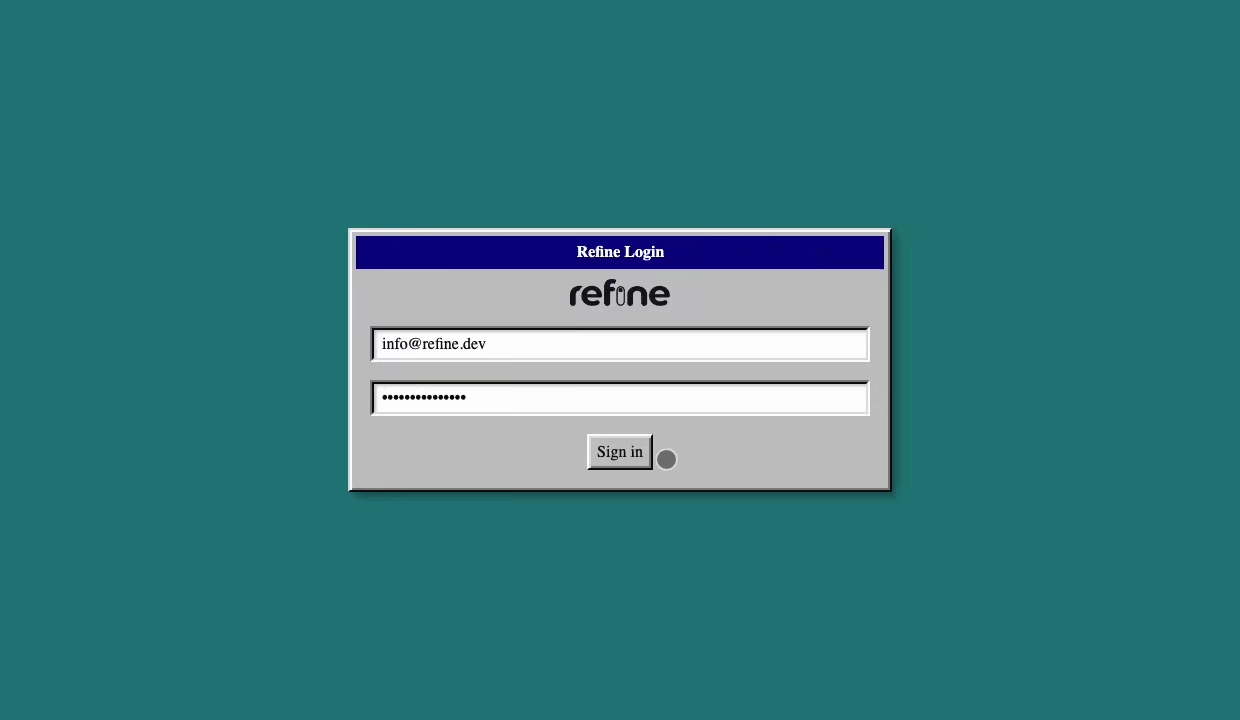
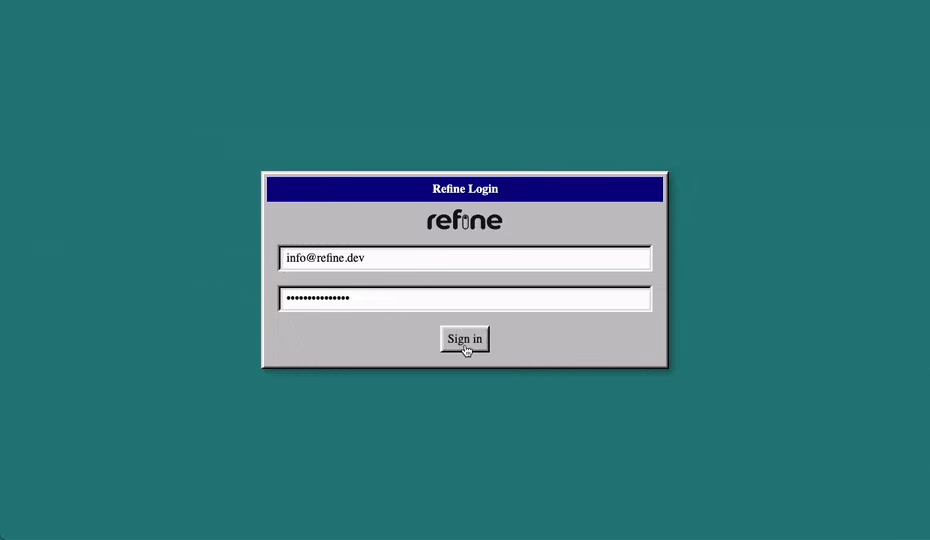
Now, we can access our Login page at /login path and log in to our Supabase database.
 Refine Login Page
Adding a Layout
Before we start adding resources which means adding CRUD pages, we will create a layout to wrap these pages. We will create a simple layout with a header and a footer.
First, let's create a <Footer /> component in src/components/footer/index.tsx directory with the following code:
src/components/footer/index.tsx
import React, { useState } from "react";
import { useLogout, useNavigation } from "@refinedev/core";
import { AppBar, Toolbar, Button, MenuList, MenuListItem } from "react95";

export const Footer: React.FC = () => {
  const [open, setOpen] = useState(false);

  const { mutate: logout } = useLogout();
  const { push } = useNavigation();

  return (
    <AppBar style={{ top: "unset", bottom: 0 }}>
      <Toolbar style={{ justifyContent: "space-between" }}>
        <div style={{ position: "relative", display: "inline-block" }}>
          <Button
            onClick={() => setOpen(!open)}
            active={open}
            style={{ fontWeight: "bold" }}
          >
            <img
              src="https://raw.githubusercontent.com/refinedev/refine/main/logo.png"
              alt="Refine logo in footer menu button"
              style={{ height: "20px", marginRight: 4 }}
            />
          </Button>
          {open && (
            <MenuList
              style={{
                position: "absolute",
                left: "0",
                bottom: "100%",
              }}
              onClick={() => setOpen(false)}
            >
              <MenuListItem
                onClick={() => {
                  push("posts");
                }}
              >
                Posts
              </MenuListItem>
              <MenuListItem
                onClick={() => {
                  logout();
                }}
              >
                <span role="img" aria-label="🔙">
                  🔙
                </span>
                Logout
              </MenuListItem>
            </MenuList>
          )}
        </div>
      </Toolbar>
    </AppBar>
  );
};
Next, we will create a <Header /> component in src/components/header/index.tsx directory with the following code:
src/components/header/index.tsx
import { useState } from "react";
import { useNavigation, useParsed } from "@refinedev/core";
import { AppBar, Toolbar, Button, MenuList, MenuListItem } from "react95";

export const Header = () => {
    const [open, setOpen] = useState(false);
    const { goBack, create } = useNavigation();
    const { action, resource } = useParsed();

    return (
        <AppBar style={{ zIndex: 1 }}>
            <Toolbar>
                <Button
                    variant="menu"
                    onClick={() => setOpen(!open)}
                    active={open}
                >
                    File
                </Button>
                <Button variant="menu" disabled>
                    Edit
                </Button>
                <Button variant="menu" disabled>
                    View
                </Button>
                <Button variant="menu" disabled>
                    Format
                </Button>
                <Button variant="menu" disabled>
                    Tools
                </Button>
                <Button variant="menu" disabled>
                    Table
                </Button>
                <Button variant="menu" disabled>
                    Window
                </Button>
                <Button variant="menu" disabled>
                    Help
                </Button>
                {open && (
                    <MenuList
                        style={{
                            position: "absolute",
                            left: "0",
                            top: "100%",
                        }}
                        onClick={() => setOpen(false)}
                    >
                        {action !== "list" && (
                            <MenuListItem
                                onClick={() => {
                                    goBack();
                                }}
                            >
                                Back to {resource?.name}
                            </MenuListItem>
                        )}
                        {action === "list" && (
                            <MenuListItem
                                onClick={() => {
                                    create(resource?.name ?? ""));
                                }}
                            >
                                Create {resource?.name}
                            </MenuListItem>
                        )}
                    </MenuList>
                )}
            </Toolbar>
        </AppBar>
    );
};
Now, we can create a <Layout /> component using the <Header /> and <Footer /> components we created above. Update a src/components/layout/index.tsx file with the following code:
src/components/layout/index.tsx
import { PropsWithChildren } from "react";

import { Footer } from "../footer";
import { Header } from "../header";

export const Layout: React.FC<PropsWithChildren> = ({ children }) => {
  return (
    <div>
      <Header />
      <div
        style={{
          padding: "72px 24px 24px 24px",
          backgroundColor: "rgb(0, 128, 128)",
          minHeight: "calc(100vh - 48px - 72px - 24px)",
        }}
      >
        {children}
      </div>
      <Footer />
    </div>
  );
};
Finally, we can use the <Layout /> component when we add routes to our application.
Let's create dummy CRUD pages for our posts resource. Create a src/pages/posts directory and create the following files:
src/pages/posts/list.tsx
post;
src/pages/posts/create.tsx
import { Window, WindowHeader, WindowContent } from "react95";

export const PostCreate = () => {
  return (
    <Window style={{ width: "100%" }}>
      <WindowHeader>Posts</WindowHeader>
      <WindowContent>Create Page</WindowContent>
    </Window>
  );
};
src/pages/posts/edit.tsx
import { Window, WindowHeader, WindowContent } from "react95";

export const PostEdit = () => {
  return (
    <Window style={{ width: "100%" }}>
      <WindowHeader>Posts</WindowHeader>
      <WindowContent>Edit Page</WindowContent>
    </Window>
  );
};
And finally, we can add these pages to our application. Update the src/App.tsx file with the following code:
src/App.tsx
//...
import { Layout } from "./components/layout";

import { LoginPage } from "./pages/login";
import { PostList } from "./pages/posts/list";
import { PostCreate } from "./pages/posts/create";
import { PostEdit } from "./pages/posts/edit";

function App() {
  return (
    <BrowserRouter>
      <RefineKbarProvider>
        <ThemeProvider theme={original}>
          <Refine
            // ...
            resources={[
              {
                name: "posts",
                list: "/posts",
                create: "/posts/create",
                edit: "/posts/edit/:id",
              },
            ]}
          >
            <Routes>
              <Route
                element={
                  <Authenticated fallback={<CatchAllNavigate to="/login" />}>
                    <Layout>
                      <Outlet />
                    </Layout>
                  </Authenticated>
                }
              >
                <Route
                  index
                  element={<NavigateToResource resource="posts" />}
                />

                <Route path="/posts">
                  <Route index element={<PostList />} />
                  <Route path="create" element={<PostCreate />} />
                  <Route path="edit/:id" element={<PostEdit />} />
                </Route>
              </Route>
              <Route
                element={
                  <Authenticated fallback={<Outlet />}>
                    <NavigateToResource />
                  </Authenticated>
                }
              >
                <Route path="/login" element={<LoginPage />} />
              </Route>
            </Routes>
          </Refine>
        </ThemeProvider>
      </RefineKbarProvider>
    </BrowserRouter>
  );
}

export default App;
 Refine95 Menu
Create Post CRUD Pages
List Page
After our login process, we'll get the posts from our supabase and display them in the table. We will use React95 components for the UI portion of our table, as well as @refinedev/react-table package to handle pagination, sorting, and filtering. You can use all the features of TanStack Table with the @refinedev/react-table adapter.
So, let's install the @refinedev/react-table and dependencies.
npm i @refinedev/react-table @tanstack/react-table
In next steps, we'll assume that you have the following interfaces in src/interfaces/index.d.ts file.
src/interfaces/index.d.ts
export interface IPost {
  id: string;
  title: string;
  categories: ICategory[];
}

export interface ICategory {
  id: string;
  title: string;
}

export interface ICsvPost {
  title: string;
  content: string;
  categoryId: string;
}
Let's update a <PostList /> component in src/pages/posts/list.tsx directory with the following code:
src/pages/posts/list.tsx
import React from "react";
import { useTable } from "@refinedev/react-table";
import { useDelete, useNavigation } from "@refinedev/core";
import { ColumnDef, flexRender } from "@tanstack/react-table";
import {
  Table,
  TableBody,
  TableHead,
  TableRow,
  TableHeadCell,
  TableDataCell,
  Window,
  WindowHeader,
  WindowContent,
  Button,
  Select,
  NumberInput,
  Hourglass,
  ScrollView,
} from "react95";

import { IPost } from "../../interfaces";

export const PostList = () => {
  const { edit } = useNavigation();

  const { mutate: deletePost } = useDelete<IPost>();

  const columns = React.useMemo<ColumnDef<IPost>[]>(
    () => [
      {
        id: "id",
        header: "ID",
        accessorKey: "id",
      },
      {
        id: "title",
        header: "Title",
        accessorKey: "title",
      },
      {
        id: "categoryId",
        header: "Category",
        accessorKey: "categories.title",
      },
      {
        id: "action",
        header: "Action",
        accessorKey: "id",
        cell: function render({ getValue }) {
          return (
            <div
              style={{
                display: "flex",
                justifyContent: "center",
                gap: 16,
              }}
            >
              <Button
                size="sm"
                onClick={() => edit("posts", getValue() as number)}
              >
                Edit
              </Button>
              <Button
                size="sm"
                onClick={() => {
                  const id = getValue() as number;

                  const result = window.confirm(
                    "Are you sure you want to delete this post?",
                  );

                  if (result) {
                    deletePost({
                      resource: "posts",
                      id,
                    });
                  }
                }}
              >
                Delete
              </Button>
            </div>
          );
        },
      },
    ],
    [],
  );

  const {
    reactTable: { getHeaderGroups, getRowModel },
    options: { pageCount },
    getState,
    setPageIndex,
    setPageSize,
    refineCore: { result },
  } = useTable<IPost>({
    columns,
    refineCoreProps: {
      meta: {
        select: "*, categories(*)",
      },
    },
  });

  return (
    <>
      <Window style={{ width: "100%" }}>
        <WindowHeader>Posts</WindowHeader>
        <WindowContent>
          <ScrollView style={{ width: "100%", height: "410px" }}>
            <Table>
              <TableHead>
                {getHeaderGroups().map((headerGroup) => (
                  <TableRow key={headerGroup.id}>
                    {headerGroup.headers.map((header) => (
                      <TableHeadCell
                        key={header.id}
                        colSpan={header.colSpan}
                        onClick={header.column.getToggleSortingHandler()}
                      >
                        {flexRender(
                          header.column.columnDef.header,
                          header.getContext(),
                        )}
                      </TableHeadCell>
                    ))}
                  </TableRow>
                ))}
              </TableHead>
              <TableBody>
                {getRowModel().rows.map((row) => {
                  return (
                    <TableRow key={row.id}>
                      {row.getVisibleCells().map((cell) => {
                        return (
                          <TableDataCell key={cell.id}>
                            {flexRender(
                              cell.column.columnDef.cell,
                              cell.getContext(),
                            )}
                          </TableDataCell>
                        );
                      })}
                    </TableRow>
                  );
                })}
              </TableBody>
            </Table>
            {isLoading && (
              <div
                style={{
                  display: "flex",
                  justifyContent: "center",
                  alignItems: "center",
                  height: "350px",
                }}
              >
                <Hourglass size={32} />
              </div>
            )}
          </ScrollView>
        </WindowContent>
        <div
          style={{
            display: "flex",
            justifyContent: "flex-end",
            marginBottom: 8,
            marginTop: 8,
            alignItems: "flex-end",
          }}
        >
          <Select<number>
            style={{ marginLeft: 8 }}
            value={getState().pagination.pageSize}
            onChange={(option) => {
              setPageSize(option.value);
            }}
            options={pageSizeOptions}
            defaultValue={10}
          ></Select>
          <span style={{ marginLeft: 8 }}>
            Page{" "}
            <strong>
              {getState().pagination.pageIndex + 1} of {pageCount}
            </strong>
            <span style={{ marginLeft: 8 }}>
              Go to page:
              <NumberInput
                style={{ marginLeft: 8 }}
                min={1}
                defaultValue={getState().pagination.pageIndex + 1}
                width={130}
                onChange={(value) => {
                  const page = value ? Number(value) - 1 : 0;
                  setPageIndex(page);
                }}
              />
            </span>
          </span>
        </div>
      </Window>
    </>
  );
};

const pageSizeOptions = [
  { value: 10, label: "10" },
  { value: 20, label: "20" },
  { value: 30, label: "30" },
  { value: 40, label: "40" },
];
We used the useTable hook to fetch the data for the table. It makes a request to the /posts endpoint with the query parameters. The query parameters are used to filter, sort, and paginate the posts. Since we defined the posts resource in src/App.tsx, the useTable hook knows which endpoint to use for fetching the data.
After fetching the data, we used the React95 table components to render the data. We also added delete button and edit button to each row. When the user clicks the delete button, we call the deletePost function with the resource and id parameters. The deletePost function is provided by the useDelete hook. When the user clicks the edit button, we call the edit function with the "posts" resource and the post id to navigate to the edit page.
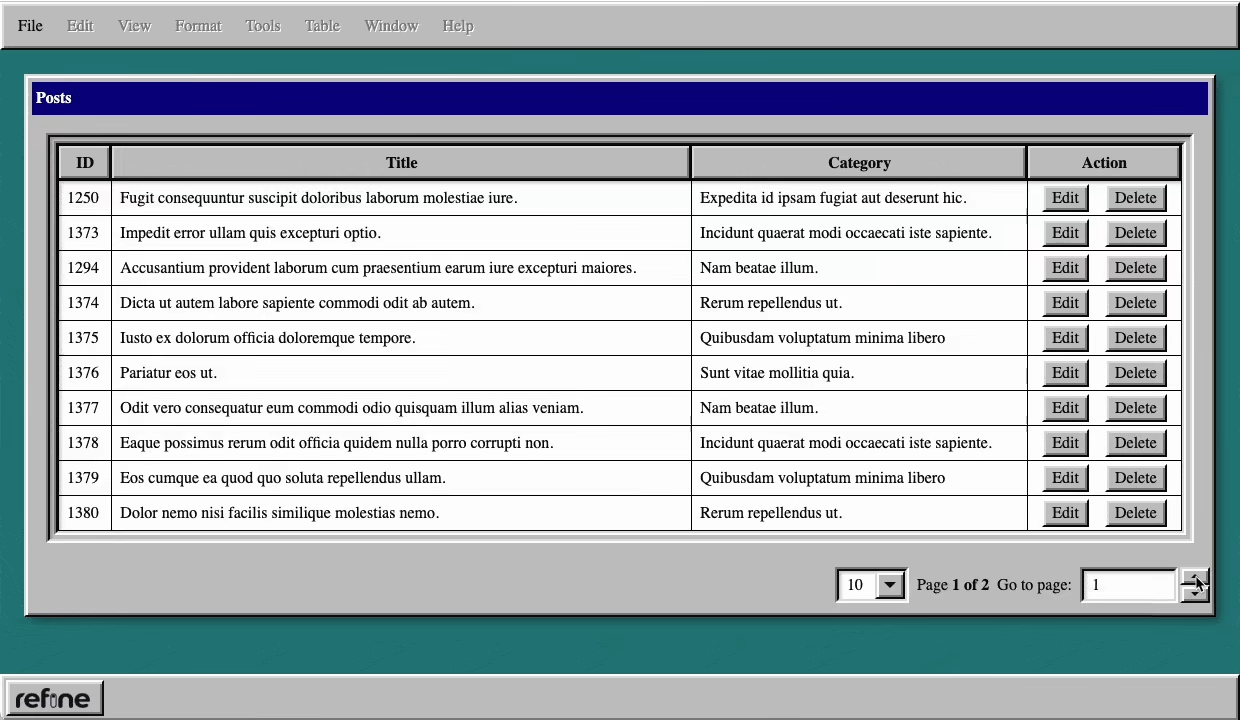 Refine List Page
Create Page and Edit Page
We have created our post list page. Now we will create page where we can create posts. Refine provides a @refinedev/react-hook-form adapter that you can use all the features of React Hook Form with Refine. We will use this to manage our form state.
So, let's install the @refinedev/react-hook-form and dependencies.
npm i @refinedev/react-hook-form react-hook-form
Let's update a <PostCreate /> component in src/pages/posts/create.tsx directory with the following code:
src/pages/posts/create.tsx
import { useForm } from "@refinedev/react-hook-form";
import { useSelect } from "@refinedev/core";
import {
  Select,
  GroupBox,
  Button,
  TextInput,
  Window,
  WindowHeader,
  WindowContent,
} from "react95";
import { Controller } from "react-hook-form";

export const PostCreate: React.FC = () => {
  const {
    refineCore: { onFinish, formLoading },
    register,
    handleSubmit,
    control,
    formState: { errors },
  } = useForm();

  const { options } = useSelect({
    resource: "categories",
  });

  return (
    <Window style={{ width: "100%", height: "100%" }}>
      <WindowHeader>
        <span>Create Post</span>
      </WindowHeader>
      <WindowContent>
        <form onSubmit={handleSubmit(onFinish)}>
          <label>Title: </label>
          <br />
          <br />
          <TextInput
            {...register("title", { required: true })}
            placeholder="Type here..."
          />
          {errors.title && <span>This field is required</span>}
          <br />
          <br />

          <Controller
            name="categoryId"
            control={control}
            render={({ field: { onChange, value } }) => (
              <GroupBox label={"Category"}>
                <Select
                  options={options}
                  menuMaxHeight={160}
                  width={160}
                  variant="flat"
                  onChange={(option) => onChange(option.value)}
                  value={value}
                />
              </GroupBox>
            )}
          />
          {errors.category && <span>This field is required</span>}
          <br />
          <label>Content: </label>
          <br />
          <TextInput
            {...register("content", { required: true })}
            multiline
            rows={10}
            cols={50}
          />

          {errors.content && <span>This field is required</span>}
          <br />
          <Button type="submit" value="Submit">
            Submit
          </Button>
          {formLoading && <p>Loading</p>}
        </form>
      </WindowContent>
    </Window>
  );
};
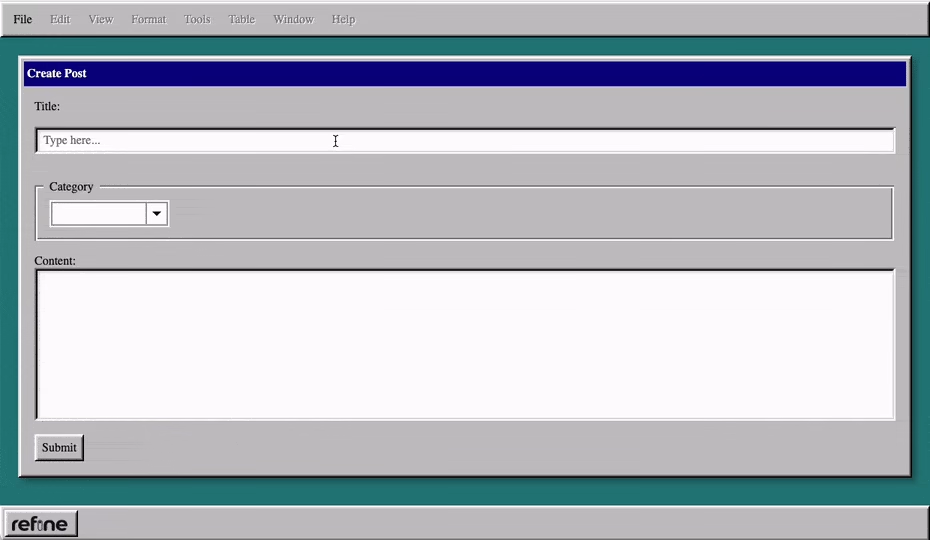 Refine Create Page
Now, let's update a <PostEdit /> component in src/pages/posts/edit.tsx directory with the following code:
src/pages/posts/edit.tsx
import { useForm } from "@refinedev/react-hook-form";
import { useSelect } from "@refinedev/core";
import {
  Select,
  GroupBox,
  Button,
  TextInput,
  Window,
  WindowHeader,
  WindowContent,
} from "react95";
import { Controller } from "react-hook-form";

export const PostEdit: React.FC = () => {
  const {
    refineCore: { onFinish, formLoading },
    register,
    handleSubmit,
    control,
    formState: { errors },
  } = useForm();

  const { options } = useSelect({
    resource: "categories",
  });

  return (
    <Window style={{ width: "100%", height: "100%" }}>
      <WindowHeader active={true} className="window-header">
        <span>Edit Post</span>
      </WindowHeader>
      <WindowContent>
        <form onSubmit={handleSubmit(onFinish)}>
          <label>Title: </label>
          <br />
          <TextInput
            {...register("title", { required: true })}
            placeholder="Type here..."
          />
          {errors.title && <span>This field is required</span>}
          <br />
          <br />

          <Controller
            name="categoryId"
            control={control}
            render={({ field: { onChange, value } }) => (
              <GroupBox label={"Category"}>
                <Select
                  options={options}
                  menuMaxHeight={160}
                  width={160}
                  variant="flat"
                  onChange={(option) => onChange(option.value)}
                  value={value}
                />
              </GroupBox>
            )}
          />
          {errors.category && <span>This field is required</span>}
          <br />
          <label>Content: </label>
          <br />
          <TextInput
            {...register("content", { required: true })}
            multiline
            rows={10}
            cols={50}
          />

          {errors.content && <span>This field is required</span>}
          <br />
          <Button type="submit" value="Submit">
            Submit
          </Button>
          {formLoading && <p>Loading</p>}
        </form>
      </WindowContent>
    </Window>
  );
};
Edit and create pages almost look the same. We can use the same form for both pages. useForm hook knows which action we are performing. For example, if we are on the edit page, it will automatically fetch the post data and fill the form with it.
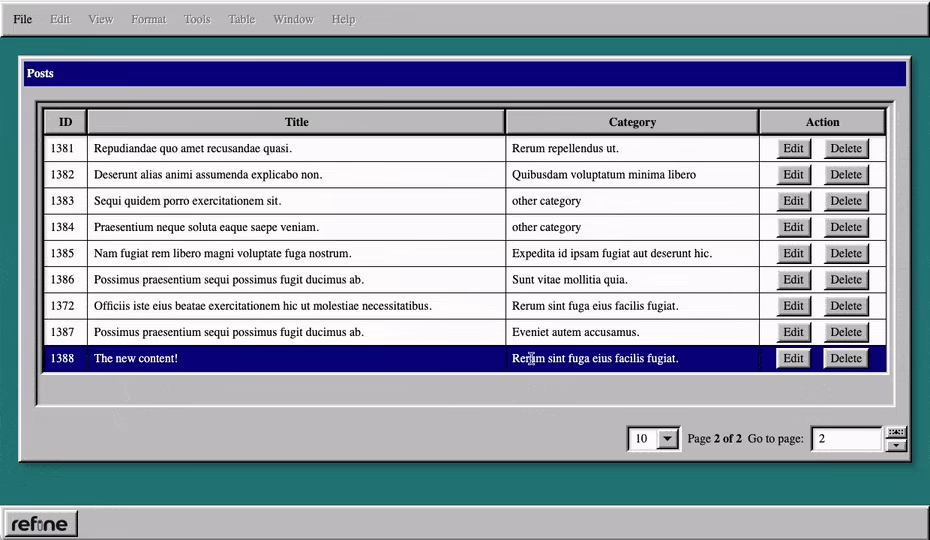 Refine Edit Page
Project Overview
 Refine Project Overview
Live CodeSandbox Example
Conclusion
Refine is a very powerful and flexible internal tool development framework. The features it provides will greatly reduce your development time. In this example, we have shown step-by-step how a development can be quick and easy using a custom UI and refine-core features. Refine does not restrict you, and it delivers almost all of your project's requirements via the hooks it provides, regardless of the UI.