Build Access Control Mechanism using Permify
In this article, we will examine how to build an Access Control mechanism in Refine using Permify; an authorization as a service that helps you to create any kind of authorization system easily with its panel.
Introduction
As an overview, we will:
- Setup Permify to Refine application
- Create a access control mechanism in Refine Access Control Provider
- Define access control rules & options on Permify Panel to check user accesses.
Step 1: Setup the Permify in Refine application
First let's create a demo react application using refine. You can follow the tutorial to create a simple admin panel for a CMS-like application.
If you're application is ready, lets create a free instant account at Permify from here.
Then, we need to install permify js package to our app with following command:
npm install @permify/permify-service-js
And initialize permify client with workspace id and public token which can be found in the Workspace Settings section.
//initialize permify client
const permify = new PermifyClient({
  workspace_id: "workspace_id",
  public_key: "public_token",
});
Before diving into more; if you’re using your API rather than Refine’s test API, you need to complete the setup for your backend as well.
On the server side you just need to match your users and resources. You can follow the Getting Started on Permify docs.
If you’re using Refine’s demo API, create a data folder and add sample users there. We will use the Header layout component to change logged in sample users.
Check out the example demo environment for the data folder and full UI layer.
Step 2: Create a access control mechanism in Refine Access Control Provider
Refine provides an agnostic API via the accessControlProvider to manage access control throughout your app.
Lets create a mechanism in our Access Control Provider using Permify client’s isAuthorized function.
accessControlProvider={{
 can: async ({ resource, action, params }) => {
   if (action === "delete" || action === "edit" || action === "show") {
     return Promise.resolve({
       can: await permify.isAuthorized(
         user.id,
         resource,
         action,
         params.id.toString(),
         resource
       )
     });
   }

   return Promise.resolve({
     can: await permify.isAuthorized(user.id, resource, action)
   });
 }
}}
With this set up, each access request can be captured by Permify and returns a decision according to your pre-defined rules and conditions on the Permify Panel.
Step 3: Run application & Create Resources
Run the application and then open your Policies section on the Permify Panel to see created policies.
isAuthorized function works in the first or create methodology. As an example, if the action is create and resource is posts it will automatically create its policy.
Since it's newly created and no rules attached, it will return a true to access request.
Note: If you’re testing this access mechanism without creating resources beforehand on Permify. You won’t see the policies for delete, show and edit actions since these are unique resource items related so that these fields are hidden.
To create resources use createResource request on your backend.
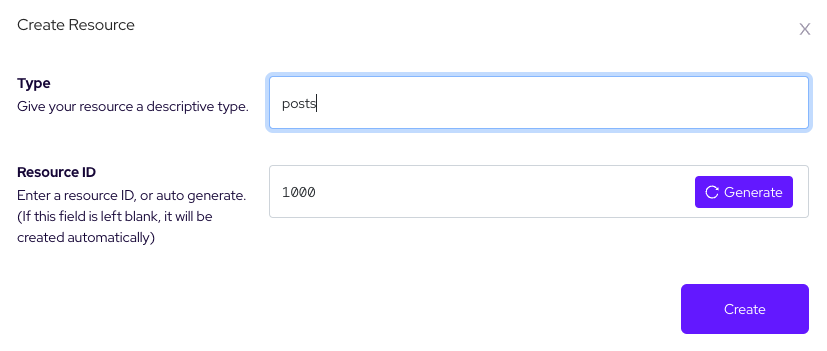
For testing purposes, let’s create resource from Panel with entering Refine params.id as resource.id and type as resource name as shown below
Step 4: Define access control rules & options on Permify
Now we’ll define some rules and rule sets (options) to check specific conditions on access requests on resources.
Let's say we have “admin” and “editor” role and the basic access conditions are:
- Users with admin role can access everywhere
- Users with an editor role only edit or delete specific content if he/she is the owner of the resource.
Let’s create rules for these comparisons. Open Rules Section and click Create Rule button
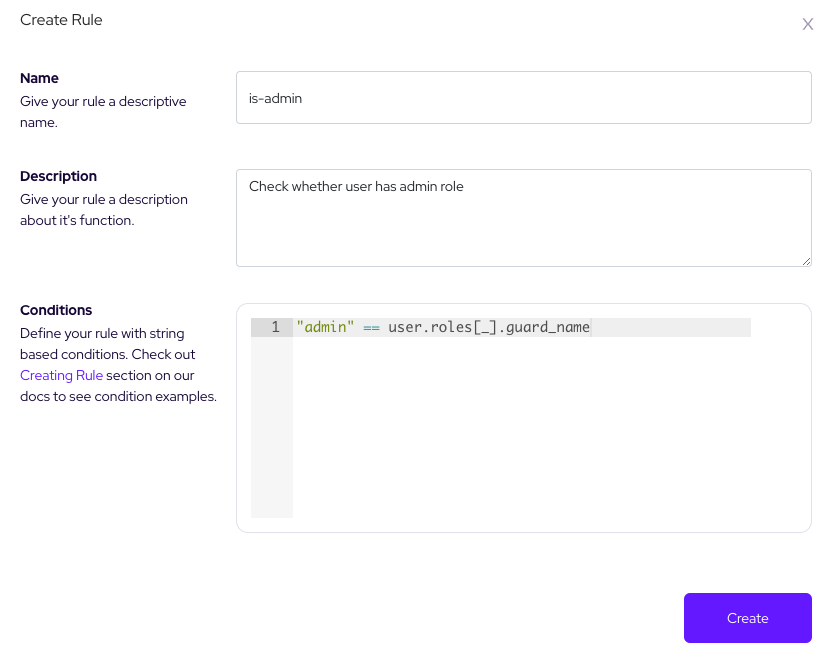
We can create an is-editor rule to check the editor role as same as checking admin.
As an overview you can create a role checking rule with a statement
“role_name” === user.roles[].guard_name
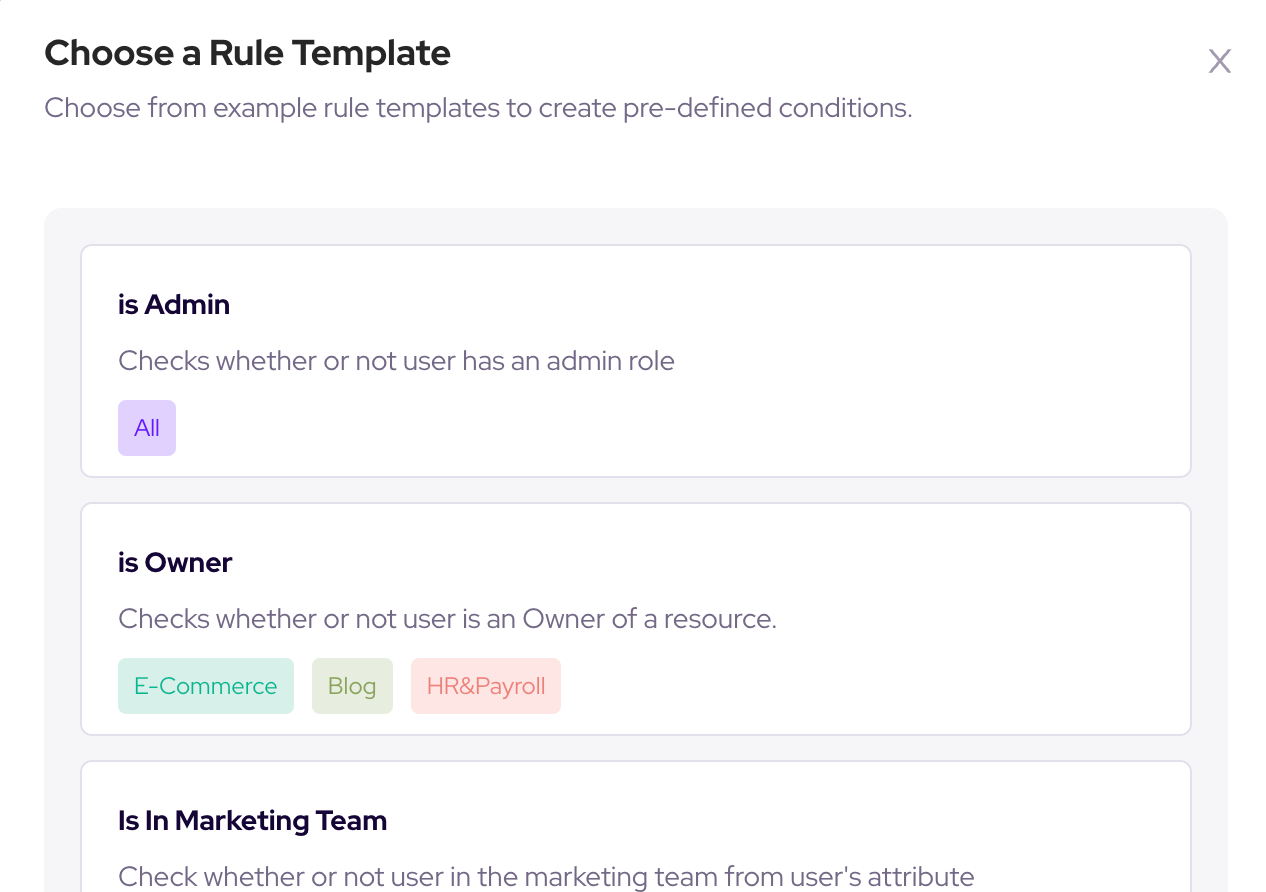
Alternatively you can create rules using or modifying rule templates. For our example we need to create a resource owner rule.
Click use a template button and choose is Owner rule template for checking whether user is owner of the resource.
Then let's attach these rules to our policies in order to meet with our access conditions defined above. After editing policies your table should look like this
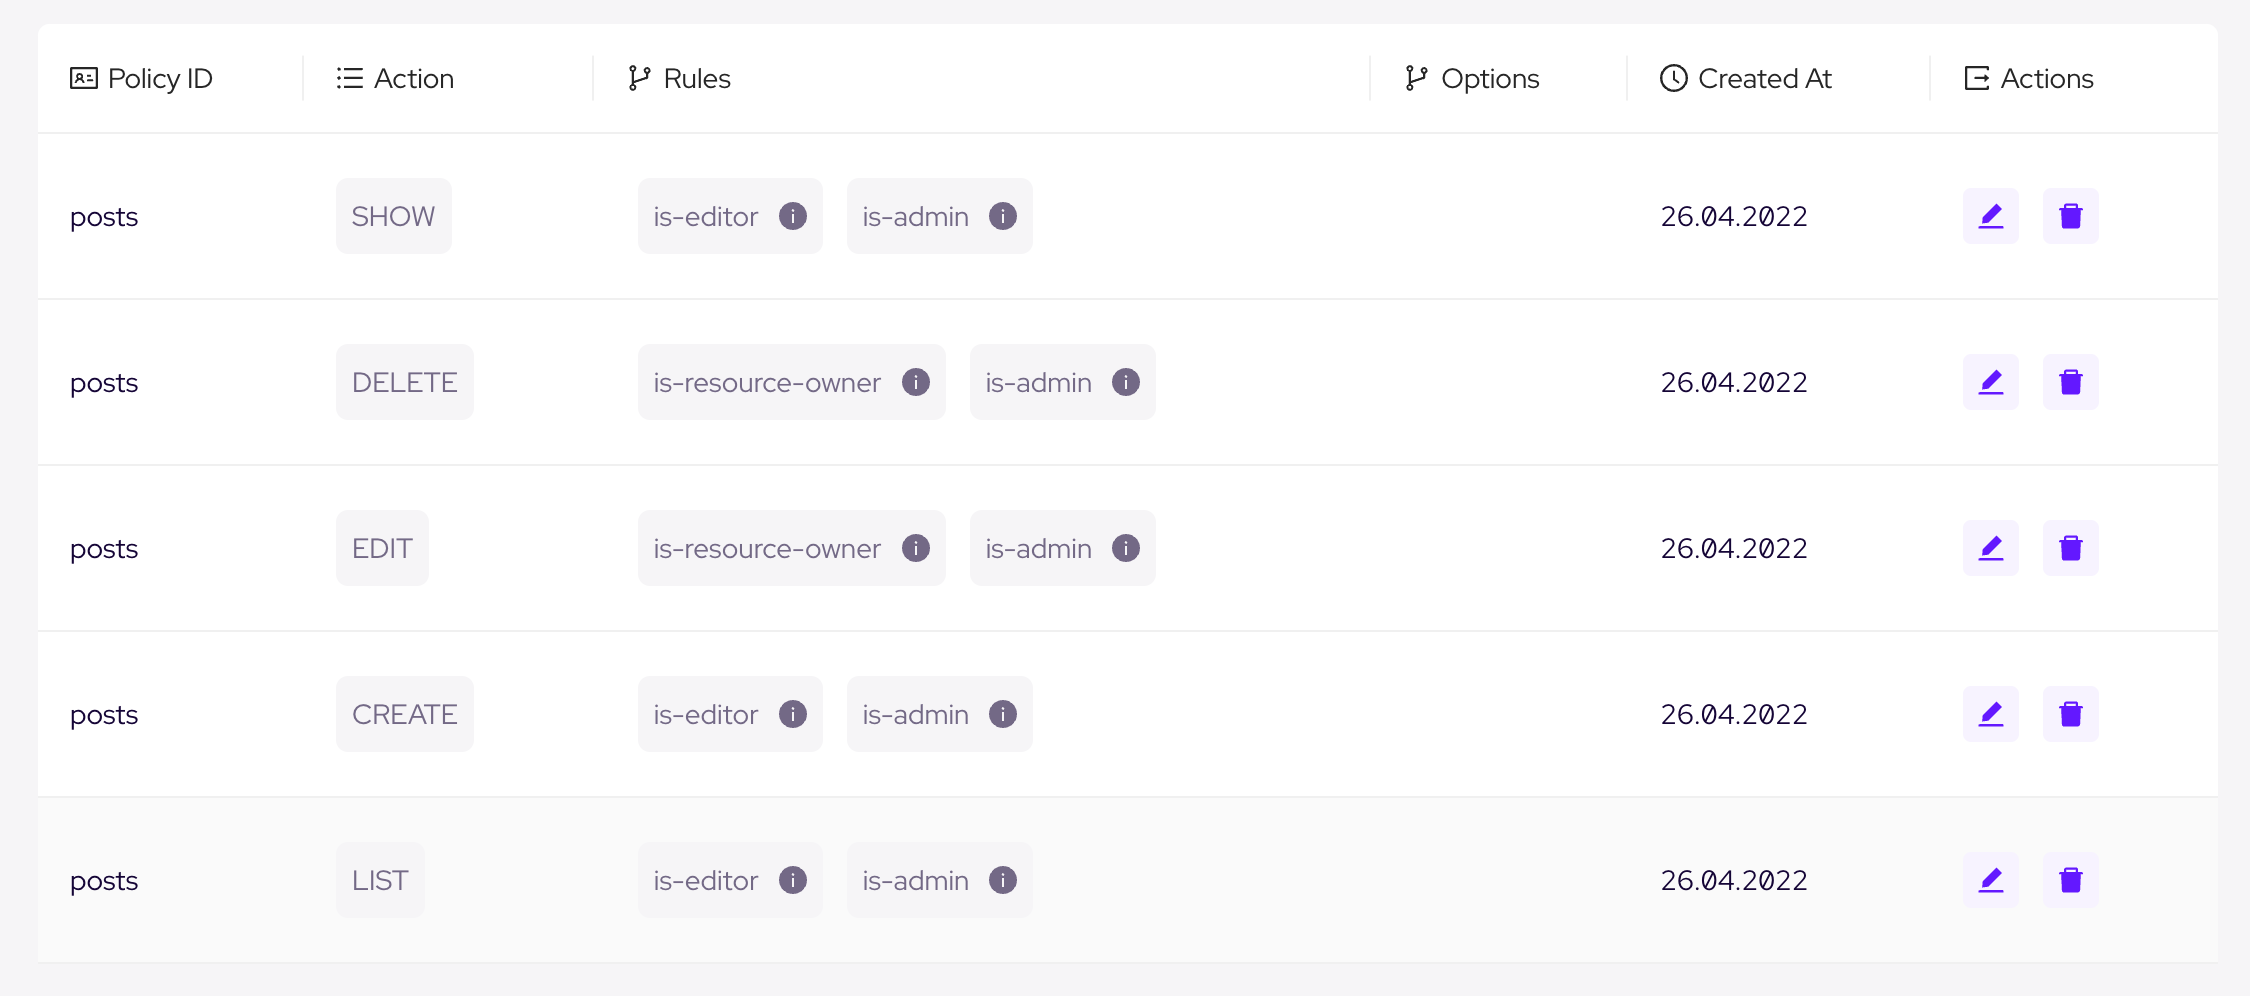
Before testing these policies, let's set the owner of the test resource (params.id === 1000) as our editor rule user.
Open up Resources Section and change the attributes object of post item 1000 as follows:
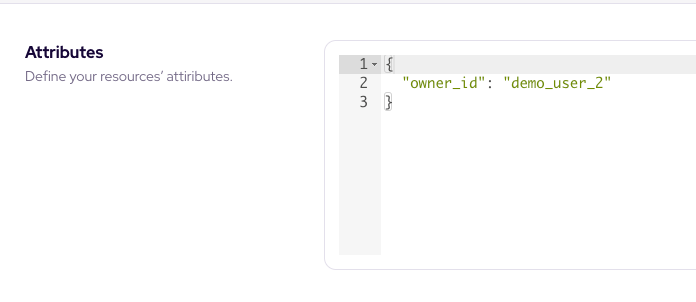
Now let's run the application again to see results for both roles.
Step 5: Creating rule sets (Options)
There are times when authorization structure conditions can’t be straight forward as we demonstrated.
Sometimes business needs force you to check multiple complex rules or rule sets.
To demonstrade that lets add a custom role to create rule sets (Options) on Permify.
Lets say
- Users with an editor role can edit any post if he/she is in working hours.
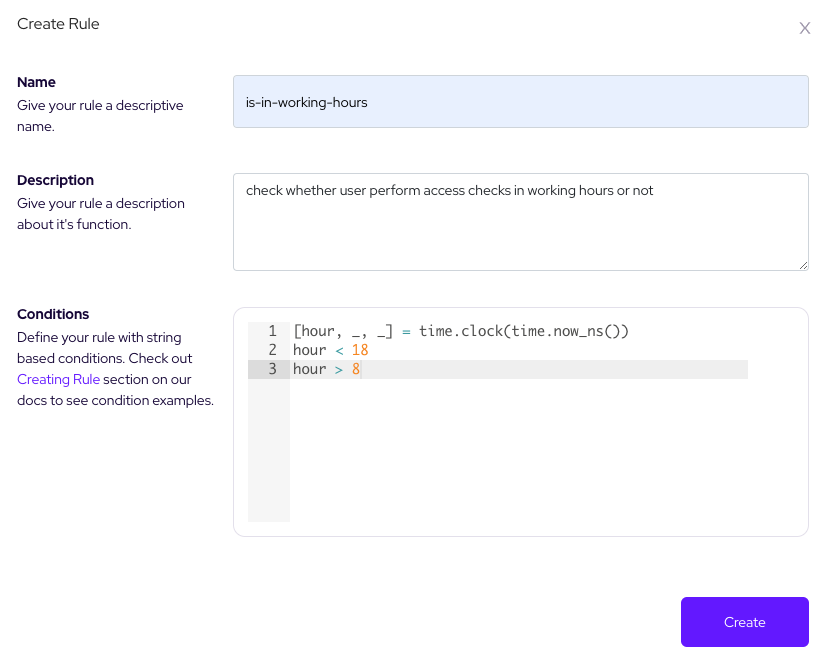
Basically if the user is in working hours approximately (8:00 am to 6.00 pm) users with an editor role can access edit of any given resource.
Firstly we need to create a rule to check whether user perform access checks in working hours or not. Create this rule like below:
Also we need to check that the user should have an editor role to access content. There is the point where rule sets(options) come up. Lets create an option from option section as follows:
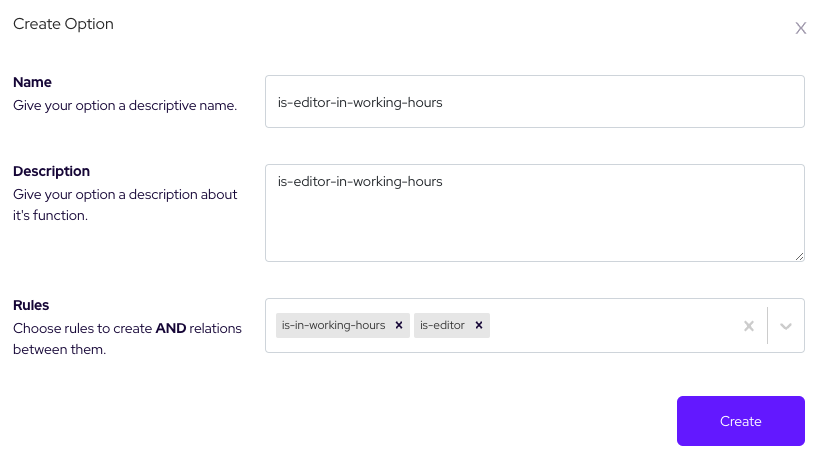
Now add this rule to our edit policy and test the results with running our app.
Select the Editor role and you should see edit button disabled when you're performing that action outside the time interval we have determined (8:00 am to 6.00 pm)
Conclusion
In this article, we create a couple access check examples using Permify.
We mostly focused on the client side using Refine access control provider hence Permify is a full stack solution which you can implement your authorization logic for every layer of your application from backend to frontend.
So, if you are looking for an access control mechanism, you can create any kind of role or attribute based authorization structures easily with Permify.

