Introduction
Passwords are one of the most popular ways to authenticate a user. However, passwords have disadvantages, such as being subject to brute force attacks and data breaches.
Another significant problem with password-based login is that keeping track of different passwords can become challenging. This is where the term 'OTP' (One Time Password) can be helpful.
When we talk about OTP-based authentication, users need to enter a six-digit OTP number sent to them through an automated call or SMS when they want to access the application.
You can access the example app we'll be building in the article by following this link.
Steps we'll cover:
- What is Supabase?
- What is Refine?
- Prerequisites
- Getting Started
- Installing Tailwind CSS for Refine project
- Set up the Supabase Project
- Create the Login Page
- Data Provider
- Auth Provider
What is Supabase?
Supabase is an open-source Firebase alternative. It provides a real-time database, authentication, and media buckets in one platform. You can use Supabase with any frontend tool, such as React, Angular, or Vue.js.
One of the great features of Supabase is its Auth service. Supabase Auth allows you to easily add OTP-based authentication to your app with just a few lines of code.
In this guide, you will implement OTP-based login in Refine using the Supabase library.
What is Refine?
Refine is a React-based open-source frameworks for building admin panels, dashboards, internal tools and storefront apps rapidly. It helps developers to avoid from repetitive tasks demanded by CRUD operations and provides solutions for like authentication, access control, routing, networking, state management.
One of the great features of Refine is its out-of-the-box data providers integrations. Refine has a built-in data provider for supabase and we'll see how to use it properly.
Prerequisites
To follow this guide, you must install the latest Node.js version on your system and be familiar with React and TypeScript concepts. For this tutorial, you will also require a Twilio account to send out OTP text messages and a Github account to sign up for Supabase.
Getting Started
Start by creating the Refine app using the create refine-app CLI tool.
npm create refine-app@latest refine-supabase-auth
✔ Downloaded remote source successfully.
✔ Choose a project template · Refine(Vite)
✔ What would you like to name your project?: · refine-supabase-auth
✔ Choose your backend service to connect: · Supabase
✔ Do you want to use a UI Framework?: · no
✔ Do you want to add example pages?: · no
✔ Do you need i18n (Internationalization) support?: · no
✔ Choose a package manager: · npm
Choose the headless option while specifying the UI framework, as you will be integrating tailwind in this tutorial. You can select your preferred package manager; this tutorial will use yarn. Choose the supabase option when selecting the Data Provider.
Here is the source code of Refine supabase data provider
Installing Tailwind CSS for Refine project
Next, navigate to your project directory and install the following packages.
npm install -D tailwindcss postcss autoprefixer
npm install daisyui react-daisyui
Daisy UI adds attractive component classes to Tailwind, which are customizable and comes with modular React components like <Button />, <Card />, etc., out-of-the-box.
Run the following command to initialize Tailwind in your project.
npx tailwindcss init
Update the recently added tailwind.config.js file to add some theming to the Refine app.
/** @type {import('tailwindcss').Config} */
export default {
  content: [
    "node_modules/daisyui/dist/**/*.js",
    "node_modules/react-daisyui/dist/**/*.js",
    "./src/**/*.{js,jsx,ts,tsx}",
  ],
  theme: {
    extend: {
      colors: {
        dark: "#030303",
        gray: "#eaeaec",
      },
    },
  },
  plugins: [require("daisyui")],
  daisyui: {
    themes: [
      {
        mytheme: {
          primary: "#545bef",
          secondary: "#757EC0",
          accent: "#09f08a",
        },
      },
    ],
  },
};
Create postcss.config.js:
/** @type {import('tailwindcss').Config} */
export default {
  plugins: {
    tailwindcss: {},
    autoprefixer: {},
  },
};
Now, create the App.css file and add the following content.
@tailwind base;
@tailwind components;
@tailwind utilities;
In the App.tsx file, import the App.css file to add the styling.
Run the npm run dev command to start the Refine development server.
npm run dev

Set up the Supabase Project
Head over to app.supabase.com and sign in to your Supabase account. Next, create a new project by clicking on the "New Project" button.
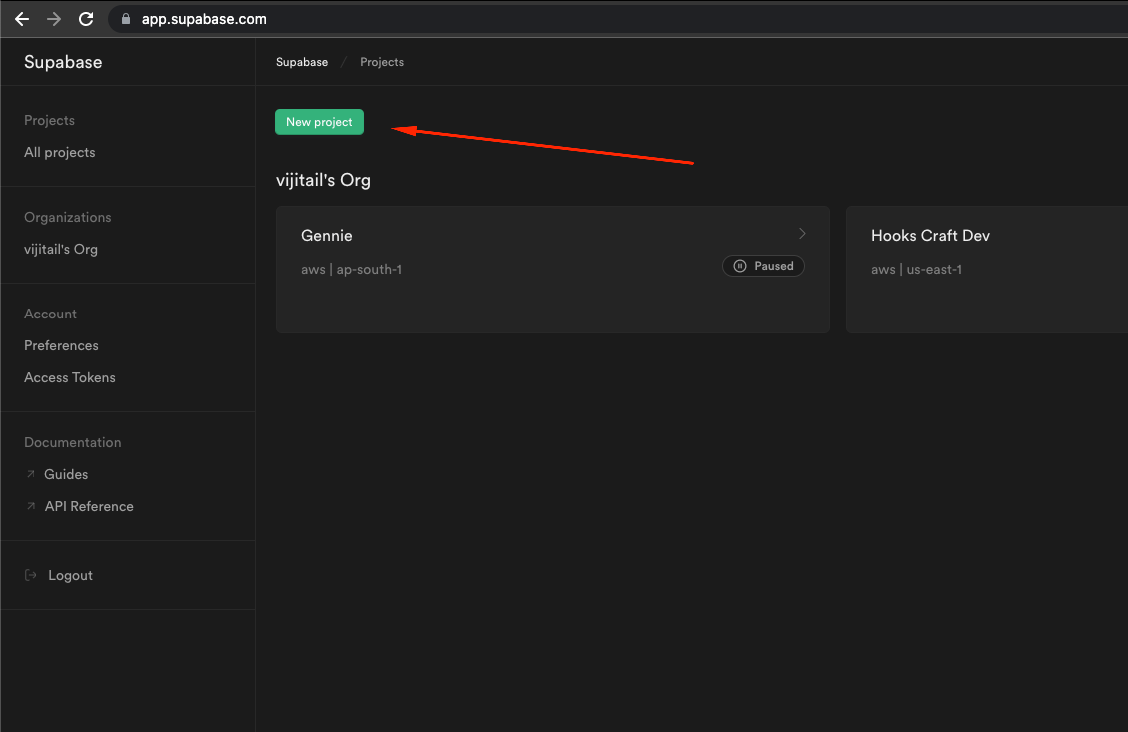
Add the name of the project and the database password, and wait for Supabase to set up and create your project. Meanwhile, you can grab the public key and the project URL from the Supabase dashboard and update the credentials in your code.
Once the project is created, go to Authentication -> Settings to configure the Auth providers.
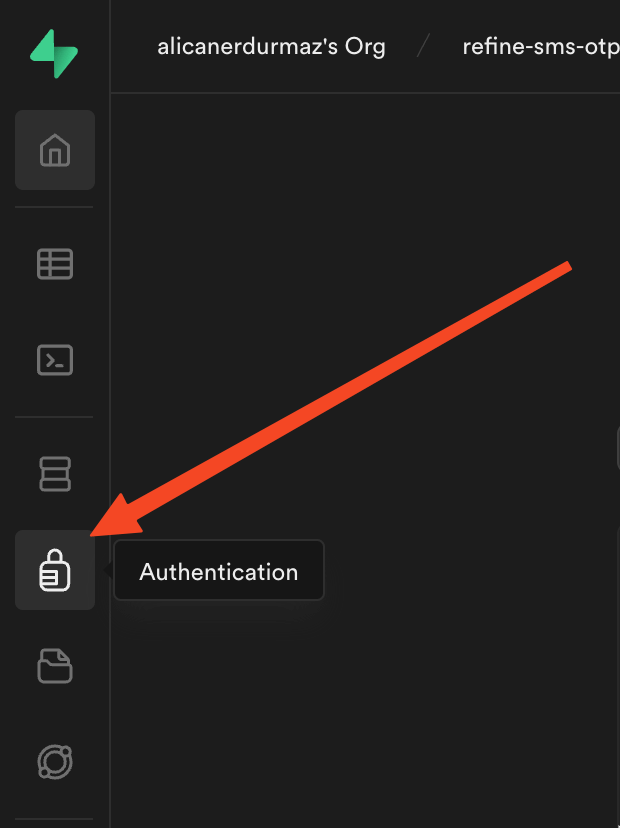
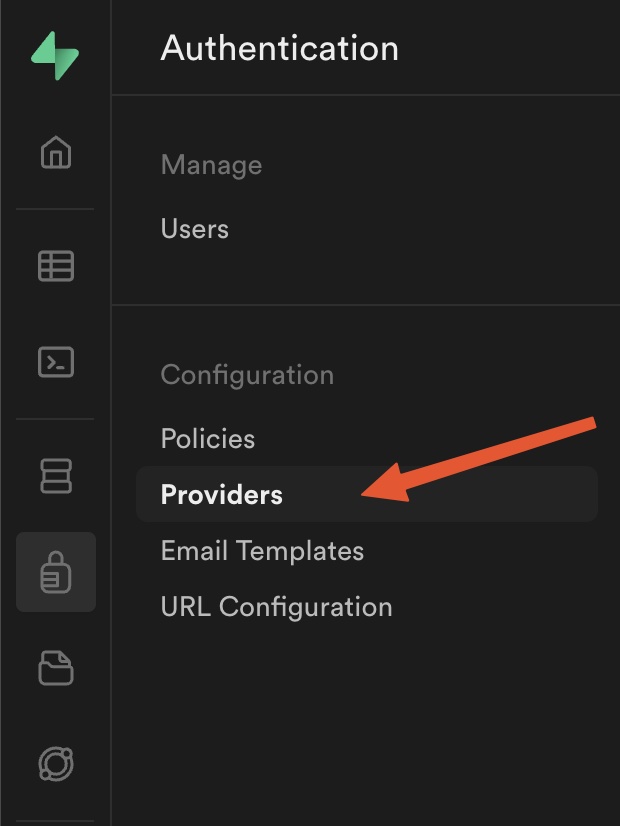
You will find the Phone Auth option in the Auth providers section; enable it and select Twilio as the SMS provider.
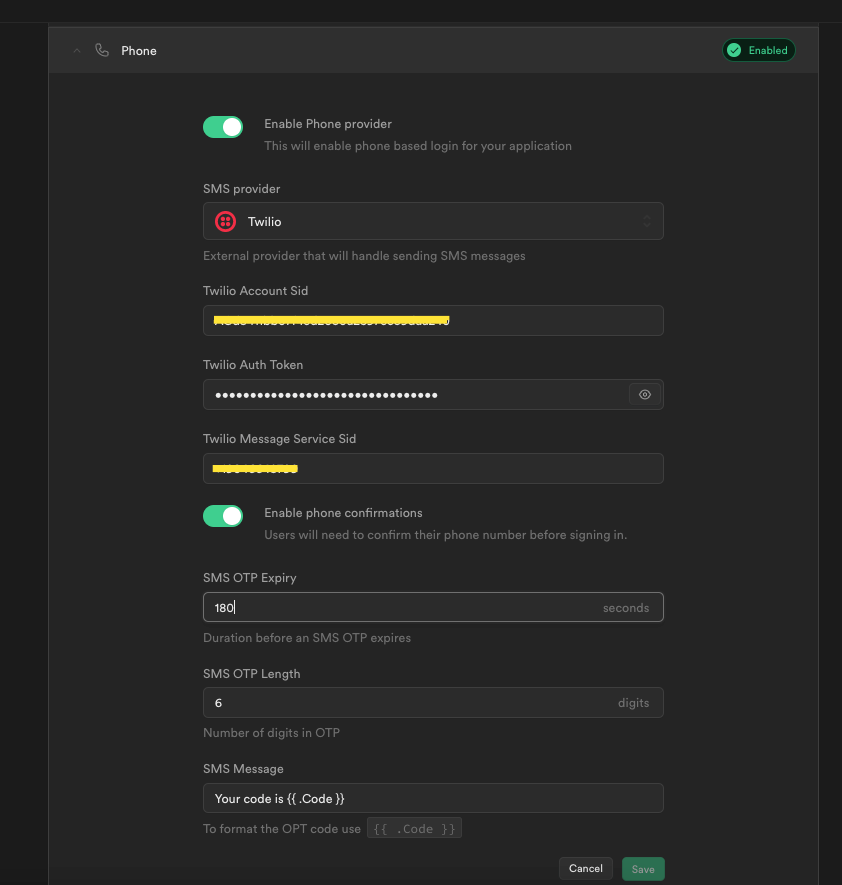
You need to create and developer account and set up credentials on Twilio Console
Add your Twilio API credentials to complete the integration. You can also edit the OTP expiry time, length of the OTP, and the SMS template according to your business requirements. For this guide, you can stick with the default values.
The backend setup is now complete. In the next section, you will start building the app's frontend.
Create the Login Page
In this guide, you are allowing users to access their account without requiring a password. Once the users log into their account, they will see a list of countries on the dashboard screen.
On the login page, you need to create a two-step form. In the first step, the user will enter the mobile number to receive the OTP message, and in the second step, the user will enter the OTP token to log in. Display an error if the OTP token is invalid or expired.
import { useLogin } from "@refinedev/core";
import { useRef, useState } from "react";
import { Alert, Button, Card, Input } from "react-daisyui";
import { supabaseClient } from "../utility";

export const LoginPage = () => {
  const mobileNoRef = useRef<string>();
  const otpRef = useRef<string>();
  const [error, setError] = useState<string>();
  const [formState, setFormState] = useState<"SEND_OTP" | "LOGIN">("SEND_OTP");

  const { mutate: login } = useLogin();

  const onLogin = () => {
    login(
      { mobileNo: mobileNoRef.current, otp: otpRef.current },
      { onError: (error) => setError(error.message) },
    );
  };

  const mobileFormRender = () => (
    <>
      <label className="text-dark font-medium">Enter your mobile number</label>
      <Input
        className="border-gray bg-gray text-dark mb-4 text-lg font-medium"
        onChange={(e) => (mobileNoRef.current = e.target.value)}
        onFocus={() => setError("")}
        name="mobile"
        type={"tel"}
        defaultValue={mobileNoRef.current}
      />
      <Button color="accent" className="shadow" onClick={onSendOtp}>
        Send OTP
      </Button>
    </>
  );

  const otpFormRender = () => (
    <>
      <label className="text-dark font-medium">Enter OTP</label>
      <Input
        className="border-gray bg-gray text-dark mb-4 text-lg font-medium"
        onChange={(e) => (otpRef.current = e.target.value)}
        onFocus={() => setError("")}
        name="otp"
        value={otpRef.current}
      />
      <Button color="accent" className="shadow" onClick={onLogin}>
        Login
      </Button>
    </>
  );

  const onSendOtp = async () => {
    const mobileNo = mobileNoRef.current || "";
    if (!/^\+[1-9]{1}[0-9]{3,14}$/.test(mobileNo)) {
      setError("Please enter a valid mobile number");
      return;
    }

    const { error } = await supabaseClient.auth.signInWithOtp({
      phone: mobileNo,
    });
    if (error) {
      setError(error.message);
      return;
    }
    setFormState("LOGIN");
  };

  return (
    <div className="bg-primary flex min-h-screen items-center justify-center">
      <Card className="w-1/2 bg-white shadow-lg " bordered={false}>
        <Card.Body>
          {error && (
            <Alert status="error" className="mb-2">
              {error}
            </Alert>
          )}
          <h2 className="text-dark mb-3  text-xl font-bold">Sign In</h2>
          {formState === "SEND_OTP" && mobileFormRender()}
          {formState === "LOGIN" && otpFormRender()}
        </Card.Body>
      </Card>
    </div>
  );
};
In the above code, we set a formState state variable to define whether to render the mobile input or the OTP input on the screen. If there's any error, set the error variable and display it using the <Alert /> component.
Import the <LoginPage /> component in the App.tsx file and create a route for it.
To create a route, import the <Route /> component from react-router-dom and pass the <LoginPage /> component as the children. We also use <Authenticated />, <Outlet /> and <NavigateToResource /> components
to redirect the user to the home page if they are already logged in.
Refer to the Auth Provider documentation to learn more about authentication. →
Refer to the documentation to learn more routing in Refine →
Show `App.tsx` Code
import { Authenticated, Refine, WelcomePage } from "@refinedev/core";
import { RefineKbar, RefineKbarProvider } from "@refinedev/kbar";

import routerBindings, {
  CatchAllNavigate,
  DocumentTitleHandler,
  UnsavedChangesNotifier,
} from "@refinedev/react-router-v6";
import { dataProvider, liveProvider } from "@refinedev/supabase";
import {
  BrowserRouter,
  Navigate,
  Outlet,
  Route,
  Routes,
} from "react-router-dom";

import authProvider from "./authProvider";
import { supabaseClient } from "./utility";

import { LoginPage } from "./pages/Login";

import "./App.css";

function App() {
  return (
    <BrowserRouter>
      <RefineKbarProvider>
        <Refine
          dataProvider={dataProvider(supabaseClient)}
          liveProvider={liveProvider(supabaseClient)}
          authProvider={authProvider}
          routerProvider={routerBindings}
          options={{
            syncWithLocation: true,
            warnWhenUnsavedChanges: true,
          }}
        >
          <Routes>
            <Route
              element={
                <Authenticated fallback={<CatchAllNavigate to="/login" />}>
                  <Outlet />
                </Authenticated>
              }
            >
              <Route index element={<WelcomePage />} />
            </Route>
            <Route
              element={
                <Authenticated fallback={<Outlet />}>
                  <Navigate to="/" />
                </Authenticated>
              }
            >
              <Route path="/login" element={<LoginPage />} />
            </Route>
          </Routes>
          <RefineKbar />
          <UnsavedChangesNotifier />
          <DocumentTitleHandler />
        </Refine>
      </RefineKbarProvider>
    </BrowserRouter>
  );
}

export default App;
Also, notice that create refine-app has already imported the authProvider and dataProvider for you.
Data Provider
The dataProvider acts as a data layer for your app that makes the HTTP requests and encapsulates how the data is retrieved. It requests and returns the data using predefined methods like create(), getMany(), etc. Refine consumes these methods via data hooks.
For example, when you use the useList hook, Refine internally calls the getList() method of the data provider.
In this case, we pass the supabaseClient as the data provider. Supabase is supported out-of-the-box as a data provider by Refine. Here, the data provider internally calls supabase-js database methods like select(), insert(), etc., to handle the data.
You can learn more about data provider in the Refine docs.
Auth Provider
The authProvider is an object that Refine uses to authenticate and authorize the users. The auth provider must have methods like login(), register(), etc., to manage authentication in your app. These methods should return a Promise and are accessible via hooks.
create refine-app autogenerates the auth provider from your selected preference- in this case, it is Supabase. Unlike data providers, Refine does not offer out-of-the-box support for auth providers; you must create it from scratch.
You can read more about auth provider in detail here.
Alright, now coming back to the <LoginPage /> component. When the user requests for OTP, validate the mobile number using the regex shown in the below code. The mobile number is expected to include the country code; you can use other third-party components for mobile input with a country code dropdown and mobile validation out-of-the-box.
We'll use the input field in this guide for brevity.
import { supabaseClient } from "../utility";

// ...

const onSendOtp = async () => {
  const mobileNo = mobileNoRef.current || "";
  if (!/^\+[1-9]{1}[0-9]{3,14}$/.test(mobileNo)) {
    setError("Please enter a valid mobile number");
    return;
  }

  const { error } = await supabaseClient.auth.signInWithOtp({
    phone: mobileNo,
  });
  if (error) {
    setError(error.message);
    return;
  }
  setFormState("LOGIN");
};

// ...
To send the OTP message to the user, use the supabase.auth.signInWithOtp() method and pass the mobile number in the phone property as shown above.

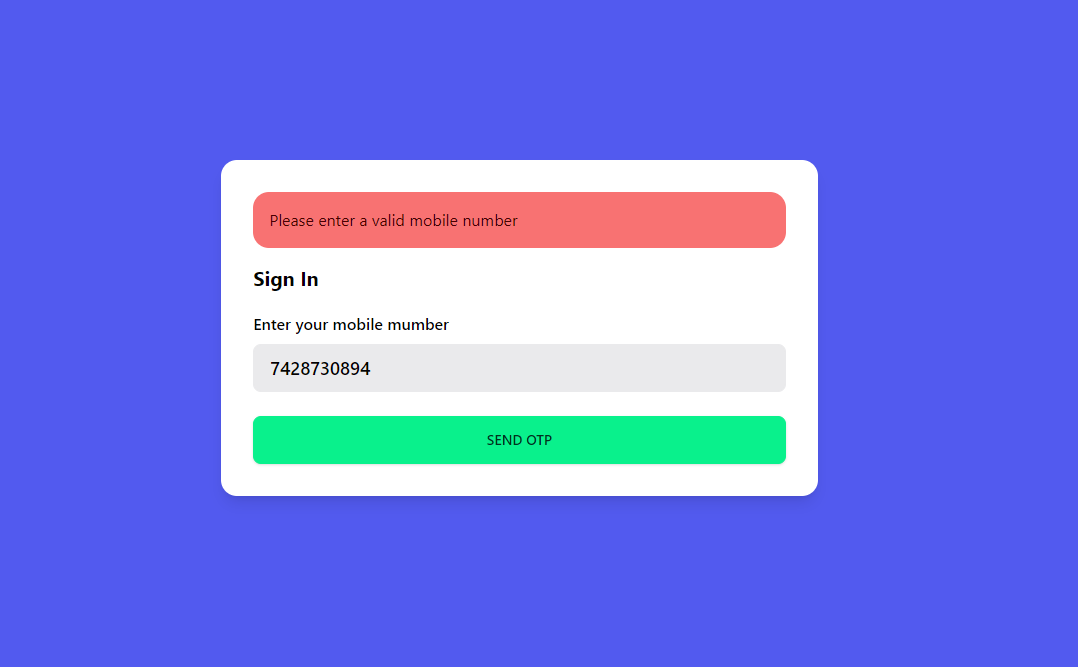
Update the login property in authProvider to accept the mobile number and OTP as input and call the supabase.auth.verifyOtp() method for verifying the OTP entered by the user and enabling access to the dashboard page of the app.
// ...

const authProvider: AuthProvider = {
  login: async ({ mobileNo, otp }) => {
    const { data, error } = await supabaseClient.auth.verifyOtp({
      type: "sms",
      phone: mobileNo,
      token: otp,
    });

    if (error) {
      return {
        success: false,
        error,
      };
    }
    if (data?.user) {
      return {
        success: true,
        redirectTo: "/",
      };
    }

    return {
      success: false,
      error: {
        message: "Login failed",
        name: "Invalid mobile number or otp",
      },
    };
  },
  // ...
};
In the onLogin() function of the <LoginPage /> component, pass the mobile number and OTP to the login() acquired from the useLogin hook.
// ...

const { mutate: login } = useLogin();

const onLogin = () => {
  login(
    { mobileNo: mobileNoRef.current, otp: otpRef.current },
    { onError: (error) => setError(error.message) },
  );
};
If the OTP is invalid, the error message will be displayed as shown below.
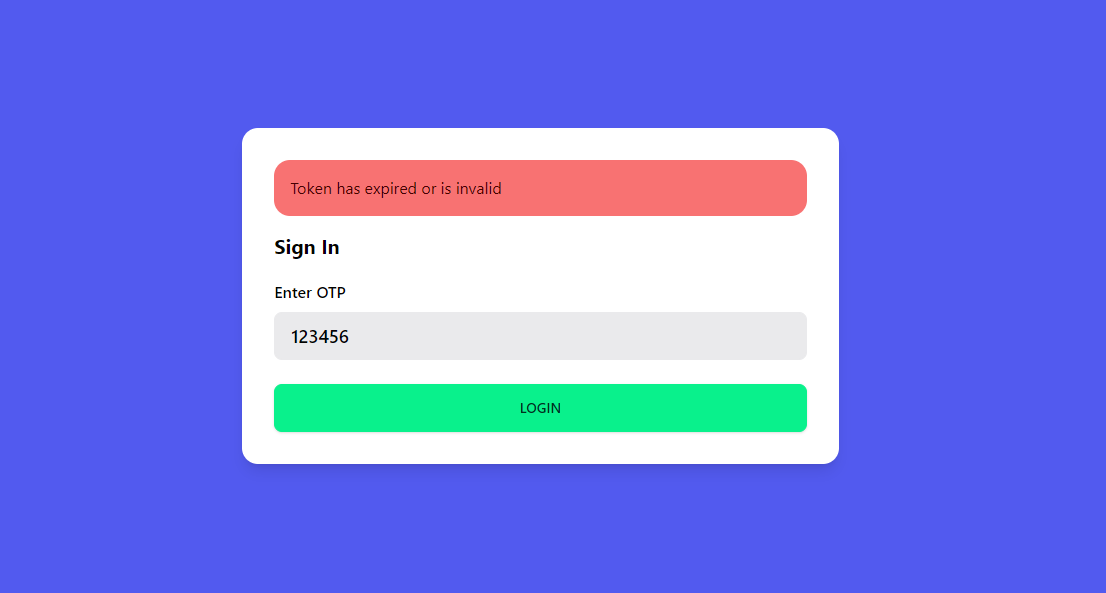
The authentication flow is now complete. Let’s finish the rest of the app by creating the countries resource.
In your Supabase project, head to the SQL editor page and click on the “Countries” option from the Quick start section. It will open up the SQL statements in an editor page; click on the RUN button to execute them.
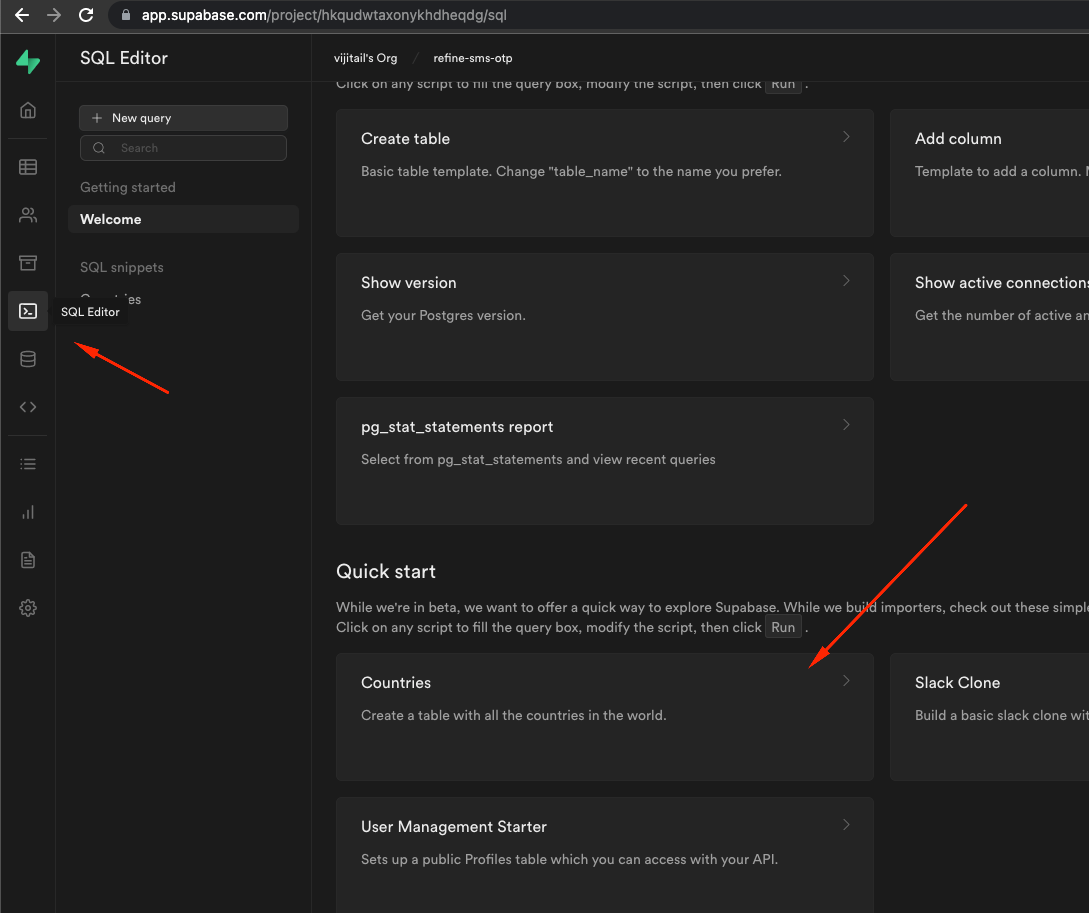
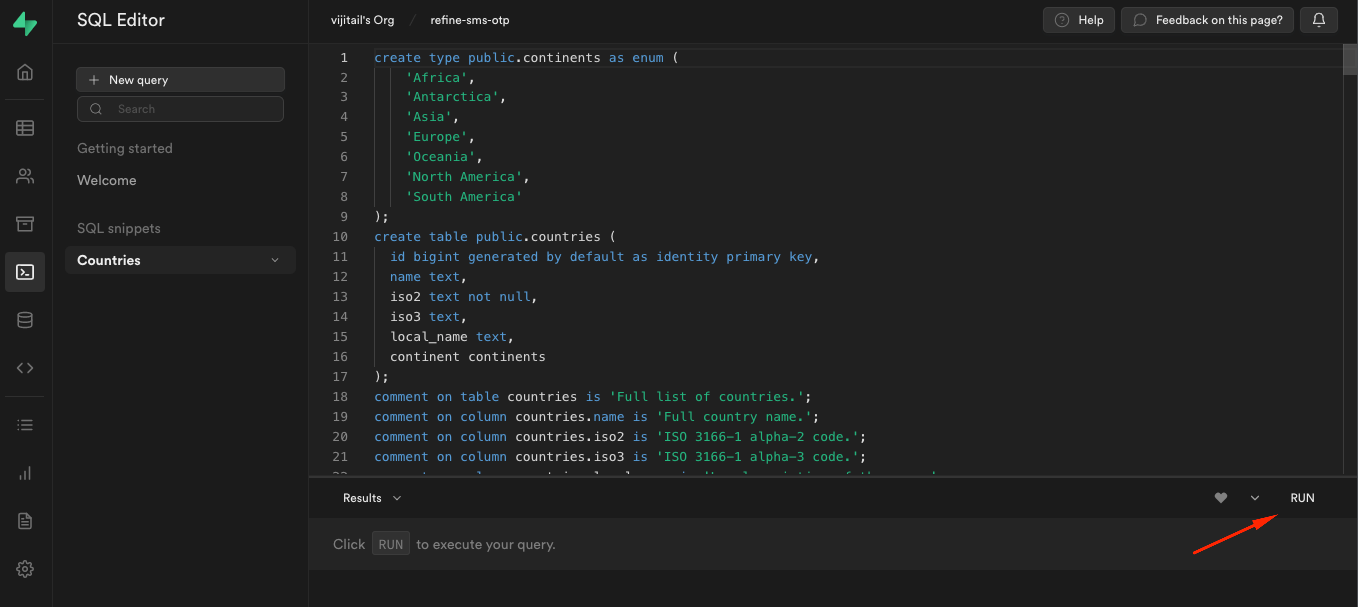
The SQL snippet will create a countries table and dump the country list and other columns like country code and continent.
In the <Countries /> component, get the data from Supabase using the useList hook and render the data using the <Table /> component.
import { useList } from "@refinedev/core";
import { Table } from "react-daisyui";

const columns = ["ID", "Name", "ISO Code", "Local Name", "Continent"];

export const Countries = () => {
  const { data: countries } = useList({
    resource: "countries",
    hasPagination: false,
  });
  return (
    <div className="overflow-x-auto">
      <Table color="primary" className="w-full">
        <Table.Head className="bg-primary">
          {columns.map((column) => (
            <span key={column}>{column}</span>
          ))}
        </Table.Head>
        <Table.Body>
          {countries?.data.map((country: Record<string, string>) => (
            <Table.Row key={country.id}>
              <span className="text-dark font-medium opacity-50">
                {country.id}
              </span>
              <span className="text-dark font-medium opacity-50">
                {country.name}
              </span>
              <span className="text-dark font-medium opacity-50">
                {country.iso2}
              </span>
              <span className="text-dark font-medium opacity-50">
                {country.local_name}
              </span>
              <span className="text-dark font-medium opacity-50">
                {country.continent}
              </span>
            </Table.Row>
          ))}
        </Table.Body>
      </Table>
    </div>
  );
};
Create the Layout component to create an app bar with a logout button.
import { LayoutProps, useLogout } from "@refinedev/core";
import { Button } from "react-daisyui";

export const Layout: React.FC<LayoutProps> = ({ children }) => {
  const { mutate: logout } = useLogout();
  return (
    <div className="flex min-h-screen flex-col">
      <div className="bg-gray mb-2 py-3">
        <div className="container mx-auto flex">
          <Button
            color="accent"
            size="sm"
            className="ml-auto shadow"
            onClick={() => logout()}
          >
            Logout
          </Button>
        </div>
      </div>
      <div className="container mx-auto bg-white py-4">{children}</div>
    </div>
  );
};
Import the <Countries /> and the <Layout /> component in the App.tsx file to finish up the application.
Show `App.tsx` Code
import { Authenticated, Refine } from "@refinedev/core";
import { RefineKbar, RefineKbarProvider } from "@refinedev/kbar";

import routerBindings, {
  CatchAllNavigate,
  DocumentTitleHandler,
  NavigateToResource,
  UnsavedChangesNotifier,
} from "@refinedev/react-router-v6";
import { dataProvider, liveProvider } from "@refinedev/supabase";
import { BrowserRouter, Outlet, Route, Routes } from "react-router-dom";

import { LoginPage } from "./pages/Login";
import { Countries } from "./pages/Countries";
import { Layout } from "./pages/Layout";

import authProvider from "./authProvider";
import { supabaseClient } from "./utility";

import "./App.css";

function App() {
  return (
    <BrowserRouter>
      <RefineKbarProvider>
        <Refine
          dataProvider={dataProvider(supabaseClient)}
          liveProvider={liveProvider(supabaseClient)}
          authProvider={authProvider}
          routerProvider={routerBindings}
          options={{
            syncWithLocation: true,
            warnWhenUnsavedChanges: true,
          }}
          resources={[{ name: "countries", list: "/countries" }]}
        >
          <Routes>
            <Route
              element={
                <Authenticated fallback={<CatchAllNavigate to="/login" />}>
                  <Layout>
                    <Outlet />
                  </Layout>
                </Authenticated>
              }
            >
              <Route
                index
                element={<NavigateToResource resource="countries" />}
              />
              <Route path="/countries" element={<Countries />} />
            </Route>

            <Route
              element={
                <Authenticated fallback={<Outlet />}>
                  <NavigateToResource resource="countries" />
                </Authenticated>
              }
            >
              <Route path="/login" element={<LoginPage />} />
            </Route>
          </Routes>
          <RefineKbar />
          <UnsavedChangesNotifier />
          <DocumentTitleHandler />
        </Refine>
      </RefineKbarProvider>
    </BrowserRouter>
  );
}

export default App;

Conclusion
OTP authentication adds an extra layer of security to your application and helps ensure that only authorized users can access it. In this article, we've gone over how to add OTP-based authentication in Refine using Supabase Auth. We've also looked at how to set up the phone auth provider in Supabase using Twilio so that users can receive their OTP tokens.
Following this article's steps, you should now have a Refine application with OTP-based authentication enabled.


