


Introduction
Before the existence of Refine, building CRUD applications and data-intensive apps in React had always involved a painstaking repetitive process. Refine eliminates this by providing a set of helper hooks, components, and service providers that are decoupled and independent of the UI components and business logic used in your application. This provides room for customizability and speed in building your application.
Refine's service providers make sure that you can easily connect to any custom REST, GraphQL backend as well as most BAAS(Backend as a service) such as Airtable. In this article, we will be building a simple React CRUD application using Refine and Airtable, a famous backend service to illustrate how you can power your applications with Refine.
Why Use Refine?
Refine is an open-source front-end development framework based on React that allows developers to create and deploy web applications in record time and with unrivaled flexibility. By design, Refine decouples UI from frontend application logic to give developers complete styling and customization control.
Refine's can be used in the development of data-intensive applications such as admin panels and dashboards; as well as an option for building public-facing applications.
It can also connect to any REST or GraphQL backend service and includes support for NestJs CRUD, Airtable, Strapi, Supabase, and others out of the box and comes with powerful, enterprise-grade UI frameworks: Ant Design, Material UI, Chakra UI and Mantine which support any UI-Kit as well as custom(headless) design.
What is Airtable?
Airtable is a simple cloud database platform that uses spreadsheets to implement database features. It is a low-code application that offers a straightforward user interface for creating and sharing relational databases. It assists users in managing and displaying their data. It also includes an easy-to-use dashboard that allows users to effectively manage the databases they've created. We will be using Airtable to power our React CRUD application.
Setup Airtable
To use Airtable, we will have to sign up for Airtable. To sign up, visit here.
 Airtable sign-up screen
After signup, you will be redirected to the dashboard from where you can create a base
 Create Airtable base
On the dashboard, we will create a base. In Airtable, A base is like a singular database that can contain records. For this article, we will create a blog base that will accommodate blog posts for the application we will be building.
To create a base, click Add a base. On creating a base, we will create a table called posts which will hold the posts' data.
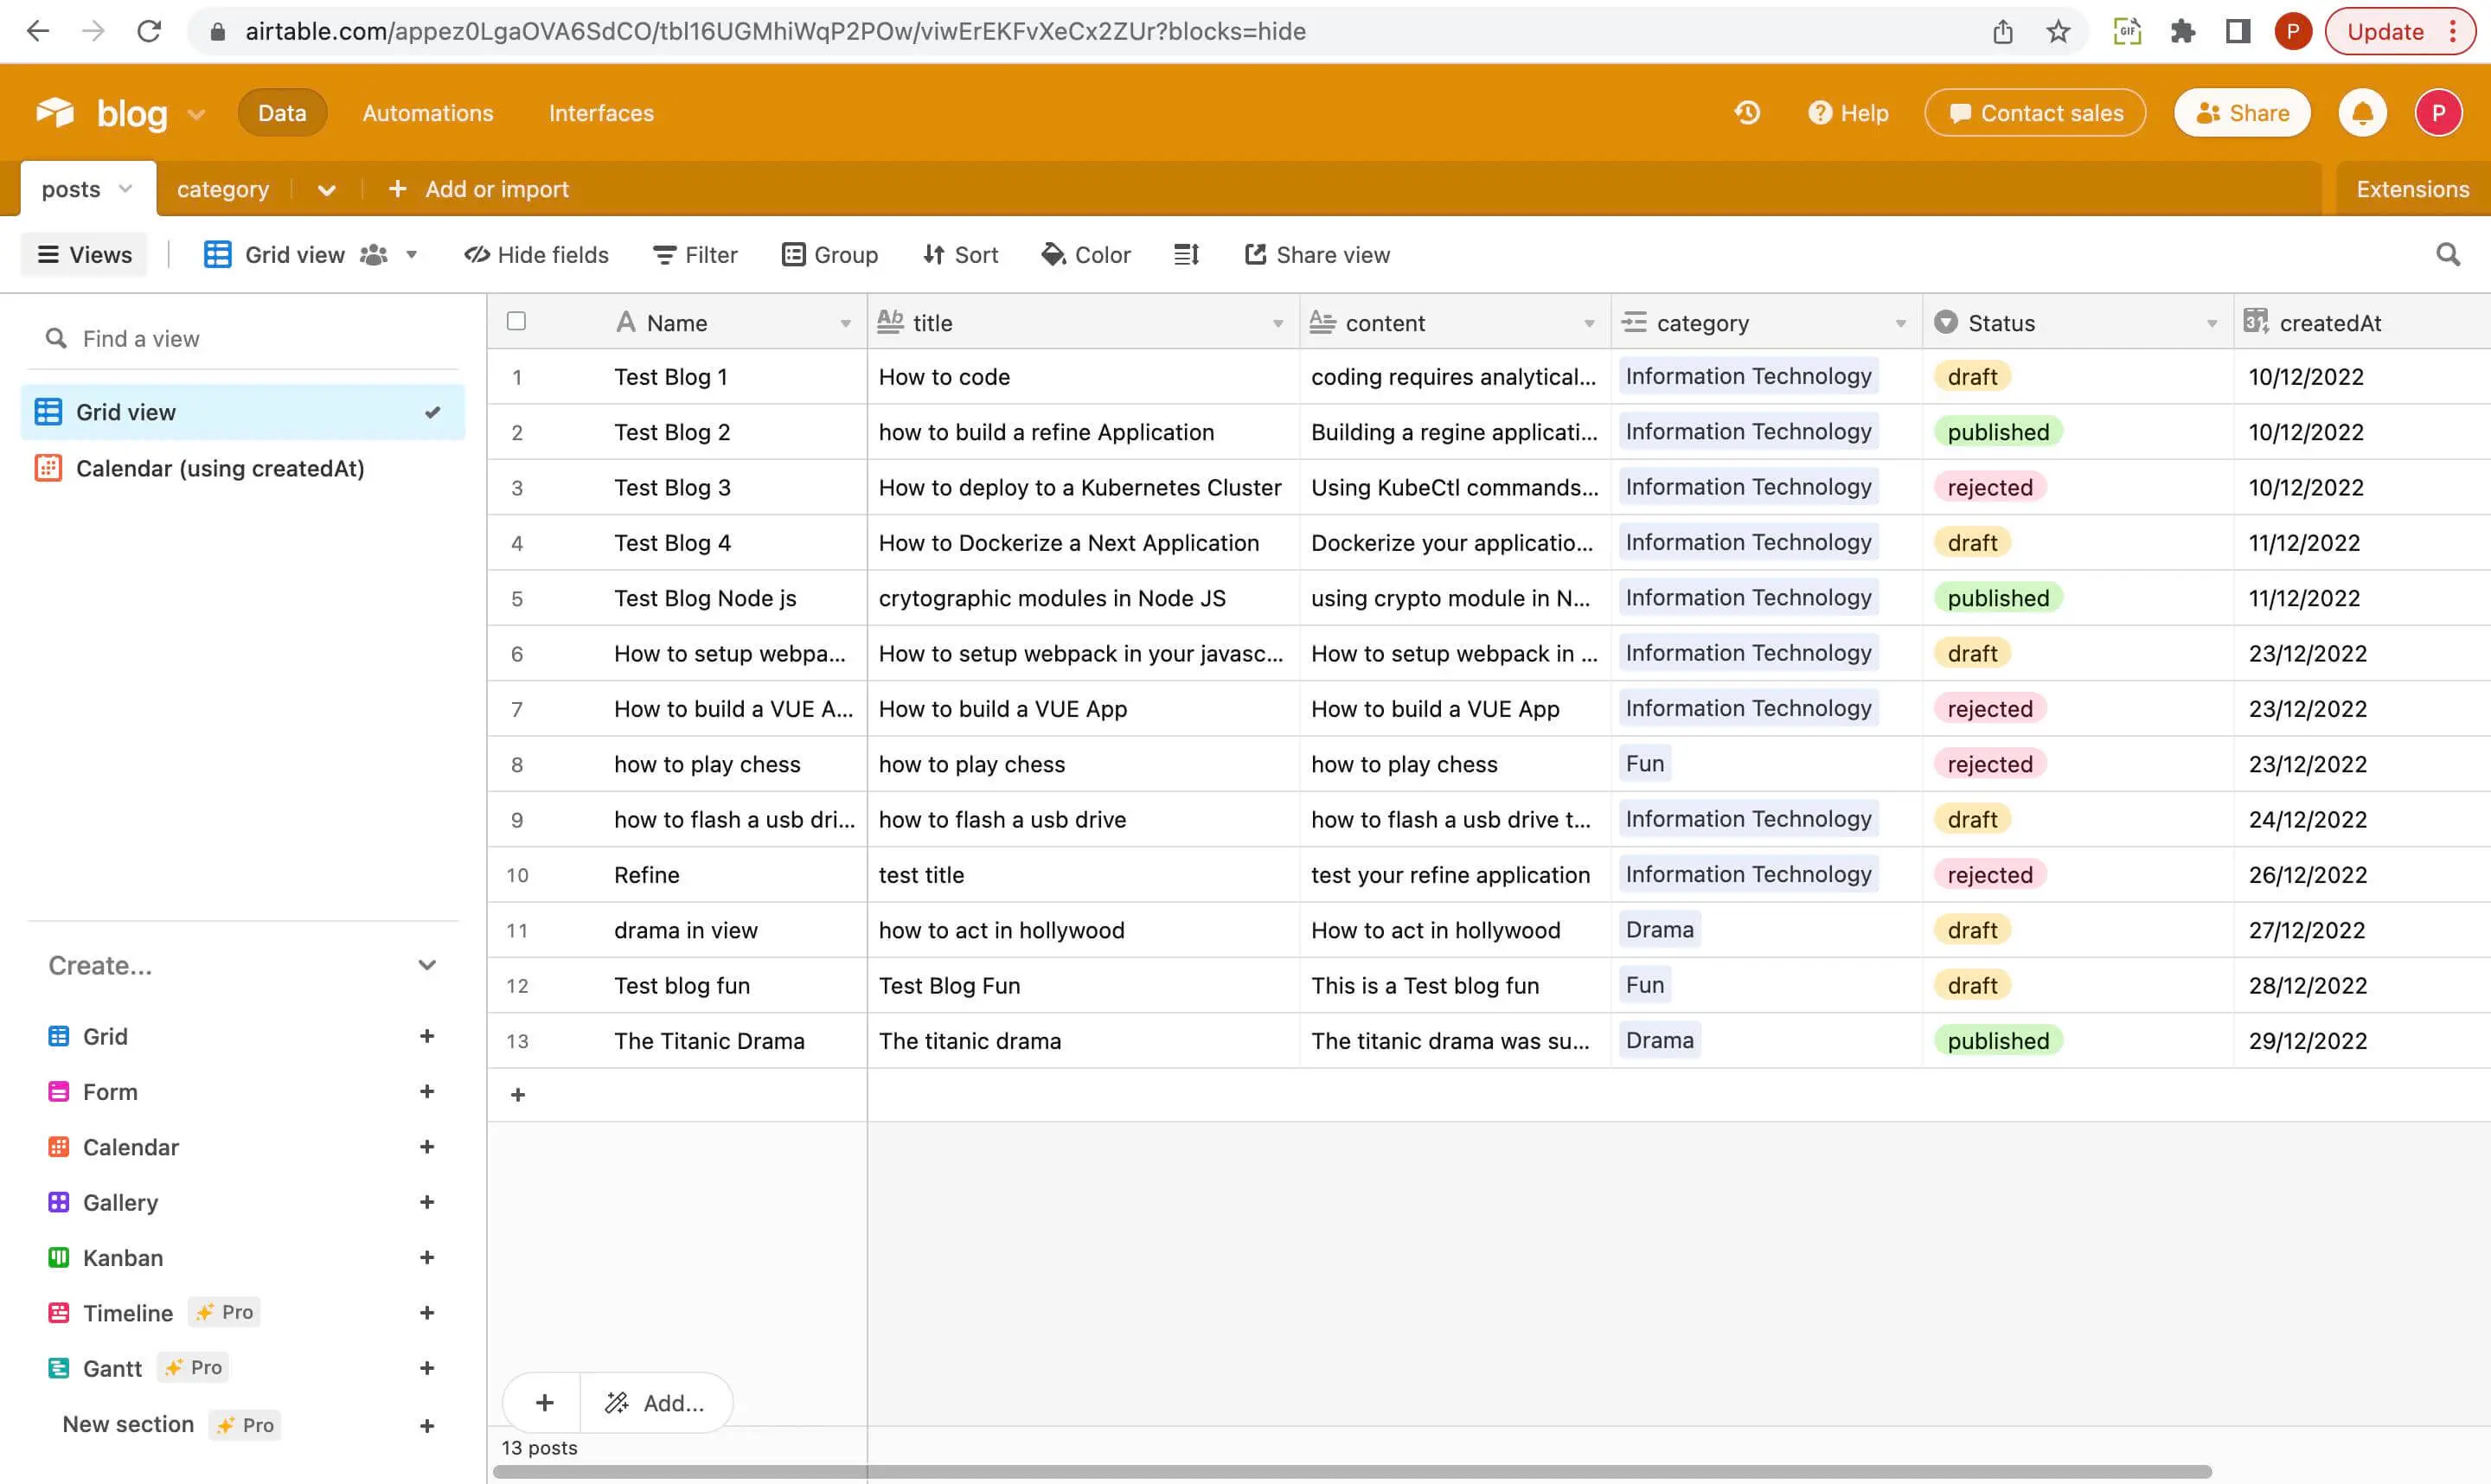 Create table in Airtable
We will create a table called categories which will hold the categories' data which we will link to the category field on the posts table.
 Create categories table
We will also populate the tables with contents.
Bootstrapping the Refine Application
For this article, we will be using the create refine-app. to create our Refine application. In other to use this, Run the following command below:
npm create refine-app@latest <name of your application>
After running the command, you will be directed to the CLI wizard. Select the following options to complete CLI wizard:
✔ Downloaded remote source successfully.
✔ Choose a project template · Refine(Vite)
✔ What would you like to name your project?: · refine-airtable
✔ Choose your backend service to connect: · Airtable
✔ Do you want to use a UI Framework?: · Headless
✔ Do you want to add example pages?: · no
✔ Do you need any Authentication logic?: · none
✔ Do you need i18n (Internationalization) support?: · no
✔ Choose a package manager: · npm
Refine is headless by design. This means that it does not come with a UI framework by default. However, it supports various UI frameworks such as Ant Design, Material UI, Chakra UI and Mantine For this article, we will be using headless structure to build our React CRUD app.
On selecting these options, the CLI will bootstrap a Refine application with the Airtable provider.
After installation, we will run the following command:
npm run dev
After running the command, the Refine application should be up and running. Visit http://localhost:5173 to access it.
 Refine app welcome screen
The
<Refine />component: This component is the entry point of a Refine app. This is where we add the configurations the application needs.DataProvider: A DataProvider in Refine is represented as a React context provider in the Refine core package which enables a Refine app to interact with an API. It also enables the application to easily consume various APIs and data services. A data provider sends HTTP requests and receives responses via predefined methods shown below.
import { Refine } from "@refinedev/core";
import dataProvider from "@refinedev/airtable";

const API_TOKEN = "your-airtable-api-token";
const BASE_ID = "your-airtable-base-id";

const App: React.FC = () => {
  return <Refine dataProvider={dataProvider(API_TOKEN, BASE_ID)} />;
};
Refer to the Data Provider documentation for more information. →
- resources: A Resource can be referred to as the building block of a Refine application. A resource connects the Data/API layer with the document/page Layer by acting as a bridge between them. A resource allows the pages of the application interact with the API.
In order to activate a resource, we have to pass the resources property to the <Refine /> component.
import { Refine } from "@refinedev/core";
import dataProvider from "@refinedev/airtable";

const API_TOKEN = "your-airtable-api-token";
const BASE_ID = "your-airtable-base-id";

const App: React.FC = () => {
  return (
    <Refine
      dataProvider={dataProvider(API_TOKEN, BASE_ID)}
      resources={[
        {
          name: "posts",
          list: "/list",
          create: "/create",
          edit: "/edit",
          show: "/show",
        },
      ]}
    />
  );
};

export default App;
the resources property accepts an array of objects with each object specifying the pages route name and the basic operations the pages under that route name can perform which are the list(displaying records from an API or service), create(add or creating a record to an API or service), edit(modifying an existing record from an API or service), show(display a specific record from an API or service) operations.
Refer to the resources documentation for more information. →
- Routing: We will use React Router v6 for routing in our application. Refine provides router bindings and utilities for React Router v6. It is built on top of the react-router-dom package. This package will provide easy integration between Refine and react-router-dom.
Refer to the React Router v6 documentation for more information. →
import { Refine } from "@refinedev/core";
import dataProvider from "@refinedev/simple-rest";
import routerProvider from "@refinedev/react-router";
import { BrowserRouter, Routes, Route } from "react-router-dom";

import { PostList, PostCreate } from "pages/posts";
import { CategoryList, CategoryShow } from "pages/categories";

const App = () => {
  return (
    <BrowserRouter>
      <Refine
        dataProvider={dataProvider}
        routerProvider={routerProvider}
        resources={[
          {
            name: "posts",
            list: "/posts",
            create: "/posts/create",
          },
          {
            name: "categories",
            list: "/categories",
            show: "/categories/show/:id",
          },
        ]}
      >
        <Routes>
          <Route path="posts">
            <Route index element={<PostList />} />
            <Route path="create" element={<PostCreate />} />
          </Route>
          <Route path="categories">
            <Route index element={<CategoryList />} />
            <Route path="show/:id" element={<CategoryShow />} />
          </Route>
        </Routes>
      </Refine>
    </BrowserRouter>
  );
};
After obtaining more insight on the constitutes of a Refine application, we will take a look at the App.tsx file created by the create refine-app
src/App.tsx
import { GitHubBanner, Refine, WelcomePage } from "@refinedev/core";
import { RefineKbar, RefineKbarProvider } from "@refinedev/kbar";

import dataProvider from "@refinedev/airtable";
import routerProvider, {
  DocumentTitleHandler,
  UnsavedChangesNotifier,
} from "@refinedev/react-router";
import { BrowserRouter, Route, Routes } from "react-router-dom";
import "./App.css";

function App() {
  const API_TOKEN = "keyI18pnBeEMfPAIb";
  const BASE_ID = "appKYl1H4k9g73sBT";

  return (
    <BrowserRouter>
      <GitHubBanner />
      <RefineKbarProvider>
        <Refine
          dataProvider={dataProvider(API_TOKEN, BASE_ID)}
          routerProvider={routerProvider}
          options={{
            syncWithLocation: true,
            warnWhenUnsavedChanges: true,
          }}
        >
          <Routes>
            <Route index element={<WelcomePage />} />
          </Routes>
          <RefineKbar />
          <UnsavedChangesNotifier />
          <DocumentTitleHandler />
        </Refine>
      </RefineKbarProvider>
    </BrowserRouter>
  );
}

export default App;
In the file above, we can see that refine CLI installed the airtable data provider. To connect to our Airtable base, we will provide the API_TOKEN and BASE_ID credentials. These credentials can be found on our airtable account page and the base documentation page.
After installation, we will set up TailwindCSS as our CSS library for this application. Since we are not using any UI framework (as we are going with the headless approach), we will use tailwind for styling. To simply add tailwind CSS to your Refine application, you can visit the guide here.
Implementing CRUD operations
We will implement the basic CRUD operations like create, list, delete and retrieve post records from Airtable but first, we will create the pages where these operations will be implemented. So our React CRUD app will have the following sections:
Creating pages for CRUD operations
To begin with, create a page/post folder inside the src folder and add a PostCreate.tsx, PostList.tsx, PostShow.tsx and PostEdit.tsx files.
To prevent Typescript from throwing an error, you can add a placeholder code in each file like so:
import React from "react";

export const PostList: React.FC = () => {
  return <div>PostList</div>;
};
Folder structure looks like this:
 Project folder structure
In the App.tsx file, we are going to include the "posts" resource and set up a route for it.
After that, create components/Layout.tsx file and add the following code:
src/components/Layout.tsx
import { useMenu, useNavigation, LayoutProps } from "@refinedev/core";
import routerProvider from "@refinedev/react-router-v6/legacy";

const { Link } = routerProvider;

export const Layout: React.FC<LayoutProps> = ({ children }) => {
  const { menuItems } = useMenu();
  const { push } = useNavigation();

  return (
    <div className="flex min-h-screen flex-col border py-4 pr-4 md:flex-row">
      <div className="mb-2 border-b py-2 md:w-2/12">
        <div className="container mx-auto">
          <div className="flex flex-col items-center gap-2">
            <Link to="/">
              <img
                className="w-32"
                src="https://refine.dev/img/refine_logo.png"
                alt="Refine logo"
              />
            </Link>

            <ul>
              {menuItems.map(({ name, label, icon, route }) => (
                <li key={name} className="float-left">
                  <a
                    className="flex cursor-pointer flex-col items-center gap-1 rounded-sm px-2 py-1 capitalize decoration-indigo-500 decoration-2 underline-offset-1 transition duration-300 ease-in-out hover:underline"
                    onClick={() => push(route || "")}
                  >
                    {icon}
                    <span>{label ?? name}</span>
                  </a>
                </li>
              ))}
            </ul>
          </div>
        </div>
      </div>

      <div className="overflow-auto bg-white md:w-10/12">{children}</div>
    </div>
  );
};
Now, we need to import created <Layout /> and page components to App.tsx file.
You can simply copy and paste the code below into the App.tsx file:
src/App.tsx
import { Refine, ErrorComponent } from "@refinedev/core";
import dataProvider from "@refinedev/airtable";
import routerProvider, {
  DocumentTitleHandler,
  NavigateToResource,
  UnsavedChangesNotifier,
} from "@refinedev/react-router";
import { BrowserRouter, Routes, Route, Outlet } from "react-router-dom";

import { PostList } from "./pages/post/list";
import { PostShow } from "./pages/post/show";
import { PostCreate } from "./pages/post/create";
import { PostEdit } from "./pages/post/edit";

import "./App.css";

function App() {
  const API_TOKEN = "key0uWArSH56JHNJV";
  const BASE_ID = "appez0LgaOVA6SdCO";

  return (
    <BrowserRouter>
      <Refine
        dataProvider={dataProvider(API_TOKEN, BASE_ID)}
        routerProvider={routerProvider}
        resources={[
          {
            name: "posts",
            list: "/posts",
            show: "/posts/show/:id",
            create: "/posts/create",
            edit: "/posts/edit/:id",
          },
        ]}
      >
        <Routes>
          <Route
            element={
              <Layout>
                <Outlet />
              </Layout>
            }
          >
            <Route index element={<NavigateToResource resource="posts" />} />
            <Route path="posts">
              <Route index element={<PostList />} />
              <Route path="show/:id" element={<PostShow />} />
              <Route path="create" element={<PostCreate />} />
              <Route path="edit/:id" element={<PostEdit />} />
            </Route>
            <Route path="*" element={<ErrorComponent />} />
          </Route>
        </Routes>
        <UnsavedChangesNotifier />
        <DocumentTitleHandler />
      </Refine>
    </BrowserRouter>
  );
}

export default App;
When you navigate to /posts route, you can see our placeholder page. We will build page components that will retrieve posts, view a post and create a post and present them in a table format and pass these components to our resource as list props.
Listing posts records
First and foremost, To list our records, we will install the @refinedev/react-table to use the useTable() hook to display all posts records in a table format. To install the table, run the following command:
npm i @refinedev/react-table @tanstack/react-table
Next, we will define an interface for the fetched data from our Airtable Base. to do this, we will create a new folder called interfaces under the src folder in the root directory of our application. Then we will create a post.d.ts file and add the code below:
export interface IPost {
  id: string;
  name: string;
  title: string;
  content: string;
  category: string;
  Status: "published" | "draft" | "rejected";
  createdAt: string;
}
As shown above, we added the id, name, title, content, category, status, and createdAt fields to the interface as these fields are present on our Airtable base.
Next, we update the list.tsx file under the pages/post folder with the following code:
src/pages/post/list.tsx
import React from "react";
import { useTable } from "@refinedev/react-table";
import { ColumnDef, flexRender } from "@tanstack/react-table";
import { IPost } from "../../interfaces/post";
import { useNavigation, useDelete } from "@refinedev/core";

export const PostList: React.FC = () => {
  const { show, edit, create } = useNavigation();
  const { mutate } = useDelete();

  const columns = React.useMemo<ColumnDef<IPost>[]>(
    () => [
      {
        id: "id",
        header: "ID",
        accessorKey: "id",
      },
      {
        id: "Name",
        header: "Name",
        accessorKey: "Name",
      },
      {
        id: "category",
        header: "Category",
        accessorKey: "category",
      },
      {
        id: "status",
        header: "Status",
        accessorKey: "Status",
      },
      {
        id: "action",
        header: "Action",
        accessorKey: "id",
        cell: function render({ getValue }) {
          return (
            <>
              <button
                className="rounded border border-gray-200 p-2 text-xs font-medium leading-tight transition duration-150 ease-in-out hover:bg-indigo-500 hover:text-white"
                onClick={() => show("posts", getValue() as number)}
              >
                View
              </button>
              <button
                className="rounded border border-gray-200 p-2 text-xs font-medium leading-tight transition duration-150 ease-in-out hover:bg-indigo-500 hover:text-white"
                onClick={() => edit("posts", getValue() as number)}
              >
                Edit
              </button>

              <button
                className="rounded border border-gray-200 p-2 text-xs font-medium leading-tight transition duration-150 ease-in-out hover:bg-red-500 hover:text-white"
                onClick={() =>
                  mutate({
                    id: getValue() as number,
                    resource: "posts",
                  })
                }
              >
                Delete
              </button>
            </>
          );
        },
      },
    ],
    [],
  );

  const {
    reactTable: { getHeaderGroups, getRowModel },
  } = useTable<IPost>({
    columns,
  });

  return (
    <div className="container mx-auto pb-4">
      <table className="min-w-full table-fixed divide-y divide-gray-200 border">
        <thead className="bg-gray-100">
          {getHeaderGroups().map((headerGroup) => (
            <tr key={headerGroup.id}>
              {headerGroup.headers.map((header) => (
                <th
                  key={header.id}
                  colSpan={header.colSpan}
                  className="px-6 py-3 text-left text-xs font-medium uppercase tracking-wider text-gray-700 "
                >
                  {flexRender(
                    header.column.columnDef.header,
                    header.getContext(),
                  )}
                </th>
              ))}
            </tr>
          ))}
        </thead>
        <tbody className="divide-y divide-gray-200 bg-white">
          {getRowModel().rows.map((row) => {
            return (
              <tr key={row.id} className="transition hover:bg-gray-100">
                {row.getVisibleCells().map((cell) => {
                  return (
                    <td
                      key={cell.id}
                      className="whitespace-nowrap px-6 py-2 text-sm font-medium text-gray-900"
                    >
                      {flexRender(
                        cell.column.columnDef.cell,
                        cell.getContext(),
                      )}
                    </td>
                  );
                })}
              </tr>
            );
          })}
        </tbody>
      </table>
    </div>
  );
};
In the code above, we use the useTable() hook from the @refinedev/react-table package to fetch records from our Airtable base. It allows us to fetch data according to the sorter, filter, and pagination states.
We also use the useNavigation() hook to navigate to the show, edit, and create pages of the posts resource.
Handling relationships
Remember the records from our posts base on Airtable has a category field, we will map the category fields to their corresponding titles on the category base we created on airtable. But first, we will add a category type to the post.d.ts file under interfaces under the src folder in the root directory of our application.
// ...

export interface ICategory {
  id: string;
  name: string;
  posts: string;
}
Next, we need to map records from different the category field to the category base on Airtable. For this, we're going to use the useMany() Refine hook.
The useMany() hook is a variant of the react-query's useQuery() hook. it is used to obtain multiple items from a resource.
To get more information about this hook, view its documentation here.
Update the <PostList /> component with the highlighted code below:
src/pages/post/list.tsx
import React from "react";
import { useTable } from "@refinedev/react-table";
import { ColumnDef, flexRender } from "@tanstack/react-table";
import { ICategory, IPost } from "../../interfaces/post";
import {
  useNavigation,
  useDelete,
  useMany,
  GetManyResponse,
} from "@refinedev/core";

import "./App.css";

export const PostList: React.FC = () => {
  /* code from previous block */

  const columns = React.useMemo<ColumnDef<IPost>[]>(
    () => [
      /* code from previous block */
      {
        id: "category",
        header: "Category",
        accessorKey: "category",
        cell: function render({ getValue, table }) {
          const meta = table.options.meta as {
            categoriesData: GetManyResponse<ICategory>;
          };
          const singleValue: string[] | any = getValue();
          const category = meta.categoriesData?.data?.find(
            (item) => item.id === singleValue[0],
          );
          return category?.name ?? "Loading...";
        },
      },
      /* code from previous block */
    ],
    [],
  );

  const {
    reactTable: { getHeaderGroups, getRowModel },
    setOptions,
    refineCore: { result },
  } = useTable<IPost>({ columns });

  const categoryIds = result?.data?.map((item) => item.category?.[0]) ?? [];

  const { result: categoriesData } = useMany<ICategory>({
    resource: "category",
    ids: categoryIds,
    queryOptions: {
      enabled: categoryIds.length > 0,
    },
  });

  setOptions((prev) => ({
    ...prev,
    meta: {
      ...prev.meta,
      categoriesData,
    },
  }));

  return (
    <div className="mx-auto pb-4">
      <div className="mb-3 mt-1 flex items-center justify-end">
        <button
          className="flex items-center justify-between gap-1 rounded border border-gray-200 bg-indigo-500 p-2 text-xs font-medium leading-tight text-white transition duration-150 ease-in-out hover:bg-indigo-600"
          onClick={() => create("posts")}
        >
          <span>Create Post</span>
        </button>
      </div>
      <table className="min-w-full table-fixed divide-y divide-gray-200 border">
        <thead className="bg-gray-100">
          {getHeaderGroups().map((headerGroup, idx) => (
            <tr key={idx}>
              {headerGroup.headers.map((header, idx) => (
                <th
                  key={idx}
                  colSpan={header.colSpan}
                  className="px-6 py-3 text-left text-xs font-medium uppercase tracking-wider text-gray-700 "
                >
                  {flexRender(
                    header.column.columnDef.header,
                    header.getContext(),
                  )}
                </th>
              ))}
            </tr>
          ))}
        </thead>
        <tbody className="divide-y divide-gray-200 bg-white">
          {getRowModel().rows.map((row, idx) => {
            return (
              <tr key={idx} className="transition hover:bg-gray-100">
                {row.getVisibleCells().map((cell, idx) => {
                  return (
                    <td
                      key={idx}
                      className="whitespace-nowrap px-6 py-2 text-sm font-medium text-gray-900"
                    >
                      {flexRender(
                        cell.column.columnDef.cell,
                        cell.getContext(),
                      )}
                    </td>
                  );
                })}
              </tr>
            );
          })}
        </tbody>
      </table>
    </div>
  );
};
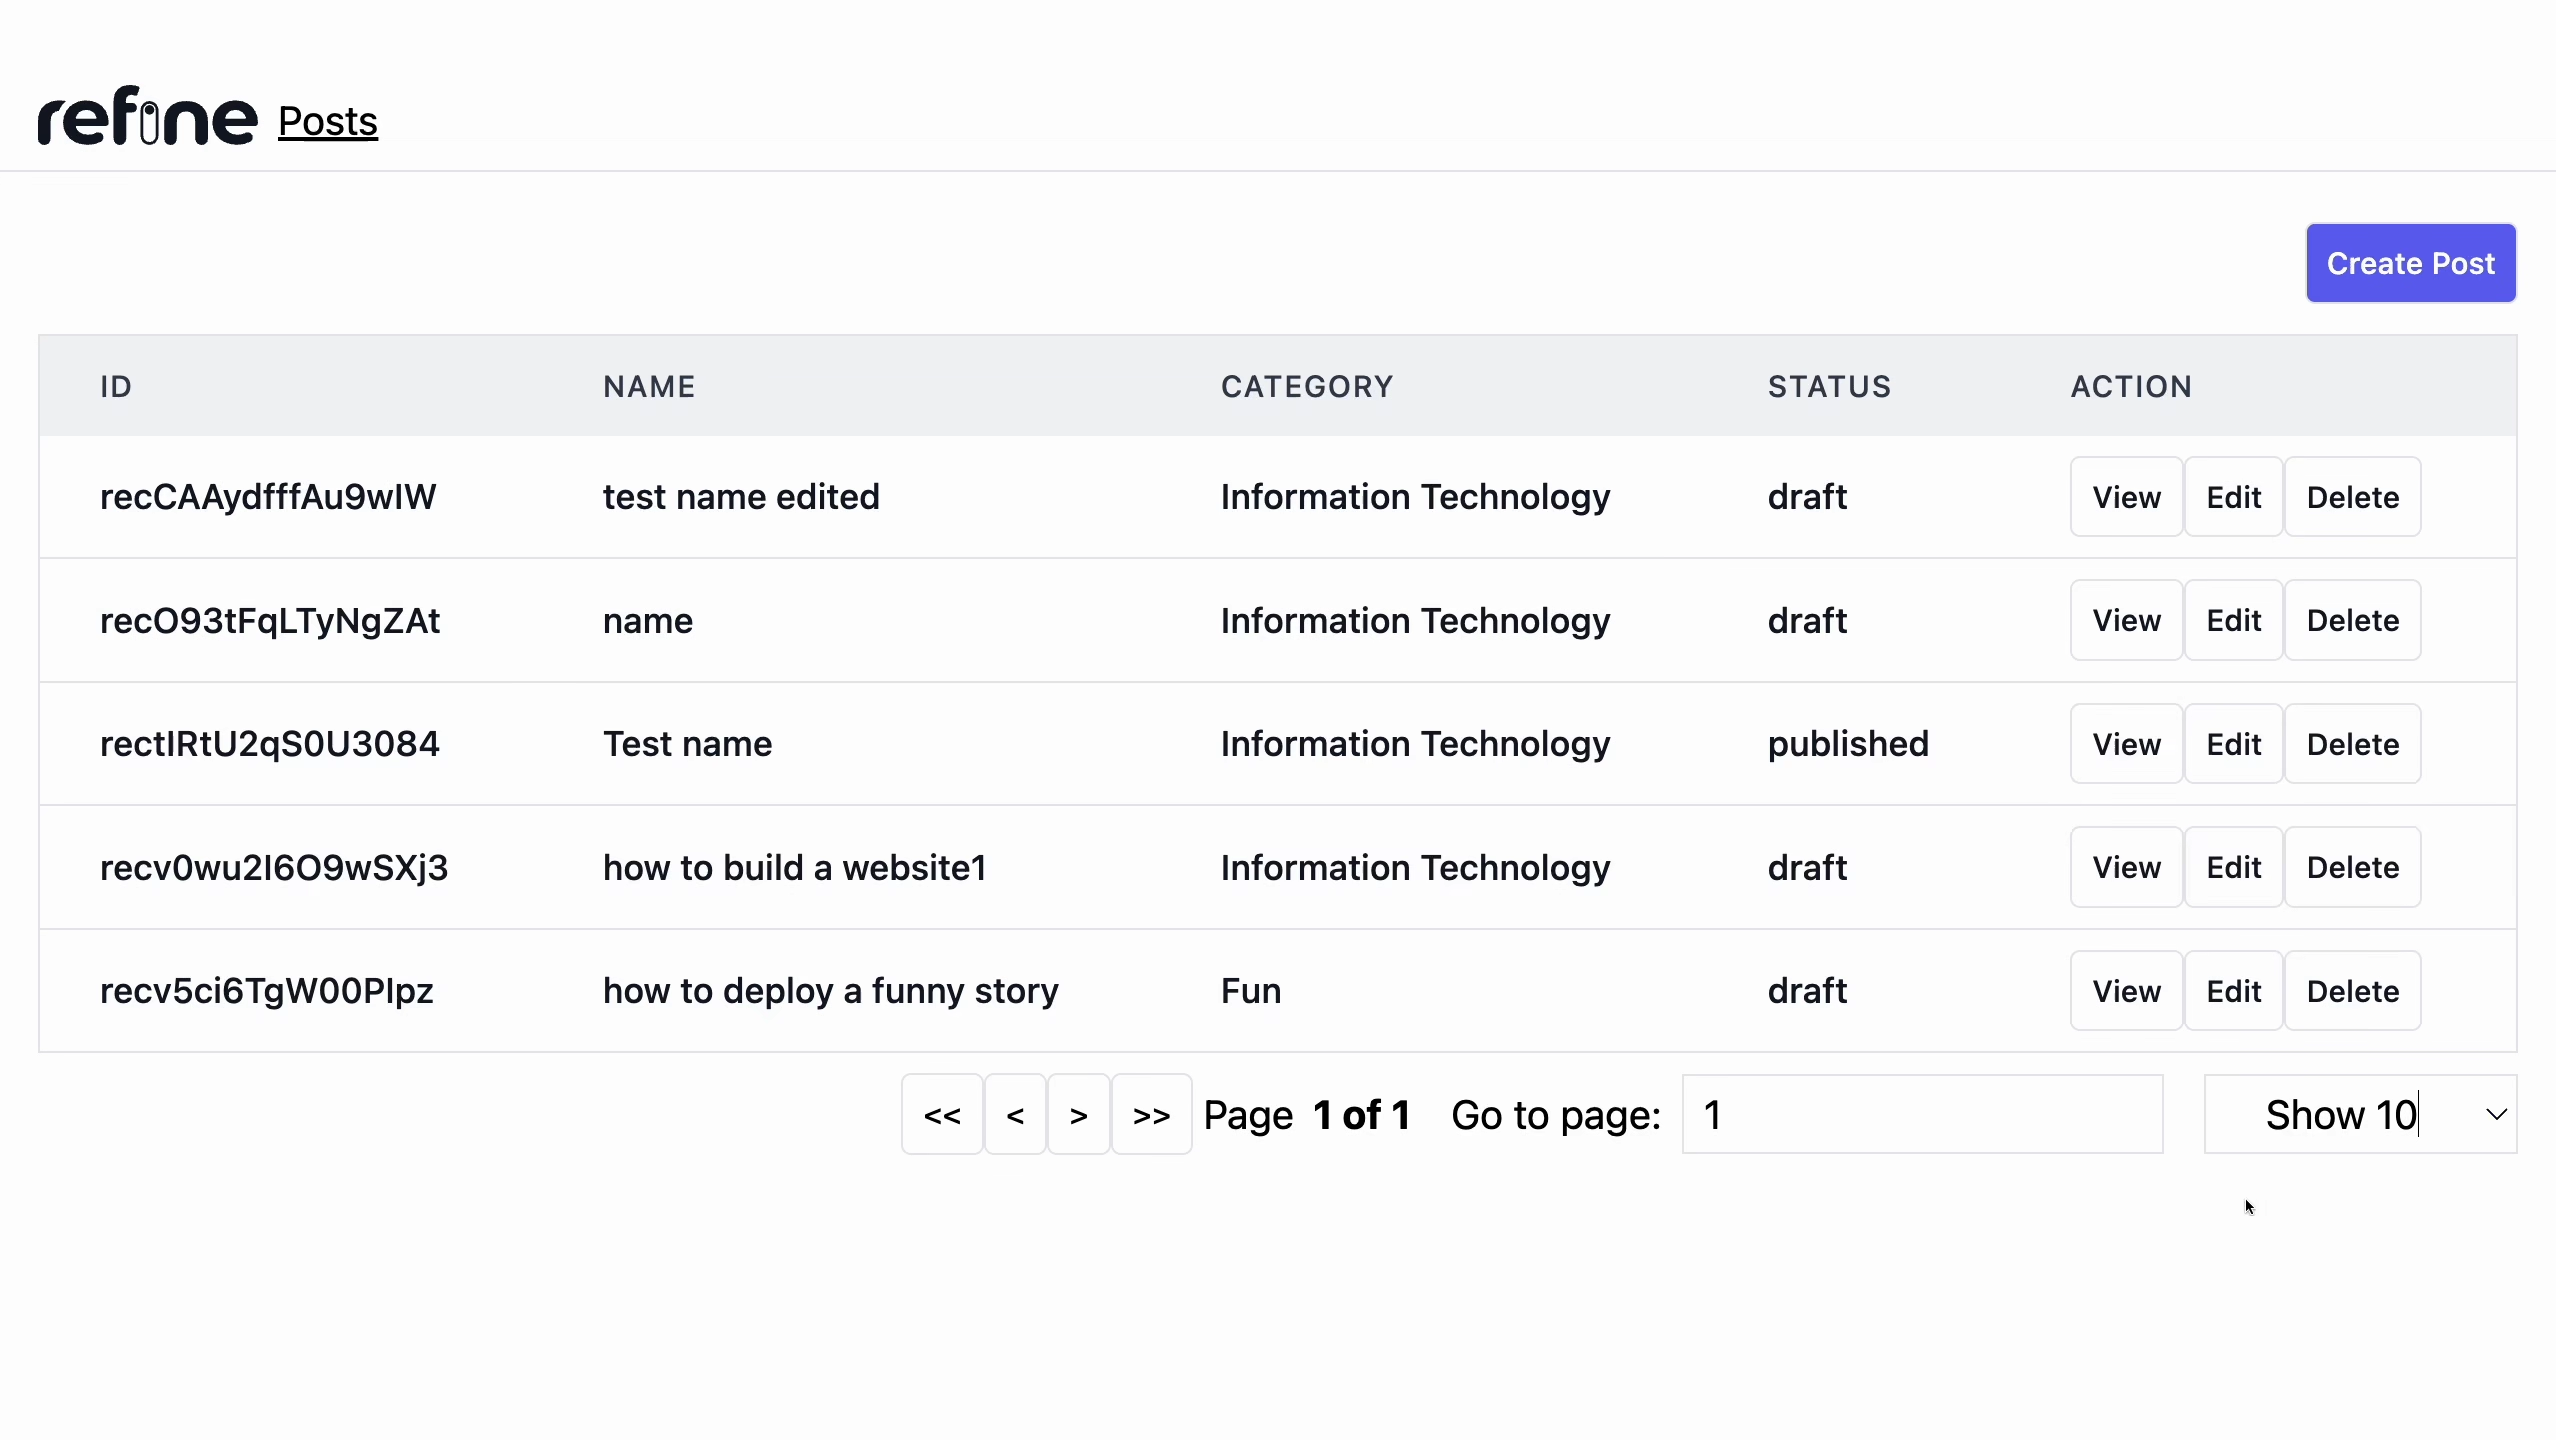
In the code above, The useMany() hook fetches records from the category base using the category field present on the posts table. this ensures that all the category fields are properly mapped to their respective records on the category base.
We also update the category row on the table to display the category record assigned to a category field from the mapping.
 Handling relationships view
Viewing a single post record
For viewing a record in our React CRUD app, we will use the useShow() hook which is present in the @refinedev/core package.
We will add a show.tsx file In the post under the pages folder.
Next, with the following code:
src/pages/post/show.tsx
import { useSelect, useShow } from "@refinedev/core";
import { IPost } from "../../interfaces/post";

export const PostShow: React.FC = () => {
  const { result } = useShow<IPost>();

  const { options } = useSelect({
    resource: "category",
    defaultValue: result?.category?.[0],
    optionLabel: "name",
    optionValue: "id",
  });

  return (
    <div className="container mx-auto">
      <div className="my-6">
        <label className="mb-2 block text-sm font-medium">Id</label>
        <input
          value={record?.id}
          disabled
          className="block w-full rounded-lg border border-gray-300 bg-gray-50 p-2.5 text-sm"
        />
      </div>
      <div className="mb-6">
        <label className="mb-2 block text-sm font-medium">Name</label>
        <input
          value={record?.title}
          disabled
          className="block w-full rounded-lg border border-gray-300 bg-gray-50 p-2.5 text-sm"
        />
      </div>
      <div className="mb-6">
        <label className="mb-2 block text-sm font-medium">Title</label>
        <input
          value={record?.title}
          disabled
          className="block w-full rounded-lg border border-gray-300 bg-gray-50 p-2.5 text-sm"
        />
      </div>

      <div className="mb-6">
        <label className="mb-2 block text-sm font-medium">Content</label>
        <textarea
          disabled
          value={record?.content}
          id="content"
          className="block w-full rounded-lg border border-gray-300 bg-gray-50 p-2.5 text-sm "
          placeholder="Content"
          rows={10}
        />
      </div>

      <div className="mb-6">
        <label className="mb-2 block text-sm font-medium">Category</label>
        <input
          value={
            options?.find((curr) => curr?.value === record?.category[0])
              ?.label || record?.category
          }
          disabled
          className="block w-full rounded-lg border border-gray-300 bg-gray-50 p-2.5 text-sm"
        />
      </div>

      <div className="mb-6">
        <label className="mb-2 block text-sm font-medium">Status</label>
        <input
          value={record?.Status}
          disabled
          className="block w-full rounded-lg border border-gray-300 bg-gray-50 p-2.5 text-sm"
        />
      </div>

      <div className="mb-6">
        <label className="mb-2 block text-sm font-medium">Created At</label>
        <input
          type={"date"}
          value={record?.createdAt}
          disabled
          className="block w-full rounded-lg border border-gray-300 bg-gray-50 p-2.5 text-sm"
        />
      </div>
    </div>
  );
};
In the code above, we used the useShow() hook to obtain a record. The useShow() hook enables you to retrieve the desired record. It uses the getOne method as the query function from the dataProvider passed to <Refine />. More information about the useShow() hook can be obtained here.
We also used the useSelect() hook to map the category fields on the record to the category base in order to get the category value and label from the base.
const { options } = useSelect({
  resource: "category",
  defaultValue: query?.data?.data?.category?.[0],
  optionLabel: "name",
  optionValue: "id",
});
The hook accepts an object with properties resource which directs the hook to the base containing the records, defaultValue which specifies a default value for the options, optionLabel, which specifies the field on the base that will be mapped to the label and optionValue, which specifies the field on the base that will be mapped to the value.
To get more information on the useSelect() hook, take a look at the documentation here.
We'll add a View button to each row, so we'll need to update our <PostList /> component to include one for each record. update the <PostList /> component with the code below:
import React from "react";
import { useTable, ColumnDef, flexRender } from "@refinedev/react-table";
import { IPost } from "../../interfaces/post";
import { useNavigation, useDelete } from "@refinedev/core";


export const PostList: React.FC = () => {
 const { ... ,edit} = useNavigation();
 const { mutate } = useDelete();

 const columns = React.useMemo<ColumnDef<IPost>[]>(
   () => [
      ...

     {
       id: "action",
       header: "Action",
       accessorKey: "id",
       cell: function render({ getValue }) {
         return (
           <button
             className="rounded border border-gray-200 p-2 text-xs font-medium leading-tight transition duration-150 ease-in-out hover:bg-indigo-500 hover:text-white"
             onClick={() =>
               show("posts", getValue() as number)
             }
           >
             View
           </button>
         );
       },
     },
   [],
 );

 return (
    ...
   );
};
 Single post detail view
Creating post record
To create a record, we will install the @refinedev/react-hook-form to use the useForm() hook that comes with form validation out of the box and handles our form submission request to Airtable.
npm i @refinedev/react-hook-form
Next, In the post under the pages folder we will add a create.tsx file with the following code:
src/pages/post/create.tsx
import { useSelect } from "@refinedev/core";
import { useForm } from "@refinedev/react-hook-form";
import React from "react";

export const PostCreate: React.FC = () => {
  const {
    refineCore: { onFinish, formLoading, query },
    register,
    handleSubmit,
    formState: { errors },
  } = useForm();

  const { options } = useSelect({
    resource: "category",
    defaultValue: query?.data?.data?.category?.[0],
    optionLabel: "name",
    optionValue: "id",
  });

  const handleSubmitHandler = (data: any) => {
    onFinish({ ...data, category: [data.category] });
  };

  return (
    <div className="container mx-auto">
      <br />
      <form onSubmit={handleSubmit(handleSubmitHandler)}>
        <div className="mb-6">
          <label htmlFor="Name" className="mb-2 block text-sm font-medium">
            Name
          </label>
          <input
            {...register("Name", { required: true })}
            type="text"
            id="Name"
            className="block w-full rounded-lg border border-gray-300 bg-gray-50 p-2.5 text-sm"
            placeholder="Name"
          />
          {errors.title && (
            <p className="mt-1 text-sm text-red-600">
              <span className="font-medium">Oops!</span> This field is required
            </p>
          )}
        </div>

        <div className="mb-6">
          <label htmlFor="title" className="mb-2 block text-sm font-medium">
            Title
          </label>
          <input
            {...register("title", { required: true })}
            type="text"
            id="title"
            className="block w-full rounded-lg border border-gray-300 bg-gray-50 p-2.5 text-sm "
            placeholder="Title"
          />
          {errors.title && (
            <p className="mt-1 text-sm text-red-600">
              <span className="font-medium">Oops!</span> This field is required
            </p>
          )}
        </div>

        <div className="mb-6">
          <label htmlFor="content" className="mb-2 block text-sm font-medium">
            Content
          </label>
          <textarea
            {...register("content", { required: true })}
            id="content"
            className="block w-full rounded-lg border border-gray-300 bg-gray-50 p-2.5 text-sm "
            placeholder="Content"
            rows={10}
          />
          {errors.content && (
            <p className="mt-1 text-sm text-red-600">
              <span className="font-medium">Oops!</span> This field is required
            </p>
          )}
        </div>

        <div className="mb-6">
          <label htmlFor="category" className="mb-2 block text-sm font-medium">
            Category
          </label>

          <select
            defaultValue={""}
            {...register("category", { required: true })}
            className="block w-full rounded-lg border border-gray-300 bg-gray-50 p-2.5 text-sm"
          >
            <option value={""} disabled>
              Please select
            </option>

            {options?.map((category) => (
              <option key={category.value} value={category.value}>
                {category.label}
              </option>
            ))}
          </select>

          {errors.category && (
            <p className="mt-1 text-sm text-red-600">
              <span className="font-medium">Oops!</span> This field is required
            </p>
          )}
        </div>

        <div className="mb-6">
          <label htmlFor="status" className="mb-2 block text-sm font-medium">
            Status
          </label>
          <select
            {...register("Status")}
            className="block w-full rounded-lg border border-gray-300 bg-gray-50 p-2.5 text-sm"
          >
            <option value="published">published</option>
            <option value="draft">draft</option>
            <option value="rejected">rejected</option>
          </select>
        </div>

        <button
          type="submit"
          className="flex w-full items-center rounded-lg bg-indigo-500 px-5 py-2.5 text-center text-sm font-medium text-white hover:bg-indigo-600 sm:w-auto"
        >
          {formLoading ? "loading..." : <span>Save</span>}
        </button>
      </form>
    </div>
  );
};
In the code above, we used the useForm() hook to create records. This hook comes from the @refinedev/react-hook-form which is inherently a Refine adapter of the React Hook Form library. In a nutshell, this library allows you to use the React Hook Form library with refine. More information about the useForm() hook can be obtained here.
We use methods provided by the useForm() hook like register() to validate the new post we will add into airtable. The hooks also provide methods like handleSubmit() and onFinish() methods which handle the submission of the contents from the form to Airtable.
We'll also add a create post button to the <PostList /> component. Update the <PostList /> component with the code below:
import React from "react";
import { useTable, ColumnDef, flexRender } from "@refinedev/react-table";
import { IPost } from "../../interfaces/post";
import { useNavigation, useDelete } from "@refinedev/core";


export const PostList: React.FC = () => {
 const { ... , create } = useNavigation();

 return (
   <div className="container mx-auto pb-4">
     <div className="mb-3 mt-1 flex items-center justify-end">
       <button
         className="flex items-center justify-between gap-1 rounded border border-gray-200 bg-indigo-500 p-2 text-xs font-medium leading-tight text-white transition duration-150 ease-in-out hover:bg-indigo-600"
         onClick={() => create("posts")}
       >
         <span>Create Post</span>
       </button>
     </div>

     ...
   </div>
 );
};
 Create post flow
Editing post record
For editing a record, we will add an edit.tsx file In the post under the pages folder
Next, with the following code:
src/pages/post/edit.tsx
import { useSelect } from "@refinedev/core";
import { useForm } from "@refinedev/react-hook-form";
import React, { useEffect } from "react";

export const PostEdit: React.FC = () => {
  const {
    refineCore: { onFinish, formLoading, query },
    register,
    handleSubmit,
    resetField,
    formState: { errors },
  } = useForm();

  const { options } = useSelect({
    resource: "category",
    defaultValue: query?.data?.data?.category?.id,
    optionLabel: "name",
    optionValue: "id",
  });

  useEffect(() => {
    resetField("category.id");
  }, [options, resetField]);

  const handleSubmitHandler = (data: any) => {
    onFinish({ ...data, category: [data.category] });
  };

  return (
    <div className="container mx-auto">
      <br />
      <form onSubmit={handleSubmit(handleSubmitHandler)}>
        <div className="mb-6">
          <label htmlFor="Name" className="mb-2 block text-sm font-medium">
            Name
          </label>
          <input
            {...register("Name", { required: true })}
            type="text"
            id="Name"
            className="block w-full rounded-lg border border-gray-300 bg-gray-50 p-2.5 text-sm"
            placeholder="Name"
          />
          {errors.title && (
            <p className="mt-1 text-sm text-red-600">
              <span className="font-medium">Oops!</span> This field is required
            </p>
          )}
        </div>

        <div className="mb-6">
          <label htmlFor="title" className="mb-2 block text-sm font-medium">
            Title
          </label>
          <input
            {...register("title", { required: true })}
            type="text"
            id="title"
            className="block w-full rounded-lg border border-gray-300 bg-gray-50 p-2.5 text-sm "
            placeholder="Title"
          />
          {errors.title && (
            <p className="mt-1 text-sm text-red-600">
              <span className="font-medium">Oops!</span> This field is required
            </p>
          )}
        </div>

        <div className="mb-6">
          <label htmlFor="content" className="mb-2 block text-sm font-medium">
            Content
          </label>
          <textarea
            {...register("content", { required: true })}
            id="content"
            className="block w-full rounded-lg border border-gray-300 bg-gray-50 p-2.5 text-sm "
            placeholder="Content"
            rows={10}
          />
          {errors.content && (
            <p className="mt-1 text-sm text-red-600">
              <span className="font-medium">Oops!</span> This field is required
            </p>
          )}
        </div>

        <div className="mb-6">
          <label htmlFor="category" className="mb-2 block text-sm font-medium">
            Category
          </label>

          <select
            defaultValue={""}
            {...register("category", { required: true })}
            className="block w-full rounded-lg border border-gray-300 bg-gray-50 p-2.5 text-sm"
          >
            <option value={""} disabled>
              Please select
            </option>
            <option value="Information Technology">
              Information Technology
            </option>
            <option value="Fun">Fun</option>
            <option value="Drama">Drama</option>
          </select>

          {errors.category && (
            <p className="mt-1 text-sm text-red-600">
              <span className="font-medium">Oops!</span> This field is required
            </p>
          )}
        </div>

        <div className="mb-6">
          <label htmlFor="status" className="mb-2 block text-sm font-medium">
            Status
          </label>
          <select
            defaultValue={""}
            {...register("category", { required: true })}
            className="block w-full rounded-lg border border-gray-300 bg-gray-50 p-2.5 text-sm"
          >
            <option value={""} disabled>
              Please select
            </option>

            {options?.map((category) => (
              <option key={category.value} value={category.value}>
                {category.label}
              </option>
            ))}
          </select>
        </div>

        <button
          type="submit"
          className="flex w-full items-center rounded-lg bg-indigo-500 px-5 py-2.5 text-center text-sm font-medium text-white hover:bg-indigo-600 sm:w-auto"
        >
          {formLoading ? "loading..." : <span>Save</span>}
        </button>
      </form>
    </div>
  );
};
Similar to that of the <PostEdit /> component, we use methods provided by the useForm() hook like register() to validate the new post we will be adding into airtable.
Additionally, we created a function onSubmit() which modifies the category data before passing it to the onFinish() function. This is because, when editing the category field, we will pass the modified category as an array of strings to airtable because of the link/relationship of the field to the category base on Airtable.
After this, we then add the onSubmit() function as a parameter to the handleSubmit() method which then handle the update of the contents from the form to Airtable.
We'll add an Edit button to each row, so we'll need to update our <PostList /> component to include one for each record. update the <PostList /> component with the code below:
import React from "react";
import { useTable, ColumnDef, flexRender } from "@refinedev/react-table";
import { IPost } from "../../interfaces/post";
import { useNavigation, useDelete } from "@refinedev/core";


export const PostList: React.FC = () => {
 const { ... ,edit} = useNavigation();
 const { mutate } = useDelete();

 const columns = React.useMemo<ColumnDef<IPost>[]>(
   () => [
    ...,
     {
       id: "action",
       header: "Action",
       accessorKey: "id",
       cell: function render({ getValue }) {
         return (
           <button
             className="rounded border border-gray-200 p-2 text-xs font-medium leading-tight transition duration-150 ease-in-out hover:bg-indigo-500 hover:text-white"
             onClick={() =>
               edit("posts", getValue() as number)
             }
           >
             Edit
           </button>
         );
       },
     },
   [],
 );

 return (
    ...
   );
};
After this, we can now add the component <PostEdit /> in the edit.tsx file to our resource present in the App.tsx file.
 Edit post flow
Deleting post record
For deleting a record, we will use the useDelete() hook which is present in the @refinedev/core package which was installed using the refine CLI to build our Refine application.
We'll add a Delete button to each row because Refine doesn't add one automatically, so we'll need to update our <PostList /> component to include one for each record. Add the highlighted lines below to the existing list component.
import React from "react";
import { useTable, ColumnDef, flexRender } from "@refinedev/react-table";
import { IPost } from "../../interfaces/post";
import { useNavigation, useDelete } from "@refinedev/core";


export const PostList: React.FC = () => {
 const { show, edit, create } = useNavigation();
 const { mutate } = useDelete();

 const columns = React.useMemo<ColumnDef<IPost>[]>(
   () => [
    ...,

     {
         id: "action",
         header: "Action",
         accessorKey: "id",
         cell: function render({ getValue }) {
           return (
             <button
               className="rounded border border-gray-200 p-2 text-xs font-medium leading-tight transition duration-150 ease-in-out hover:bg-red-500 hover:text-white"
               onClick={() =>
                 mutate({
                   id: getValue() as number,
                   resource: "posts",
                 })
               }
             >
               Delete
             </button>

           );
         },
      },
   [],
 );

 return (
    ...
   );
};
 Delete post confirmation
Adding Pagination
Next, we will add Pagination to our application. in order to achieve this, the useTable() hook provides certain functions that handle pagination. They are:
getState: This is the useTable() state variable.setPageIndex(): This is a function that handles setting the page index.getCanPreviousPage(): This is a boolean value that indicates if a previous page exists or not.getPageCount: This variable holds the number of pages.getCanNextPage: This is a boolean value that indicates if a next page exists or not.nextPage(): This function handles navigation to the next page.previousPage: This function handles navigation to the previous page.setPageSize(): This is a function that handles setting the content to be shown on a page (page size).
We will go to update the <PostList /> component with the highlighted code below:
src/pages/post/list.tsx
import React from "react";
import { useTable } from "@refinedev/react-table";
import { ColumnDef, flexRender } from "@tanstack/react-table";
import { ICategory, IPost } from "../../interfaces/post";
import {
useNavigation,
useDelete,
GetManyResponse,
useMany,
} from "@refinedev/core";
export const PostList: React.FC = () => {
const { show, edit, create } = useNavigation();
const { mutate } = useDelete();
const columns = React.useMemo<ColumnDef<IPost>[]>(
() => [
{
id: "id",
header: "ID",
accessorKey: "id",
},
{
id: "Name",
header: "Name",
accessorKey: "Name",
},
{
id: "category",
header: "Category",
accessorKey: "category",
cell: function render({ getValue, table }) {
const meta = table.options.meta as {
categoriesData: GetManyResponse<ICategory>;
};
const singleValue: string[] | any = getValue();
const category = meta.categoriesData?.data?.find(
(item) => item.id === singleValue[0],
);
return category?.name ?? "Loading...";
},
},
{
id: "status",
header: "Status",
accessorKey: "Status",
},
{
id: "action",
header: "Action",
accessorKey: "id",
cell: function render({ getValue }) {
return (
<>
<button
className="rounded border border-gray-200 p-2 text-xs font-medium leading-tight transition duration-150 ease-in-out hover:bg-indigo-500 hover:text-white"
onClick={() => show("posts", getValue() as number)}
>
View
</button>
<button
className="rounded border border-gray-200 p-2 text-xs font-medium leading-tight transition duration-150 ease-in-out hover:bg-indigo-500 hover:text-white"
onClick={() => edit("posts", getValue() as number)}
>
Edit
</button>
<button
className="rounded border border-gray-200 p-2 text-xs font-medium leading-tight transition duration-150 ease-in-out hover:bg-red-500 hover:text-white"
onClick={() =>
mutate({
id: getValue() as number,
resource: "posts",
})
}
>
Delete
</button>
</>
);
},
},
],
[],
);
const {
reactTable: { getHeaderGroups, getRowModel },
setOptions,
refineCore: { result },
getState,
setPageIndex,
getCanPreviousPage,
getPageCount,
getCanNextPage,
nextPage,
previousPage,
setPageSize,
} = useTable<IPost>({ columns });
const categoryIds = result?.data?.map((item) => item.category?.[0]) ?? [];
const { result: categoriesData } = useMany<ICategory>({
resource: "category",
ids: categoryIds,
queryOptions: {
enabled: categoryIds.length > 0,
},
});
setOptions((prev) => ({
...prev,
meta: {
...prev.meta,
categoriesData,
},
}));
return (
<div className="mx-auto pb-4">
<div className="mb-3 mt-1 flex items-center justify-end">
<button
className="flex items-center justify-between gap-1 rounded border border-gray-200 bg-indigo-500 p-2 text-xs font-medium leading-tight text-white transition duration-150 ease-in-out hover:bg-indigo-600"
onClick={() => create("posts")}
>
<span>Create Post</span>
</button>
</div>
<table className="min-w-full table-fixed divide-y divide-gray-200 border">
<thead className="bg-gray-100">
{getHeaderGroups().map((headerGroup, idx) => (
<tr key={idx}>
{headerGroup.headers.map((header, idx) => (
<th
key={idx}
colSpan={header.colSpan}
className="px-6 py-3 text-left text-xs font-medium uppercase tracking-wider text-gray-700 "
>
{flexRender(
header.column.columnDef.header,
header.getContext(),
)}
</th>
))}
</tr>
))}
</thead>
<tbody className="divide-y divide-gray-200 bg-white">
{getRowModel().rows.map((row, idx) => {
return (
<tr key={idx} className="transition hover:bg-gray-100">
{row.getVisibleCells().map((cell, idx) => {
return (
<td
key={idx}
className="whitespace-nowrap px-6 py-2 text-sm font-medium text-gray-900"
>
{flexRender(
cell.column.columnDef.cell,
cell.getContext(),
)}
</td>
);
})}
</tr>
);
})}
</tbody>
</table>
<div className="mx-auto mt-12 flex items-center justify-between">
<div className="mx-auto flex items-center justify-between md:w-7/12">
<button
className="rounded border border-gray-200 p-2 text-xs font-medium leading-tight transition duration-150 ease-in-out hover:bg-indigo-500 hover:text-white"
onClick={() => setPageIndex(0)}
disabled={!getCanPreviousPage()}
>
{"<<"}
</button>
<button
className="rounded border border-gray-200 p-2 text-xs font-medium leading-tight transition duration-150 ease-in-out hover:bg-indigo-500 hover:text-white"
onClick={() => previousPage()}
disabled={!getCanPreviousPage()}
>
{"<"}
</button>
<button
className="rounded border border-gray-200 p-2 text-xs font-medium leading-tight transition duration-150 ease-in-out hover:bg-indigo-500 hover:text-white"
onClick={() => nextPage()}
disabled={!getCanNextPage()}
>
{">"}
</button>
<button
className="rounded border border-gray-200 p-2 text-xs font-medium leading-tight transition duration-150 ease-in-out hover:bg-indigo-500 hover:text-white"
onClick={() => setPageIndex(getPageCount() - 1)}
disabled={!getCanNextPage()}
>
{">>"}
</button>
<div className="w-[40%] px-5">
Page
<strong>
{getState().pagination.pageIndex + 1} of {getPageCount()}
</strong>
</div>
<div className="px-5">
Go to page:
<input
className="block rounded-[8px] border p-2"
type="number"
defaultValue={getState().pagination.pageIndex + 1}
onChange={(e) => {
const page = e.target.value ? Number(e.target.value) - 1 : 0;
setPageIndex(page);
}}
/>
</div> <select
className="w-[50%] border px-5"
value={getState().pagination.pageSize}
onChange={(e) => {
setPageSize(Number(e.target.value));
}}
>
{[10, 20, 30, 40, 50].map((pageSize) => (
<option key={pageSize} value={pageSize}>
Show {pageSize}
</option>
))}
</select>
</div>
</div>
</div>
);
};
Conclusion
In this article, we covered how to create a headless Refine application using the create refine-app as well as creating a React CRUD application using Refine. There is no limit to what can be achieved using Refine as you can quickly a fully API or BAAS-powered application with minimal effort and code. It also has well-detailed documentation which can soon get you started as well as guide you through your building process. To access the documentation, visit here.
Live CodeSandbox Example
npm create refine-app@latest -- --example blog-refine-airtable-crud