
CAUTION
This post was created using version 3.x.x of Refine. Although we plan to update it with the latest version of Refine as soon as possible, you can still benefit from the post in the meantime.
You should know that Refine version 4.x.x is backward compatible with version 3.x.x, so there is no need to worry. If you want to see the differences between the two versions, check out the migration guide.
Just be aware that the source code example in this post have been updated to version 4.x.x.
Looking for an invoice generator that is easy to use and lets you customize your invoices? With Refine simple and intuitive interface, you can create your own invoices in few hours. Plus, we offer a wide range of templates and customization options so you can get the exact look you want. Learn more about our invoice generator here!


Introduction
We are almost ready to launch our Refine Invoice Generator. In this Part II article, we'll customize it just a little more and then take an in-depth look at what you can do with the finished Refine product!
In this part, we will create a missions part for the services your company provides. Then we will create our invoice page using these missions and the clients and contacts we created in Part I. In addition, you will not only be able to create your invoices, but you will also be able to view and download these invoices as PDF.
CAUTION
This article is written as a continuation of our Develop your Own Customizable Invoice Generator with Refine article. If you have not read Part I, we recommend that you read Part I before reading this article.
Let's see together how easily and in a short time we can develop our project with its Refine features.
Create New Strapi Collections
In our Part I article, we created our company, contact and client collections. In this section, let's create the Missions and Invoice Strapi collections for the missions and invoices pages.
Mission Collection:
- Mission(Mission Title): Text
- Mission_description: Text
- Day: Number
- Daily_rate: Number
 Strapi missions collection type structure
Invoice Collection:
- Name: Text
- Date: Date
- Company : Relation with Company
- Discount : Number
- Tax: Number
- Custom_id: Text
- Contact: Relation with Contact
- Missions: Relation with Mission
 Strapi invoices collection type structure
We created our missions and invoice collections fields. Our goal here is to define the products or services you offer specifically to your company and to create invoices based on them. By determining how many working days a product or service will last and its price on a daily basis, the total will be automatically reflected on your invoice. Now let's create our Refine Missions page using this collection. And let's understand better by creating an example missions with Refine.
Refine Missions Page
Let's use the refine-antd package's useTable hook to create our page, and let's define the fields in our Table Component.
import {
  List,
  Table,
  useTable,
  TagField,
  useModalForm,
  EditButton,
} from "@refinedev/antd";

import { IMission } from "interfaces";

export const MissionList: React.FC = () => {
  const { tableProps } = useTable<IMission>();

  return (
    <List>
      <Table {...tableProps}>
        <Table.Column dataIndex="id" title="ID" />
        <Table.Column dataIndex="mission" title="Mission" />
        <Table.Column
          dataIndex="mission_description"
          title="Mission Description"
        />
        <Table.Column dataIndex="day" title="Day(s)" />
        <Table.Column
          dataIndex="daily_rate"
          title="Daily Rate"
          render={(value) => <TagField value={value} color="red" />}
        />
        <Table.Column<IMission>
          title="Total"
          render={(_, record) => {
            return (
              <TagField
                value={`${record.daily_rate * record.day} $`}
                color="green"
              />
            );
          }}
        />
        <Table.Column<IMission>
          title="Actions"
          dataIndex="actions"
          key="actions"
          render={(_value, record) => (
            <EditButton
              hideText
              size="small"
              recordItemId={record.id}
              onClick={() => editShow(record.id)}
            />
          )}
        />
      </Table>
    </List>
  );
};
We defined the fields we created on the strapi side with the Refine Table and created our table. Let's take a look at how our table looks like.
 Missions list page with CRUD operations
As you can see, we were able to create and display our table very simply thanks to the Refine. Let's learn how to create a Mission from our Refine interface now.
Refine Missions Create Page
Let's create a modal component for our Mission Create page. Let's connect our fields using Modal and Form from the refine-antd package.
src/components/mission/CreateMission.tsx
import {
  Modal,
  Form,
  Input,
  ModalProps,
  FormProps,
  InputNumber,
} from "@refinedev/antd";

type CreateMissionProps = {
  modalProps: ModalProps;
  formProps: FormProps;
};

export const CreateMission: React.FC<CreateMissionProps> = ({
  modalProps,
  formProps,
}) => {
  return (
    <Modal {...modalProps} title="Create Contact">
      <Form {...formProps} layout="vertical">
        <Form.Item
          label="Title"
          name="mission"
          rules={[
            {
              required: true,
            },
          ]}
        >
          <Input />
        </Form.Item>
        <Form.Item label="Description" name="mission_description">
          <Input />
        </Form.Item>
        <Form.Item label="Day(s)" name="day">
          <InputNumber defaultValue={1} />
        </Form.Item>
        <Form.Item label="Daily Rate" name="daily_rate">
          <InputNumber defaultValue={1} />
        </Form.Item>
      </Form>
    </Modal>
  );
};
Let's define the CreateMission component we created above in our MissionList and fill its props with Refine useModalForm.
import { List, Table, useTable, TagField, useModalForm } from "@refinedev/antd";

import { IMission } from "interfaces";
import { CreateMission, EditMission } from "components/mission";

export const MissionList: React.FC = () => {
  const { tableProps } = useTable<IMission>();

  const { formProps, modalProps, show } = useModalForm({
    resource: "missions",
    action: "create",
  });

  return (
    <>
      <List
        createButtonProps={{
          onClick: () => {
            show();
          },
        }}
      >
        <Table {...tableProps}>
          <Table.Column dataIndex="id" title="ID" />
          <Table.Column dataIndex="mission" title="Mission" />
          <Table.Column
            dataIndex="mission_description"
            title="Mission Description"
          />
          <Table.Column dataIndex="day" title="Day(s)" />
          <Table.Column
            dataIndex="daily_rate"
            title="Daily Rate"
            render={(value) => <TagField value={value} color="red" />}
          />
          <Table.Column<IMission>
            title="Total"
            render={(_, record) => {
              return (
                <TagField
                  value={`${record.daily_rate * record.day} $`}
                  color="green"
                />
              );
            }}
          />
        </Table>
      </List>
      <CreateMission modalProps={modalProps} formProps={formProps} />
    </>
  );
};
 Creating a new mission with form fields
Missions Page is now ready, you can create and manage your business's products or services here with Refine.
Our next step is to create invoices according to these tasks and clients. Let's create, organize and display invoices with Refine.
Refine Invoices Page
Let's put the Invoice Collections fields that we created with Strapi into our Table by fetch the refine-antd useTable. Our Invoice collection has a relation with the client, company and missions collections.
Thanks to the refine-strapi-v4 dataProvider, we can use the data of collections that are related to each other.
In order to use the fields of the collections that are related to each other, we must populate the collections in meta.
Populate the contacts, companies and missions related with our Invoice collection in meta.
src/pages/InvoiceList.tsx
import {
  List,
  Table,
  useTable,
  DateField,
  TagField,
  EmailField,
  Space,
  DeleteButton,
  EditButton,
  Icons,
  Button,
  Modal,
} from "@refinedev/antd";

import { IInvoice } from "interfaces";
import { PdfLayout } from "components/pdf";

const { FilePdfOutlined } = Icons;

export const InvoiceList: React.FC = () => {
  const { tableProps } = useTable<IInvoice>({
    meta: {
      populate: {
        contact: { populate: ["client"] },
        company: { populate: ["logo"] },
        missions: "*",
      },
    },
  });

  return (
    <>
      <List>
        <Table {...tableProps}>
          <Table.Column dataIndex="id" title="ID" />
          <Table.Column<IInvoice>
            dataIndex="name"
            title="Invoice Name"
            render={(_, record) => {
              return `Invoice_#${record.id}${record.name}`;
            }}
          />
          <Table.Column<IInvoice>
            dataIndex="date"
            title="Invoice Date"
            render={(value) => <DateField format="LL" value={value} />}
          />
          <Table.Column dataIndex={["company", "name"]} title="Your Company" />
          <Table.Column
            dataIndex={"missions"}
            title="Missions"
            render={(value) => {
              return value.map((item: any) => {
                return <TagField color="blue" value={item.mission} />;
              });
            }}
          />
          <Table.Column
            dataIndex="discount"
            title="Discount(%)"
            render={(value) => <TagField color="blue" value={value} />}
          />
          <Table.Column
            dataIndex="tax"
            title="Tax(%)"
            render={(value) => <TagField color="cyan" value={value} />}
          />
          <Table.Column dataIndex="custom_id" title="Custom Invoice ID" />

          <Table.Column
            dataIndex={["contact", "email"]}
            title="Contact"
            render={(value) => <EmailField value={value} />}
          />
          <Table.Column<IInvoice>
            title="Actions"
            dataIndex="actions"
            render={(_, record) => {
              return (
                <Space>
                  <EditButton hideText size="small" recordItemId={record.id} />
                  <DeleteButton
                    hideText
                    size="small"
                    recordItemId={record.id}
                  />
                </Space>
              );
            }}
          />
        </Table>
      </List>
    </>
  );
};
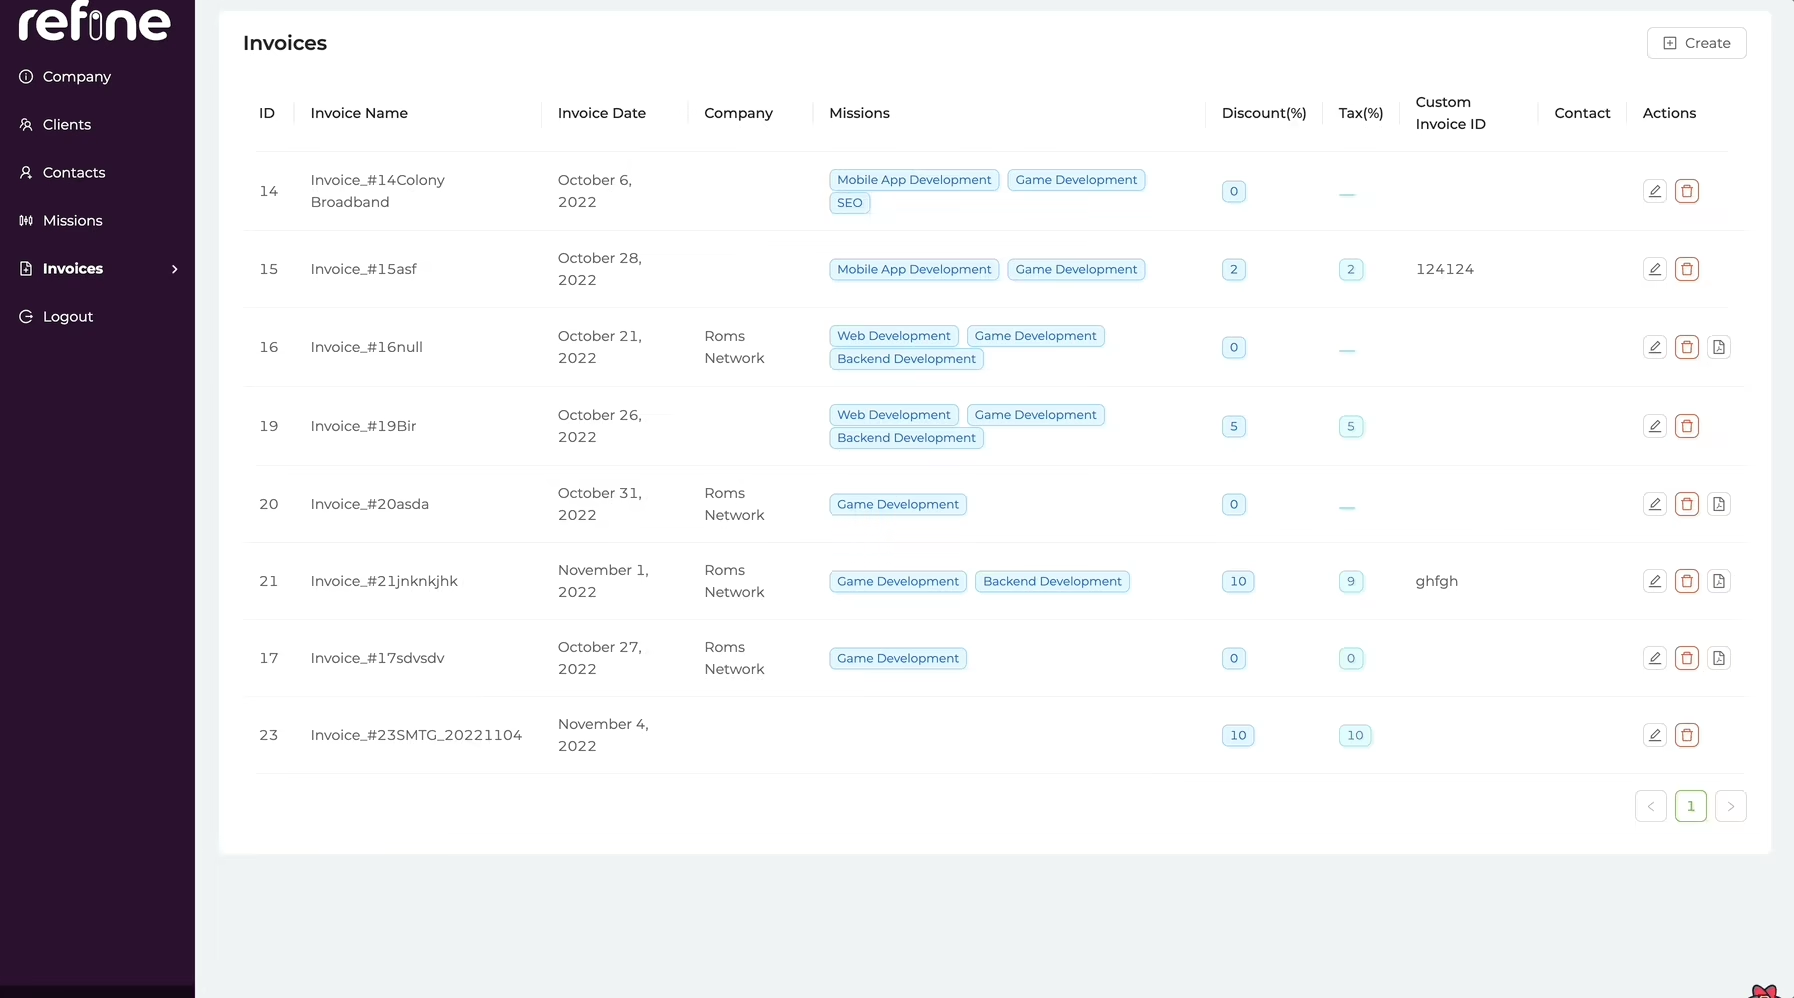
 Invoices list page with table view
As you can see, we were able to list invoices with Refine. Using the Invoice collection and the fields associated with it, we can create a fully featured Invoice.
Our invoice contains all the information. With Refine Invoice Generator you can define the company issuing the invoice, discount percentage, tax percentage, customId and similar information in a single invoice.
Let's understand better by creating an invoice example from our Refine UI.
Refine Create Invoice Page
Here, we first fetch the company, contacts and missions using the Refine's useSelect hook, and by giving it to the Select component, we create selectable components to detail our invoice.
Then, we fill our Refine Create and Form components with the fields of the collection in the strap to perform a creation process as we did in our previous examples.
src/pages/invoice/CreateInvoice
import {
  Create,
  Form,
  Input,
  Select,
  useForm,
  useSelect,
  DatePicker,
} from "@refinedev/antd";

import { ICompany, IContact, IMission, IInvoice } from "interfaces";

export const CreateInvoice = () => {
  const { formProps, saveButtonProps } = useForm<IInvoice>();

  const { selectProps: companySelectProps } = useSelect<ICompany>({
    resource: "companies",
    optionLabel: "name",
  });

  const { selectProps: contactSelectProps } = useSelect<IContact>({
    resource: "contacts",
    optionLabel: "first_name",
  });

  const { selectProps: missionSelectProps } = useSelect<IMission>({
    resource: "missions",
    optionLabel: "mission",
  });

  return (
    <Create saveButtonProps={saveButtonProps}>
      <Form {...formProps} layout="vertical">
        <Form.Item label="Invoice Name" name="name">
          <Input />
        </Form.Item>
        <Form.Item
          label="Select Your Company"
          name="company"
          rules={[
            {
              required: true,
            },
          ]}
        >
          <Select {...companySelectProps} />
        </Form.Item>

        <Form.Item
          label="Mission"
          name="missions"
          rules={[
            {
              required: true,
            },
          ]}
        >
          <Select {...missionSelectProps} mode="multiple" />
        </Form.Item>
        <Form.Item label="Discount(%)" name="discount">
          <Input />
        </Form.Item>
        <Form.Item label="Tax(%)" name="tax">
          <Input />
        </Form.Item>
        <Form.Item label="Custom ID" name="custom_id">
          <Input />
        </Form.Item>
        <Form.Item
          label="Contact"
          name="contact"
          rules={[
            {
              required: true,
            },
          ]}
        >
          <Select {...contactSelectProps} />
        </Form.Item>
        <Form.Item label="Invoice Date" name="date">
          <DatePicker style={{ width: "50%" }} />
        </Form.Item>
      </Form>
    </Create>
  );
};
 Creating an invoice with mission details
Our invoice generator is almost ready! As you can see, we can now create a fully featured invoice with Refine and display it in our table. As the last step, let's view and download the invoices we created as PDF.
View and Download Invoice as PDF
In this example, we will use the React-pdf package to view as PDF. Let's start our process by installing our package.
Let's start our process by installing our package.
Installation
npm i @react-pdf/renderer
Usage
To begin, let's create a pdf layout and add props to receive the data in our Invoice List.
import { useRef } from "react";

import { IInvoice } from "interfaces";

type PdfProps = {
  record: IInvoice | undefined;
};

export const PdfLayout: React.FC<PdfProps> = ({ record }) => {
  return <></>;
};
Let's create a button to display our PDF arrangement in the Invoice List, as well as a modal component for this field to appear.
import { useState } from "react";
import { useModal } from "@refinedev/core";
import {
  List,
  Table,
  useTable,
  DateField,
  TagField,
  EmailField,
  Space,
  DeleteButton,
  EditButton,
  Icons,
  Button,
  Modal,
} from "@refinedev/antd";

import { IInvoice } from "interfaces";
import { PdfLayout } from "components/pdf";

const { FilePdfOutlined } = Icons;

export const InvoiceList: React.FC = () => {
  const [record, setRecord] = useState<IInvoice>();

  const { tableProps } = useTable<IInvoice>({
    meta: {
      populate: {
        contact: { populate: ["client"] },
        company: { populate: ["logo"] },
        missions: "*",
      },
    },
  });

  const { show, visible, close } = useModal();

  return (
    <>
      <List>
        <Table {...tableProps}>
          ...
          <Table.Column<IInvoice>
            title="Actions"
            dataIndex="actions"
            render={(_, record) => {
              return (
                <Space>
                  <EditButton hideText size="small" recordItemId={record.id} />
                  <DeleteButton
                    hideText
                    size="small"
                    recordItemId={record.id}
                  />
                  <Button
                    size="small"
                    icon={<FilePdfOutlined />}
                    onClick={() => {
                      setRecord(record);
                      show();
                    }}
                  />
                </Space>
              );
            }}
          />
        </Table>
      </List>
      <Modal visible={visible} onCancel={close} width="80%" footer={null}>
        <PdfLayout record={record} />
      </Modal>
    </>
  );
};
We`ve created a button in our Invoice List and when this button is pressed, we show the Modal component that contains the PdfLayout we created. Finally, as you can see, we passed the record data in the Invoice List as PdfLayout props.
Now that we have the data of the Invoices we can edit the PdfLayout.
src/components/pdf/PdfLayout.tsx
import { useRef } from "react";

import {
  Document,
  Image,
  Page,
  StyleSheet,
  View,
  Text,
  PDFViewer,
} from "@react-pdf/renderer";
import { IInvoice } from "interfaces";
import { API_URL } from "../../constants";

type PdfProps = {
  record: IInvoice | undefined;
};

export const PdfLayout: React.FC<PdfProps> = ({ record }) => {
  const total = record?.missions.reduce((prev: any, cur: any): any => {
    return prev + cur.day * cur.daily_rate;
  }, 0);

  return (
    <PDFViewer style={styles.viewer}>
      <Document>
        <Page style={styles.page} size="A4">
          <View>
            <Image
              src={API_URL + record?.company?.logo?.url}
              style={{ width: "120px", height: "auto" }}
            />
            <View style={styles.invoiceTextNumberContainer}>
              <Text
                style={styles.invoiceText}
              >{`Invoice: Invoice_#${record?.id}${record?.name}`}</Text>
              <Text
                style={styles.invoiceId}
              >{`Invoice ID: INVOICE_#${record?.id}`}</Text>
            </View>
          </View>
          <View style={styles.dividerLG} />

          <View style={styles.invoiceForFromContainer}>
            <View style={styles.invoiceFor}>
              <Text style={styles.invoiceForFromTitle}>invoice For:</Text>
              <View>
                <Text style={styles.invoiceForFromText}>
                  {record?.contact?.client?.name}
                </Text>
                <Text style={styles.invoiceForFromText}>
                  {record?.contact?.first_name}
                </Text>
                <Text style={styles.invoiceForFromText}>
                  {record?.contact?.last_name}
                </Text>
                <Text style={styles.invoiceForFromText}>
                  {record?.contact?.email}
                </Text>
              </View>
            </View>

            <View style={styles.invoiceFrom}>
              <Text style={styles.invoiceForFromTitle}>From:</Text>
              <View>
                <Text style={styles.invoiceForFromText}>
                  {record?.company.name}
                </Text>
                <Text style={styles.invoiceForFromText}>
                  {record?.company.city}
                </Text>
                <Text style={styles.invoiceForFromText}>
                  {record?.company.address}, {record?.company.country}
                </Text>
              </View>
              <View style={styles.dividerSM} />
              <View>
                <Text
                  style={styles.invoiceForFromText}
                >{`Invoice ID: ${record?.id}`}</Text>
                <Text
                  style={styles.invoiceForFromText}
                >{`Invoice Custom ID: ${record?.custom_id}`}</Text>
                <Text
                  style={styles.invoiceForFromText}
                >{`Invoice Date: ${record?.date}`}</Text>
              </View>
            </View>
          </View>

          <View style={styles.table}>
            <View style={styles.tableHeader}>
              <Text style={[styles.tableHeaderItem, { width: "40%" }]}>
                Mission
              </Text>
              <Text style={[styles.tableHeaderItem, { width: "20%" }]}>
                Day
              </Text>
              <Text style={[styles.tableHeaderItem, { width: "20%" }]}>
                Day Rate
              </Text>
              <Text style={[styles.tableHeaderItem, { width: "20%" }]}>
                Total
              </Text>
            </View>
            {record?.missions.map((item) => {
              return (
                <View key={item.id} style={styles.tableRow}>
                  <Text style={[styles.tableCol, { width: "40%" }]}>
                    {item.mission}
                  </Text>
                  <Text style={[styles.tableCol, { width: "20%" }]}>
                    {item.day}
                  </Text>
                  <Text style={[styles.tableCol, { width: "20%" }]}>
                    {item.daily_rate}
                  </Text>
                  <Text style={[styles.tableCol, { width: "20%" }]}>
                    {item.daily_rate * item.day}
                  </Text>
                </View>
              );
            })}
          </View>

          <View style={styles.signatureTotalContainer}>
            <View style={styles.signatureContainer}>
              <Text style={styles.signatureText}>
                Signature: ________________
              </Text>
              <Text style={styles.signatureText}>
                Date: {record?.date.toString()}
              </Text>
            </View>

            <View style={styles.totalContainer}>
              <Text style={styles.totalText}>SUBTOTAL: {subtotal}</Text>
              <Text style={styles.totalText}>
                Discount(%): {record?.discount}
              </Text>
              <Text style={styles.totalText}>Tax(%): {record?.tax}</Text>
              <Text style={styles.totalText}>
                Total($):
                {subtotal +
                  (subtotal * (record?.tax as number)) / 100 -
                  (subtotal * (record?.discount as number)) / 100}
              </Text>
            </View>
          </View>
          <View style={styles.footer}>
            <Text style={styles.footerText}>{record?.company.city}</Text>
            <Text style={styles.footerText}>
              {record?.company.address}, {record?.company.country}
            </Text>
          </View>
        </Page>
      </Document>
    </PDFViewer>
  );
};

const styles = StyleSheet.create({
  viewer: {
    paddingTop: 32,
    width: "100%",
    height: "80vh",
    border: "none",
  },
  page: {
    display: "flex",
    padding: "0.4in 0.4in",
    fontSize: 12,
    color: "#333",
    backgroundColor: "#fff",
  },
  invoiceTextNumberContainer: {
    display: "flex",
    flexDirection: "row",
    alignItems: "center",
    justifyContent: "space-between",
  },
  invoiceText: {
    color: "#3aabf0",
  },
  invoiceId: {
    textAlign: "center",
  },
  invoiceForFromContainer: {
    display: "flex",
    flexDirection: "row",
    justifyContent: "space-between",
  },
  invoiceForFromTitle: {
    marginBottom: 24,
  },
  invoiceFor: {
    flex: 1.5,
  },
  invoiceFrom: {
    flex: 1,
  },
  invoiceForFromText: {
    color: "#787878",
    lineHeight: 1.5,
  },
  dividerSM: {
    width: "100%",
    height: 1,
    marginTop: 12,
    marginBottom: 12,
    backgroundColor: "#e5e5e5",
  },
  dividerLG: {
    width: "100%",
    height: 1,
    marginTop: 40,
    marginBottom: 40,
    backgroundColor: "#e5e5e5",
  },
  table: {
    marginTop: 32,
  },
  tableHeader: {
    display: "flex",
    flexDirection: "row",
    textAlign: "center",
  },
  tableHeaderItem: {
    paddingVertical: 8,
    border: "1px solid #000",
    borderBottom: "none",
  },
  tableRow: {
    display: "flex",
    flexDirection: "row",
  },
  tableCol: {
    paddingVertical: 8,
    paddingHorizontal: 4,
    border: "1px solid #000",
  },
  signatureTotalContainer: {
    display: "flex",
    flexDirection: "row",
    justifyContent: "space-between",
    marginTop: 32,
  },
  signatureContainer: {},
  totalContainer: {},
  signatureText: {
    marginTop: 32,
  },
  totalText: {
    marginTop: 16,
  },
  footer: {
    borderTop: "1px solid #e5e5e5",
    paddingTop: 8,
    marginTop: "auto",
  },
  footerText: {
    color: "#787878",
    lineHeight: 1.5,
  },
});
 Generated PDF invoice preview
Example
Demo Credentials
Username: demoPassword: demodemo
NOTE
PDF download may not work in codeSandbox mode. With this link, you can open the example in the browser and try it.
npm create refine-app@latest -- --example blog-invoice-generator
Conclusion
In this post, we've created a fully customizable and completely functional Invoice Generator app. If you want to construct an application similar to this, you may add any feature with Refine and personalize your invoice generator to your liking. We developed in very short amount of time, thanks to Refine's features and the possibilities it provides for customization.
You can develop any web application or admin panel you want in a very short time with Refine.
With Refine's headless and SSR-Next.js features, it is possible and very easy to develop both B2B and B2C applications using a single framework.