
CAUTION
This post was created using version 3.x.x of Refine. Although we plan to update it with the latest version of Refine as soon as possible, you can still benefit from the post in the meantime.
You should know that Refine version 4.x.x is backward compatible with version 3.x.x, so there is no need to worry. If you want to see the differences between the two versions, check out the migration guide.
Just be aware that the source code example in this post have been updated to version 4.x.x.


Introduction
We will build an admin panel that supports CRUD operations, has built-in authentication, and a mutation mode feature using industry-standard best tools.
Industry-standard tools and practices can be hard to reach and time-consuming to maintain on your own. Frameworks can save you time by doing these jobs for you. So, we'll use powerful frameworks including Material UI, Strapi, and Refine to build a high-quality admin panel.
UI design can be a complex and time-consuming process, but a tool like Material UI can help simplify the process and speed up the development cycle. In this tutorial, we'll use Material UI's benefits and Refine's built-in hooks to handle data fetching and mutations. We'll also integrate the Strapi data provider that Refine has built-in support.
We'll walk through the process of listing, creating and deleting posts in a Refine application and make use of Refine's components and hooks to build out our functionality.
Steps we'll cover includes:
- Introduction
- Prerequisites
- What are the benefits of using Refine?
- Bootstrapping the Refine app
- CRUD operations
- Implementing mutation mode
- Sharing the current page with filters
- Conclusion
Prerequisites
Before we dive into the meat of the article, let's first take a look at the tools documents we'll be using.
Your node version need to be minimum v16.14.0
What are the benefits of using Refine?
Refine is a headless React internal tool framework that helps you develop quickly while developing both B2B and B2C applications. It speeds you up while allowing full customization, making it an ideal choice for rapid development with pro features.
- It is Open Source under the MIT license.
- It is easy to use and learn. There are many examples to help you get started, as well as documentation.
- Is a framework that does not require you to use any UI libraries or frameworks.
- Supports Ant Design and Material UI natively for quick and easy solutions. Thanks to the headless approach, you can easily integrate your own UI solution.
- Backend agnostic, so you can connect to any backend you want.
- Customizable, which means you can change it to fit your needs.
- Some of the main features are data fetching and state management, routings, authentication, authorization, internationalization, real-time, mutation modes with optimistic and pessimistic and undoable modes
Bootstrapping the Refine app
We'll use superplate CLI wizard to create and customize Refine application.
Run the following command
npm create refine-app@latest material-ui-example -- -p refine-react -b v3
Select the following options to complete CLI wizard:
? Do you want to use a UI Framework?:
❯ Material UI

? Do you want an extended theme?:
❯ No

? Do you want to add dark mode support?:
❯ No

? Router Provider:
❯ React Router v6

? Data Provider:
❯ Strapi v4

? Do you want a customized layout?
❯ No

? i18n - Internationalization:
❯ No
CLI should be create a project and install the selected dependencies.
Implementing Strapi v4 data provider
Data providers are Refine hooks making it possible to consume different API's and data services conveniently. The required Strapi data provider setups are added automatically by the CLI wizard.
To consume Refine's Fake Strapi API, we'll need to change the API URL in the project folder.
export const API_URL = "https://api.strapi-v4.refine.dev";
Refer to Refine docs for more detailed information about Refine Strapi V4 support→
Refer to Refine's data provider documentation for detailed information→
Refer to official Strapi v4 documentation→
CRUD operations
We are going to implement CRUD operations features like listing, creating, and editing records.
Listing records
We need to create PostList page to show data on the UI.
First, we'll need an interface to work with the data from the API endpoint.
We'll create a new folder named interfaces under /src if you don't already have one. Then create a index.d.ts file with the following code:
export interface ICategory {
  id: number;
  title: string;
}

export interface IPost {
  id: number;
  title: string;
  content: string;
  status: "published" | "draft" | "rejected";
  category: ICategory;
  createdAt: string;
}
Now, we'll create a new folder named pages/posts under /src. Under that folder, create a list.tsx file with the following code:
import React from "react";
import {
  useDataGrid,
  DataGrid,
  GridColumns,
  DateField,
  List,
} from "@refinedev/mui";

import { IPost } from "interfaces";

export const PostList: React.FC = () => {
  const { dataGridProps } = useDataGrid<IPost>();

  const columns = React.useMemo<GridColumns<IPost>>(
    () => [
      { field: "title", headerName: "Title", flex: 1, minWidth: 350 },
      {
        field: "createdAt",
        headerName: "CreatedAt",
        minWidth: 220,
        renderCell: function render({ row }) {
          return <DateField format="LLL" value={row.createdAt} />;
        },
      },
    ],
    [],
  );

  return (
    <List>
      <DataGrid {...dataGridProps} columns={columns} autoHeight />
    </List>
  );
};
We import and use Material UI components from Refine's @refinedev/mui to show data.
<DataGrid/> is a native Material UI component. It renders records row by row as a table. <DataGrid/> expects a columns prop as a required.
Refine hook useDataGrid fetches data from API and wraps them with various helper hooks required for the <DataGrid/> component. Data interaction functions like sorting, filtering, and pagination will be instantly available on the <DataGrid/> with this single line of code.
Refer to Refine's useDataGrid hook doc to more information→
columns array are used for mapping and formatting each field shown on the <DataGrid/> field prop maps the field to a matching key from the API response. renderCell prop is used to choose the appropriate Field component for the given data type.
INFORMATION
The useDataGrid hook works in compatible with both the <DataGrid> and the <DataGridPro> component.
Note you will need src/App.tsx file to find your pages and posts. In the /pages folder, put this index.tsx file in it which allows everything in the posts folder to be used elsewhere.
export * from "./list";
Refer to official Refine's Material UI tutorial for detailed explanations and examples →

Adding resources and connect pages to Refine app
Now we are ready to start connecting to our API by adding a resource to our application.
We'll add /posts/ endpoint from our example API as a resource.
We'll add the highlighted code to our App.tsx to connect to the endpoint and List page.
import { Refine } from "@refinedev/core";
import {
  useNotificationProvider,
  RefineSnackbarProvider,
  CssBaseline,
  GlobalStyles,
  Layout,
  ThemeProvider,
  LightTheme,
  ReadyPage,
  ErrorComponent,
} from "@refinedev/mui";
import routerProvider from "@refinedev/react-router-v6";
import { DataProvider } from "@refinedev/strapi-v4";

import { authProvider, axiosInstance } from "./authProvider";
import { API_URL } from "./constants";
import { PostList } from "./pages/posts";

function App() {
  return (
    <ThemeProvider theme={LightTheme}>
      <CssBaseline />
      <GlobalStyles styles={{ html: { WebkitFontSmoothing: "auto" } }} />
      <RefineSnackbarProvider>
        <Refine
          notificationProvider={useNotificationProvider}
          Layout={Layout}
          ReadyPage={ReadyPage}
          catchAll={<ErrorComponent />}
          routerProvider={routerProvider}
          authProvider={authProvider}
          dataProvider={DataProvider(API_URL + `/api`, axiosInstance)}
          resources={[
            {
              name: "posts",
              list: PostList,
            },
          ]}
        />
      </RefineSnackbarProvider>
    </ThemeProvider>
  );
}

export default App;
INFORMATION
resources is a property of <Refine/> representing API Endpoints. The name property of every single resource should match one of the endpoints in your API!
After setup is complete, navigate to the project folder and start your project with:
npm run dev
The application should redirect now to an URL defined by the name property.
It'll ask you to login to the app. Try with these credentials:
Username: demo@refine.dev
Password: demodemo
Check that the URL is routed to /posts and posts are displayed correctly in a table structure and even the pagination works out-of-the box.
Handling relational data
Relations are not populated when fetching entries. We'll use meta option to use relational population for Strapi v4 API.
The records from /posts endpoint that had a category id field. To get category titles automatically from /categories endpoint for each record and show on our table, we need to use populate feature of Strapi v4.
We'll set populate parameter to define which fields will be populated.
const { dataGridProps } = useDataGrid<IPost>({
  meta: {
    populate: ["category"],
  },
});
To show category field in table, we need to add new column to the PostList component.
  const columns = React.useMemo<GridColumns<IPost>>(
        () => [
           ...
            {
                field: "category.title",
                headerName: "Category",
                minWidth: 250,
                flex: 1,
                renderCell: function render({ row }) {
                    return row.category?.title;
                },
            },
           ...
        ],
        [],
    );
TIP
We use benefits of Strapi V4 relational population feature by using populate parameter. It handles to getting relational data automatically.
Refer to Refine Strapi v4 documentation for more information →
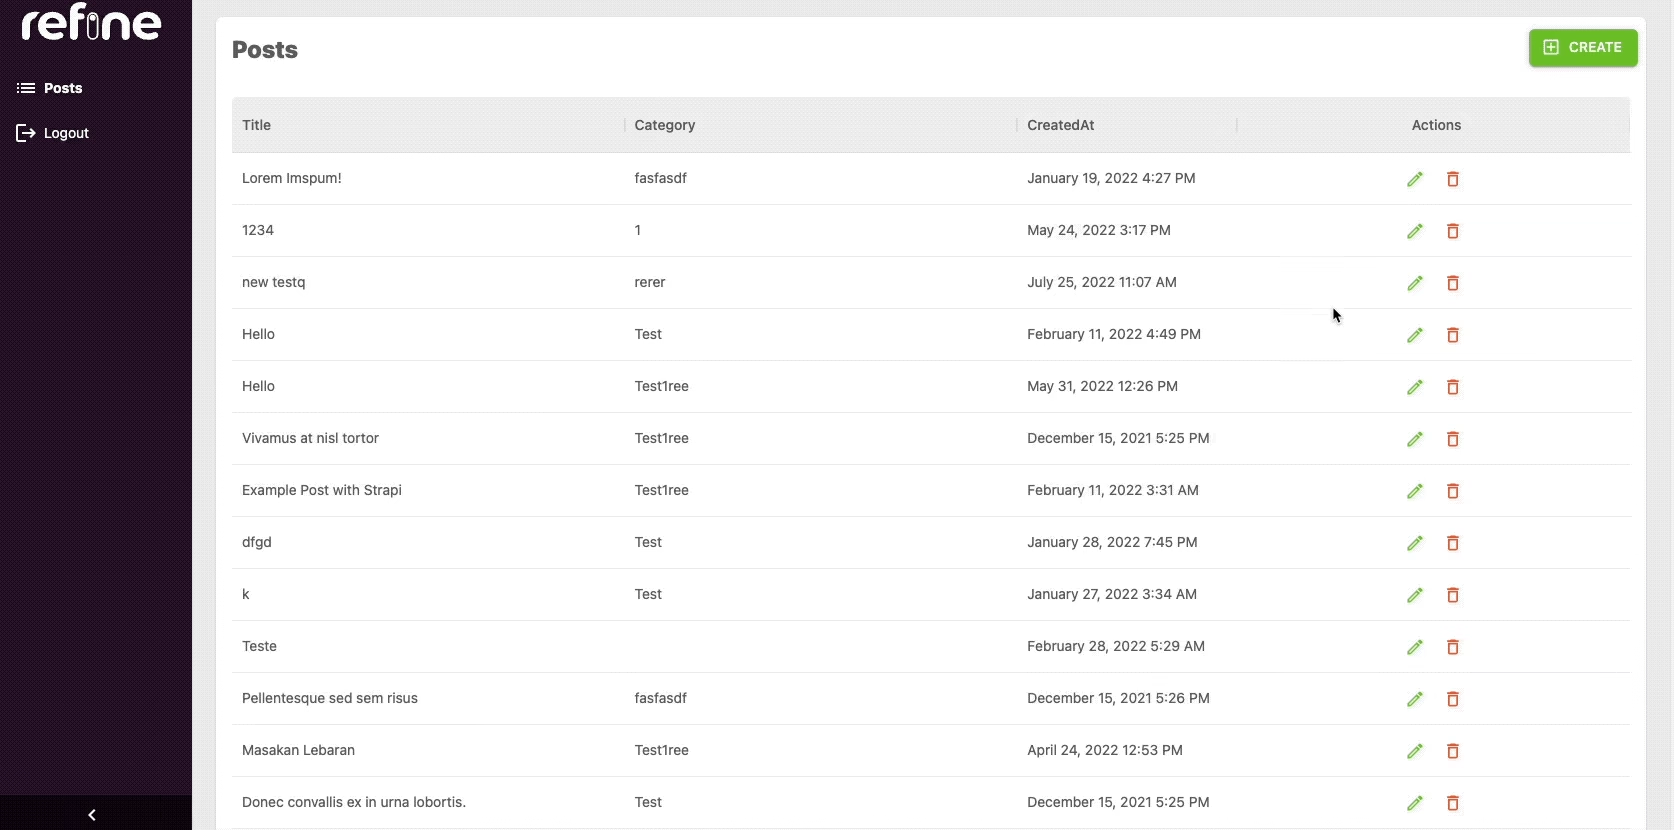
 Posts list page in Material UI DataGrid
Creating a record
The Material UI provides already styled, but still very customizable inputs that encapsulate adding labels and error handling with helper texts. However, we need a third-party library to handle forms when using Material UI. React Hook Form is one of the best options for this job!
The React Hook Form library has been integrated with Refine (@refinedev/react-hook-form) . This means you can now use Material UI for your forms and manage them using @refinedev/react-hook-form.
First, we'll create PostCreate page to create new records.
import { HttpError } from "@refinedev/core";
import {
  Box,
  TextField,
  Autocomplete,
  useAutocomplete,
  Create,
} from "@refinedev/mui";
import { useForm, Controller } from "@refinedev/react-hook-form";

import { IPost, ICategory } from "interfaces";

export const PostCreate: React.FC = () => {
  const {
    refineCore: { formLoading },
    saveButtonProps,
    register,
    control,
    formState: { errors },
  } = useForm<IPost, HttpError, IPost & { category: ICategory }>();

  const { autocompleteProps } = useAutocomplete<ICategory>({
    resource: "categories",
  });

  return (
    <Create isLoading={formLoading} saveButtonProps={saveButtonProps}>
      <Box
        component="form"
        sx={{ display: "flex", flexDirection: "column" }}
        autoComplete="off"
      >
        <TextField
          {...register("title", { required: "Title is required" })}
          error={!!errors?.title}
          helperText={errors.title?.message}
          margin="normal"
          required
          fullWidth
          id="title"
          label="Title"
          name="title"
          autoFocus
        />
        <Controller
          control={control}
          name="category"
          rules={{ required: "Category is required" }}
          render={({ field }) => (
            <Autocomplete
              {...autocompleteProps}
              {...field}
              onChange={(_, value) => {
                field.onChange(value);
              }}
              getOptionLabel={(item) => {
                return item.title ? item.title : "";
              }}
              isOptionEqualToValue={(option, value) =>
                value === undefined ||
                option?.id?.toString() === (value?.id ?? value)?.toString()
              }
              renderInput={(params) => (
                <TextField
                  {...params}
                  label="Category"
                  margin="normal"
                  variant="outlined"
                  error={!!errors.category}
                  helperText={errors.category?.message}
                  required
                />
              )}
            />
          )}
        />
      </Box>
    </Create>
  );
};
Add component export to index.tsx.
export * from "./create";
After creating the <PostCreate> component, add it to resource with create prop:
...

import {
    PostList,
    PostCreate,
} from "pages/posts";

...

const App: React.FC = () => {
    return (
        <ThemeProvider theme={LightTheme}>
            <CssBaseline />
            <GlobalStyles styles={{ html: { WebkitFontSmoothing: "auto" } }} />
            <RefineSnackbarProvider>
                <Refine
                    authProvider={authProvider}
                    routerProvider={routerProvider}
                    dataProvider={dataProvider(API_URL)}
                    notificationProvider={useNotificationProvider}
                    ReadyPage={ReadyPage}
                    Layout={Layout}
                    catchAll={<ErrorComponent />}
                    resources={[
                        {
                            name: "posts",
                            list: PostList,
                            create: PostCreate,
                        },
                    ]}
                />
            </RefineSnackbarProvider>
        </ThemeProvider>
    );
};
Try it on the browser and see if you can create new posts from scratch.
 Create post form in Material UI
Editing a record
We'll start by creating a new <PostEdit> page responsible for editing a existed single record:
import { HttpError } from "@refinedev/core";
import { Controller, useForm } from "@refinedev/react-hook-form";
import {
    Edit,
    Box,
    TextField,
    Autocomplete,
    useAutocomplete,
} from "@refinedev/mui";

import { IPost, ICategory } from "interfaces";

export const PostEdit: React.FC = () => {
    const {
        refineCore: { formLoading },
        saveButtonProps,
        register,
        control,
        formState: { errors },
    } = useForm<IPost, HttpError, IPost & { category: ICategory }>({
        refineCoreProps: { meta: { populate: ["category"] } },
    });

    const { autocompleteProps } = useAutocomplete<ICategory>({
        resource: "categories",
        defaultValue: query?.data?.data.category.id,
        queryOptions: { enabled: !!query?.data?.data.category.id },
    });

    return (
        <Edit isLoading={formLoading} saveButtonProps={saveButtonProps}>
            <Box
                component="form"
                sx={{ display: "flex", flexDirection: "column" }}
                autoComplete="off"
            >
                <TextField
                    {...register("title", { required: "Title is required" })}
                    error={!!errors?.title}
                    helperText={errors.title?.message}
                    margin="normal"
                    required
                    fullWidth
                    id="title"
                    label="Title"
                    name="title"
                    defaultValue={" "}
                    autoFocus
                />
                <Controller
                    control={control}
                    name="category"
                    rules={{ required: "Category is required" }}
                    defaultValue={ as any}
                    render={({ field }) => (
                        <Autocomplete
                            {...autocompleteProps}
                            {...field}
                            onChange={(_, value) => {
                                field.onChange(value);
                            }}
                            getOptionLabel={(item) => {
                                return item.title
                                    ? item.title
                                    : autocompleteProps?.options?.find(
                                          (p) =>
                                              p.id.toString() ===
                                              item.toString(),
                                      )?.title ?? "";
                            }}
                            isOptionEqualToValue={(option, value) =>
                                value === undefined || option?.id?.toString() === (value?.id ?? value)?.toString()
                            }
                            renderInput={(params) => (
                                <TextField
                                    {...params}
                                    label="Category"
                                    margin="normal"
                                    variant="outlined"
                                    error={!!errors.category}
                                    helperText={errors.category?.message}
                                    required
                                />
                            )}
                        />
                    )}
                />
            </Box>
        </Edit>
    );
};
Add component export to index.tsx.
export * from "./edit";
We are going to add "Edit button" to the each row in the list by defining "Actions" column in PostList page.
import React from "react";
import {
  useDataGrid,
  DataGrid,
  GridColumns,
  DateField,
  List,
  Stack,
  EditButton,
} from "@refinedev/mui";

import { IPost } from "interfaces";

export const PostList: React.FC = () => {
  const { dataGridProps } = useDataGrid<IPost>({
    meta: {
      populate: ["category"],
    },
  });

  const columns = React.useMemo<GridColumns<IPost>>(
    () => [
      { field: "title", headerName: "Title", flex: 1, minWidth: 350 },
      {
        field: "category.title",
        headerName: "Category",
        minWidth: 250,
        flex: 1,
        renderCell: function render({ row }) {
          return row.category?.title;
        },
      },

      {
        field: "createdAt",
        headerName: "CreatedAt",
        minWidth: 220,
        renderCell: function render({ row }) {
          return <DateField format="LLL" value={row.createdAt} />;
        },
      },
      {
        headerName: "Actions",
        headerAlign: "center",
        field: "actions",
        minWidth: 180,
        align: "center",
        flex: 1,
        sortable: false,
        renderCell: function render({ row }) {
          return (
            <Stack direction="row" spacing={1}>
              <EditButton size="small" hideText recordItemId={row.id} />
            </Stack>
          );
        },
      },
    ],
    [],
  );

  return (
    <List>
      <DataGrid {...dataGridProps} columns={columns} autoHeight />
    </List>
  );
};
After creating the <PostEdit> component, add it to resource with edit prop:
...

import {
    PostList,
    PostCreate,
    PostEdit
} from "pages/posts";

...

const App: React.FC = () => {
    return (
        <ThemeProvider theme={LightTheme}>
            <CssBaseline />
            <GlobalStyles styles={{ html: { WebkitFontSmoothing: "auto" } }} />
            <RefineSnackbarProvider>
                <Refine
                    authProvider={authProvider}
                    routerProvider={routerProvider}
                    dataProvider={dataProvider(API_URL)}
                    notificationProvider={useNotificationProvider}
                    ReadyPage={ReadyPage}
                    Layout={Layout}
                    catchAll={<ErrorComponent />}
                    resources={[
                        {
                            name: "posts",
                            list: PostList,
                            create: PostCreate,
                            edit: PostEdit
                        },
                    ]}
                />
            </RefineSnackbarProvider>
        </ThemeProvider>
    );
};
You can try using edit buttons which will trigger the edit forms for each record, allowing you to update the record data.
Deleting a record
Deleting a record can be done in two ways.
The first way is adding a delete button on each row since Refine doesn't automatically add one, so we have to update our <PostList> component to add a <DeleteButton> for each record.
We are going to add new cell to the Actions column to show delete button on each row.
import React from "react";
import {
    useDataGrid,
    DataGrid,
    GridColumns,
    EditButton,
    DateField,
    List,
    Stack,
    DeleteButton,
} from "@refinedev/mui";

import { IPost } from "interfaces";

export const PostList: React.FC = () => {
    const { dataGridProps } = useDataGrid<IPost>({
        meta: {
            populate: ["category"],
        },
    });


    const columns = React.useMemo<GridColumns<IPost>>(
      ...

            {
                headerName: "Actions",
                headerAlign: "center",
                field: "actions",
                minWidth: 180,
                align: "center",
                flex: 1,
                sortable: false,
                renderCell: function render({ row }) {
                    return (
                        <Stack direction="row" spacing={1}>
                            <EditButton
                                size="small"
                                hideText
                                recordItemId={row.id}
                            />
                            <DeleteButton
                                size="small"
                                hideText
                                recordItemId={row.id}
                            />

                        </Stack>
                    );
                },
            },
        ],
        [],
    );

    return (
        <List>
            <DataGrid {...dataGridProps} columns={columns} autoHeight />
        </List>
    );
};
Now we are able to delete record by clicking delete button and confirmation.
 Delete post confirmation dialog
The second way is showing delete button in <PostEdit> page. To show delete button in edit page, canDelete prop needs to be passed to resource object.
...

function App() {
    return (
        <ThemeProvider theme={LightTheme}>
            <CssBaseline />
            <GlobalStyles styles={{ html: { WebkitFontSmoothing: "auto" } }} />
            <RefineSnackbarProvider>
                <Refine
                    notificationProvider={useNotificationProvider}
                    Layout={Layout}
                    ReadyPage={ReadyPage}
                    catchAll={<ErrorComponent />}
                    routerProvider={routerProvider}
                    authProvider={authProvider}
                    dataProvider={DataProvider(API_URL + `/api`, axiosInstance)}
                    resources={[
                        {
                            name: "posts",
                            list: PostList,
                            create: PostCreate,
                            edit: PostEdit,
                            canDelete: true,
                        },
                    ]}
                />
            </RefineSnackbarProvider>
        </ThemeProvider>
    );
}

export default App;
The <DeleteButton> should be appear in an edit form.
Implementing mutation mode
We'll like to show how mutation modes making your app feel more responsive to the user. Refine offers three modes for mutations called pessimistic, optimistic, and undoable. This modes determines when the side effects are executed.
If we briefly describe:
pessimistic: UI updates are delayed until the mutation is confirmed by the server.
optimistic: UI updates are immediately updated before confirmed by server.
undoable: UI updates are immediately updated, but you can undo the mutation.
We'll implement undoable mutation mode. The mutation is applied locally, redirection and UI updates are executed immediately as if the mutation is successful. Waits for a customizable amount of timeout period before mutation is applied.
During the timeout, mutation can be cancelled from the notification with an undo button and UI will revert back accordingly.
Refer to Refine mutation mode docs for more detailed information →
To activate mutation mode, we'll set mutationMode property in options to the <Refine/> component.
...
function App() {
    return (
        <ThemeProvider theme={LightTheme}>
            <CssBaseline />
            <GlobalStyles styles={{ html: { WebkitFontSmoothing: "auto" } }} />
            <RefineSnackbarProvider>
                <Refine
                    notificationProvider={useNotificationProvider}
                    Layout={Layout}
                    ReadyPage={ReadyPage}
                    catchAll={<ErrorComponent />}
                    routerProvider={routerProvider}
                    authProvider={authProvider}
                    dataProvider={DataProvider(API_URL + `/api`, axiosInstance)}
                    resources={[
                        {
                            name: "posts",
                            list: PostList,
                            create: PostCreate,
                            edit: PostEdit,
                            canDelete: true,
                        },
                    ]}
                    options={{ mutationMode: "undoable" }}
                />
            </RefineSnackbarProvider>
        </ThemeProvider>
    );
}

export default App;
TIP
The default timeout period set to 5000ms. You can change it by setting undoableTimeout property to the <Refine> component.
 Undoable delete notification with undo action
Sharing the current page with filters
Imagine we need to share the current page with filtering and sorting parameters to our colleagues. The proper way to do is, sharing the URL that has include all needed parameters like:
/posts?current=1&pageSize=8&sort[]=createdAt&order[]=desc
Refine offers syncWithLocation property that allow us to editing query parameters manually and share current page, items count per page, sort and filter parameters easily to others.
...
function App() {
    return (
        <ThemeProvider theme={LightTheme}>
            <CssBaseline />
            <GlobalStyles styles={{ html: { WebkitFontSmoothing: "auto" } }} />
            <RefineSnackbarProvider>
                <Refine
                    ...
                    options={{
                        mutationMode: "undoable",
                        syncWithLocation: true
                    }}
                />
            </RefineSnackbarProvider>
        </ThemeProvider>
    );
}

export default App;
Now, we can get current information from URL as a query parameters. We can either use this link to share to others or define filter, pagination, and sorting parameters manually from changing URL parameters.
Conclusion
In this article, we'll show you how to build a CRUD admin panel using Refine and Material UI. This approach will allow you to quickly create an admin interface for your application with minimal coding. We'll start by setting up our project with the required dependencies. Then, we'll create our CRUD components using Material UI. Finally, we'll wire everything up and add some extra features from Refine like mutation mode.
We covered:
- How to bootstrap Refine app
- Connecting Strapiv4 data provider to Refine app.
- Creating pages for CRUD operations
- Implementing some of Refine features like mutation mode and location sync.
Refine is an open source tool that rapidly and flexibly develops for CRUD admin panels or web apps. It is easy to get started with and doesn't require a lot of code. It has nice documentation that covered examples, guidelines, and tutorials using best practices. Refine is constantly being updated with new features and improvements.