Supabase
Introduction
Supabase is an open-source Firebase alternative that provides backend features. This tutorial steps will focus specifically on database and authentication features. We'll see how to use Supabase as a data provider and implement authentication to Refine app.
Refine offers built-in data provider support for Supabase and handles all required data service methods out-of-the-box. Therefore, we will not need to use complex boilerplate codes to make it work. Refine handles all the complex works for us by internal hooks and implementations.
We'll build a simple CRUD app with Refine and use Supabase as a data provider. We'll also see how to use Supabase's authentication features on Refine app.
We are assuming that you have already know how Refine works. If not, please check out the Tutorial section first.
Refer to docs for more information about data provider →
Discover the +15 most popular backend service data providers supported out-of-the-box by Refine →
Project Setup
We'll be using create refine-app CLI to bootstrap our example project with a special preset defined to Supabase example
- Quick setup with CLI preset
- Without preset
preset
npm create refine-app@latest -- --preset refine-antd-supabase my-supabase-app
Also, we need to install npm packages to use markdown editor:
npm i @uiw/react-md-editor
This will create a new Refine app with Supabase data provider and Ant Design as a UI framework. We'll be using this project as a base to implement our example.
nopreset
You are free to bootstrap a Refine app with any other features you want. To do so, you can run the following command and choose any data provider or feature you want.
npm create refine-app@latest example-app
Then choose the following options:
? Select your project type: refine-react
 > refine-react
? Do you want to use a UI Framework?:
 > Ant Design
? Data Provider
 > Supabase
TIP
If you want to add Supabase data provider to existed Refine app, you add it by running:
npm i @refinedev/supabase
Establishing Supabase connection
Initialize Supabase client
If you head over to src/utilty folder, you'll see a file called supabaseClient.ts created by CLI. This auto-generated file contains API credentials and a function that initializes the Supabase client.
import { createClient } from "@refinedev/supabase";

const SUPABASE_URL = "https://iwdfzvfqbtokqetmbmbp.supabase.co";
const SUPABASE_KEY =
  "eyJhbGciOiJIUzI1NiIsInR5cCI6IkpXVCJ9.eyJyb2xlIjoiYW5vbiIsImlhdCI6MTYzMDU2NzAxMCwiZXhwIjoxOTQ2MTQzMDEwfQ._gr6kXGkQBi9BM9dx5vKaNKYj_DJN1xlkarprGpM_fU";

export const supabaseClient = createClient(SUPABASE_URL, SUPABASE_KEY, {
  db: {
    schema: "public", // this can be overridden by passing `meta.schema` to data hooks.
  },
  auth: {
    persistSession: true,
  },
});
We'll use this example API credentials and createClient method that exposes from refine-supabase package for enabling Refine to Supabase API connection.
You can find your Supabase URL and key from your Supabase dashboard →
TIP
You can also use environment variables to store your Supabase URL and key. This is a good practice to keep your sensitive information safe.
Register Supabase data provider
Let's head over to App.tsx file where all magic happens. This is the entry point of our app. We'll be registering our Supabase data provider here.
import { Refine } from "@refinedev/core";
import { dataProvider } from "@refinedev/supabase";
import { supabaseClient } from "utility";

function App() {
  return (
    <Refine
      dataProvider={dataProvider(supabaseClient)}
      //...
    >
      {/* ... */}
    </Refine>
  );
}

export default App;
Highlighted lines are the ones the CLI generator automatically added to register Supabase data provider. Simply, we are passing supabaseClient to dataProvider method to establish a connection with Supabase API.
With this configuration, Refine can now communicate with Supabase API and perform all required data service CRUD methods using data hooks.
Refer to documentation to learn more about how to use data hooks →
Understanding the Auth Provider
Auth provider is a concept that allows us to use any authentication service with refine.
You'll see a file called src/authProvider.ts created by CLI. This auto-generated file contains pre-defined functions using Supabase Auth API methods internally to perform authentication and authorization operations.
So basically, this is where we set complete authentication logic for the app.
Since we preferred refine-supabase as the data provider during the CLI project initialization, all required Supabase authentication methods are already implemented for us. This shows us how easy it is to bootstrap a Refine app with CLI
Refer to docs for more information about Auth Provider methods and custom Auth Providers →
Take a look the auto-generated authProvider.ts file
import { AuthProvider } from "@refinedev/core";

import { supabaseClient } from "utility";

const authProvider: AuthProvider = {
  login: async ({ email, password, providerName }) => {
    // sign in with oauth
    try {
      if (providerName) {
        const { data, error } = await supabaseClient.auth.signInWithOAuth({
          provider: providerName,
        });

        if (error) {
          return {
            success: false,
            error,
          };
        }

        if (data?.url) {
          return {
            success: true,
          };
        }
      }

      // sign in with email and password
      const { data, error } = await supabaseClient.auth.signInWithPassword({
        email,
        password,
      });

      if (error) {
        return {
          success: false,
          error,
        };
      }

      if (data?.user) {
        return {
          success: true,
        };
      }
    } catch (error: any) {
      return {
        success: false,
        error,
      };
    }

    return {
      success: false,
      error: {
        message: "Login failed",
        name: "Invalid email or password",
      },
    };
  },
  register: async ({ email, password }) => {
    try {
      const { data, error } = await supabaseClient.auth.signUp({
        email,
        password,
      });

      if (error) {
        return {
          success: false,
          error,
        };
      }

      if (data) {
        return {
          success: true,
        };
      }
    } catch (error: any) {
      return {
        success: false,
        error,
      };
    }

    return {
      success: false,
      error: {
        message: "Register failed",
        name: "Invalid email or password",
      },
    };
  },
  forgotPassword: async ({ email }) => {
    try {
      const { data, error } = await supabaseClient.auth.resetPasswordForEmail(
        email,
        {
          redirectTo: `${window.location.origin}/update-password`,
        },
      );

      if (error) {
        return {
          success: false,
          error,
        };
      }

      if (data) {
        notification.open({
          type: "success",
          message: "Success",
          description:
            "Please check your email for a link to reset your password. If it doesn't appear within a few minutes, check your spam folder.",
        });
        return {
          success: true,
        };
      }
    } catch (error: any) {
      return {
        success: false,
        error,
      };
    }

    return {
      success: false,
      error: {
        message: "Forgot password failed",
        name: "Invalid email",
      },
    };
  },
  updatePassword: async ({ password }) => {
    try {
      const { data, error } = await supabaseClient.auth.updateUser({
        password,
      });

      if (error) {
        return {
          success: false,
          error,
        };
      }

      if (data) {
        return {
          success: true,
          redirectTo: "/",
        };
      }
    } catch (error: any) {
      return {
        success: false,
        error,
      };
    }
    return {
      success: false,
      error: {
        message: "Update password failed",
        name: "Invalid password",
      },
    };
  },
  logout: async () => {
    const { error } = await supabaseClient.auth.signOut();

    if (error) {
      return {
        success: false,
        error,
      };
    }

    return {
      success: true,
      redirectTo: "/",
    };
  },
  onError: async (error) => {
    console.error(error);
    return { error };
  },
  check: async () => {
    try {
      const { data } = await supabaseClient.auth.getSession();
      const { session } = data;

      if (!session) {
        return {
          authenticated: false,
          error: {
            message: "Check failed",
            name: "Session not found",
          },
          logout: true,
          redirectTo: "/login",
        };
      }
    } catch (error: any) {
      return {
        authenticated: false,
        error: error || {
          message: "Check failed",
          name: "Session not found",
        },
        logout: true,
        redirectTo: "/login",
      };
    }

    return {
      authenticated: true,
    };
  },
  getPermissions: async () => {
    const user = await supabaseClient.auth.getUser();

    if (user) {
      return user.data.user?.role;
    }

    return null;
  },
  getUserIdentity: async () => {
    const { data } = await supabaseClient.auth.getUser();

    if (data?.user) {
      return {
        ...data.user,
        name: data.user.email,
      };
    }

    return null;
  },
};

export default authProvider;
TIP
Auth provider functions are also consumed by Refine authorization hooks. Since this is out of scope of this tutorial, we'll not cover them for now
Auth provider needed to be registered in <Refine> component to activate auth features in our app
import { Refine } from "@refinedev/core";
import authProvider from "./authProvider";

function App() {
  return (
    <Refine
      authProvider={authProvider}
      //...
    />
  );
}

export default App;
Also, we'll see the Auth provider methods in action when using AuthPage in the next sections.
At this point, our Refine app is configured to communicate with Supabase API and ready to perform authentication operations using Supabase Auth methods.
If you head over to localhost:5173, you'll see a welcome page.
Now it's time to add some resources to our app.
Adding CRUD pages
Before diving into Supabase features, we'll add simple CRUD pages to make the app more interactive.
NOTE
Since this post focuses on Supabase implementation, we'll not discuss how to create CRUD pages and how it works. You can refer to Tutorial to learn more about creating CRUD pages.
Adding a List page
Let's add a listing page to show data retrieved from Supabase API in the table. Copy and paste the following code to src/pages/posts folder and name it list.tsx.
Show the List Page code
import {
  List,
  useTable,
  EditButton,
  ShowButton,
  getDefaultSortOrder,
  FilterDropdown,
  useSelect,
} from "@refinedev/antd";
import { Table, Space, Select } from "antd";

import { IPost, ICategory } from "interfaces";

export const PostList: React.FC = () => {
  const { tableProps, sorters } = useTable<IPost>({
    sorters: {
      initial: [
        {
          field: "id",
          order: "asc",
        },
      ],
    },
    meta: {
      select: "*, categories(title)",
    },
  });

  const { selectProps } = useSelect<ICategory>({
    resource: "categories",
  });

  return (
    <List>
      <Table {...tableProps} rowKey="id">
        <Table.Column
          key="id"
          dataIndex="id"
          title="ID"
          sorter
          defaultSortOrder={getDefaultSortOrder("id", sorters)}
        />
        <Table.Column key="title" dataIndex="title" title="Title" sorter />
        <Table.Column
          key="categoryId"
          dataIndex={["categories", "title"]}
          title="Category"
          defaultSortOrder={getDefaultSortOrder("categories.title", sorters)}
          filterDropdown={(props) => (
            <FilterDropdown {...props}>
              <Select
                style={{ minWidth: 200 }}
                mode="multiple"
                placeholder="Select Category"
                {...selectProps}
              />
            </FilterDropdown>
          )}
        />
        <Table.Column<IPost>
          title="Actions"
          dataIndex="actions"
          render={(_, record) => (
            <Space>
              <EditButton hideText size="small" recordItemId={record.id} />
              <ShowButton hideText size="small" recordItemId={record.id} />
            </Space>
          )}
        />
      </Table>
    </List>
  );
};
Adding a Create page
We'll need a page for creating a new record in Supabase API. Copy and paste following code to src/pages/posts folder and name it create.tsx.
Show the Create Page code
import { useState } from "react";

import { Create, useForm, useSelect } from "@refinedev/antd";
import { Form, Input, Select, Upload } from "antd";
import { RcFile } from "antd/lib/upload/interface";

import MDEditor from "@uiw/react-md-editor";

import { IPost, ICategory } from "interfaces";
import { supabaseClient, normalizeFile } from "utility";

export const PostCreate: React.FC = () => {
  const { formProps, saveButtonProps } = useForm<IPost>();

  const { selectProps: categorySelectProps } = useSelect<ICategory>({
    resource: "categories",
  });

  return (
    <Create saveButtonProps={saveButtonProps}>
      <Form {...formProps} layout="vertical">
        <Form.Item
          label="Title"
          name="title"
          rules={[
            {
              required: true,
            },
          ]}
        >
          <Input />
        </Form.Item>
        <Form.Item
          label="Category"
          name="categoryId"
          rules={[
            {
              required: true,
            },
          ]}
        >
          <Select {...categorySelectProps} />
        </Form.Item>
        <Form.Item
          label="Content"
          name="content"
          rules={[
            {
              required: true,
            },
          ]}
        >
          <MDEditor data-color-mode="light" />
        </Form.Item>
        <Form.Item label="Images">
          <Form.Item
            name="images"
            valuePropName="fileList"
            normalize={normalizeFile}
            noStyle
          >
            <Upload.Dragger
              name="file"
              listType="picture"
              multiple
              customRequest={async ({ file, onError, onSuccess }) => {
                try {
                  const rcFile = file as RcFile;
                  await supabaseClient.storage
                    .from("refine")
                    .upload(`public/${rcFile.name}`, file, {
                      cacheControl: "3600",
                      upsert: true,
                    });

                  const { data } = await supabaseClient.storage
                    .from("refine")
                    .getPublicUrl(`public/${rcFile.name}`);

                  const xhr = new XMLHttpRequest();
                  onSuccess && onSuccess({ url: data?.publicUrl }, xhr);
                } catch (error) {
                  onError && onError(new Error("Upload Error"));
                }
              }}
            >
              <p className="ant-upload-text">Drag & drop a file in this area</p>
            </Upload.Dragger>
          </Form.Item>
        </Form.Item>
      </Form>
    </Create>
  );
};
Adding an Edit page
We'll need a page for editing a record in Supabase API. Copy and paste following code to src/pages/posts folder and name it edit.tsx.
Show the Edit Page code
import React, { useState } from "react";

import {
  Edit,
  ListButton,
  RefreshButton,
  useForm,
  useSelect,
} from "@refinedev/antd";
import { Alert, Button, Form, Input, Select, Upload } from "antd";
import { RcFile } from "antd/lib/upload/interface";

import MDEditor from "@uiw/react-md-editor";

import { IPost, ICategory } from "interfaces";
import { supabaseClient, normalizeFile } from "utility";

export const PostEdit: React.FC = () => {
  const [isDeprecated, setIsDeprecated] = useState(false);
  const { formProps, saveButtonProps, query } = useForm<IPost>({
    liveMode: "manual",
    onLiveEvent: () => {
      setIsDeprecated(true);
    },
  });

  const postData = query?.data?.data;
  const { selectProps: categorySelectProps } = useSelect<ICategory>({
    resource: "categories",
    defaultValue: postData?.categoryId,
  });

  const handleRefresh = () => {
    query?.refetch();
    setIsDeprecated(false);
  };

  return (
    <Edit
      saveButtonProps={saveButtonProps}
      pageHeaderProps={{
        extra: (
          <>
            <ListButton />
            <RefreshButton onClick={handleRefresh} />
          </>
        ),
      }}
    >
      {isDeprecated && (
        <Alert
          message="This post is changed. Reload to see it's latest version."
          type="warning"
          style={{
            marginBottom: 20,
          }}
          action={
            <Button onClick={handleRefresh} size="small" type="ghost">
              Refresh
            </Button>
          }
        />
      )}

      <Form {...formProps} layout="vertical">
        <Form.Item
          label="Title"
          name="title"
          rules={[
            {
              required: true,
            },
          ]}
        >
          <Input />
        </Form.Item>
        <Form.Item
          label="Category"
          name="categoryId"
          rules={[
            {
              required: true,
            },
          ]}
        >
          <Select {...categorySelectProps} />
        </Form.Item>
        <Form.Item
          label="Content"
          name="content"
          rules={[
            {
              required: true,
            },
          ]}
        >
          <MDEditor data-color-mode="light" />
        </Form.Item>
        <Form.Item label="Images">
          <Form.Item
            name="images"
            valuePropName="fileList"
            normalize={normalizeFile}
            noStyle
          >
            <Upload.Dragger
              name="file"
              listType="picture"
              multiple
              customRequest={async ({ file, onError, onSuccess }) => {
                const rcFile = file as RcFile;
                const fileUrl = `public/${rcFile.name}`;

                const { error } = await supabaseClient.storage
                  .from("refine")
                  .upload(fileUrl, file, {
                    cacheControl: "3600",
                    upsert: true,
                  });

                if (error) {
                  return onError?.(error);
                }
                const { data, error: urlError } = await supabaseClient.storage
                  .from("refine")
                  .getPublicUrl(fileUrl);

                if (urlError) {
                  return onError?.(urlError);
                }

                onSuccess?.({ url: data?.publicUrl }, new XMLHttpRequest());
              }}
            >
              <p className="ant-upload-text">Drag & drop a file in this area</p>
            </Upload.Dragger>
          </Form.Item>
        </Form.Item>
      </Form>
    </Edit>
  );
};
Adding Interfaces and Normalize file
We need to add interfaces for Post and Create pages to src/interfaces/index.d.ts file.
Show the interface code
export interface ICategory {
  id: string;
  title: string;
}

export interface IFile {
  name: string;
  percent: number;
  size: number;
  status: "error" | "success" | "done" | "uploading" | "removed";
  type: string;
  uid: string;
  url: string;
}

export interface IPost {
  id: string;
  title: string;
  content: string;
  categoryId: string;
  images: IFile[];
}
Also, the normalizeFile function needed to be added to the src/utility/normalize.ts file to perform file upload operations specifically for Supabase API.
Show the Normalize file code
import { UploadFile } from "antd/lib/upload/interface";

interface UploadResponse {
  url: string;
}
interface EventArgs<T = UploadResponse> {
  file: UploadFile<T>;
  fileList: Array<UploadFile<T>>;
}

export const normalizeFile = (event: EventArgs) => {
  const { fileList } = event;

  return fileList.map((item) => {
    const { uid, name, type, size, response, percent, status } = item;

    return {
      uid,
      name,
      url: item.url || response?.url,
      type,
      size,
      percent,
      status,
    };
  });
};
Finally expose those modules at src/pages/posts by adding
export * from "./create";
export * from "./edit";
export * from "./list";
Adding Resources
One last thing we need to do is to add newly created CRUD pages to the resources property of <Refine> component.
import { dataProvider } from '@refinedev/supabase';
import { supabaseClient } from 'utility';

import { BrowserRouter, Routes, Route, Outlet } from "react-router";

import { PostList, PostCreate, PostEdit } from 'pages/posts';

function App() {
    return (
        <BrowserRouter>
            <Refine
                ...
                dataProvider={dataProvider(supabaseClient)}
                resources={[
                    {
                        name: 'posts',
                        list: "/posts",
                        create: "/posts/create",
                        edit: "/posts/edit/:id",
                    },
                ]}
            >
                <Routes>
                    <Route path="/posts" element={<PostList />} />
                    <Route path="/posts/create" element={<PostCreate />} />
                    <Route path="/posts/edit/:id" element={<PostEdit />} />
                </Routes>
            </Refine>
        </BrowserRouter>
    );
}

export default App;
The resources property activates the connection between CRUD pages and Supabase API.
Refine automatically matches the Supabase API endpoint with CRUD pages for us. In this way, the pages can interact with data from the API.
The
nameproperty refers to the name of the table in the Supabase database.The
listproperty registers/postsendpoint to thePostListcomponent.The
createproperty registers/posts/createendpoint to thePostCreatecomponent. Thereby, when you head over toyourdomain.com/posts/create, you will see thePostCreatepage you just created.
Understanding the Login screen
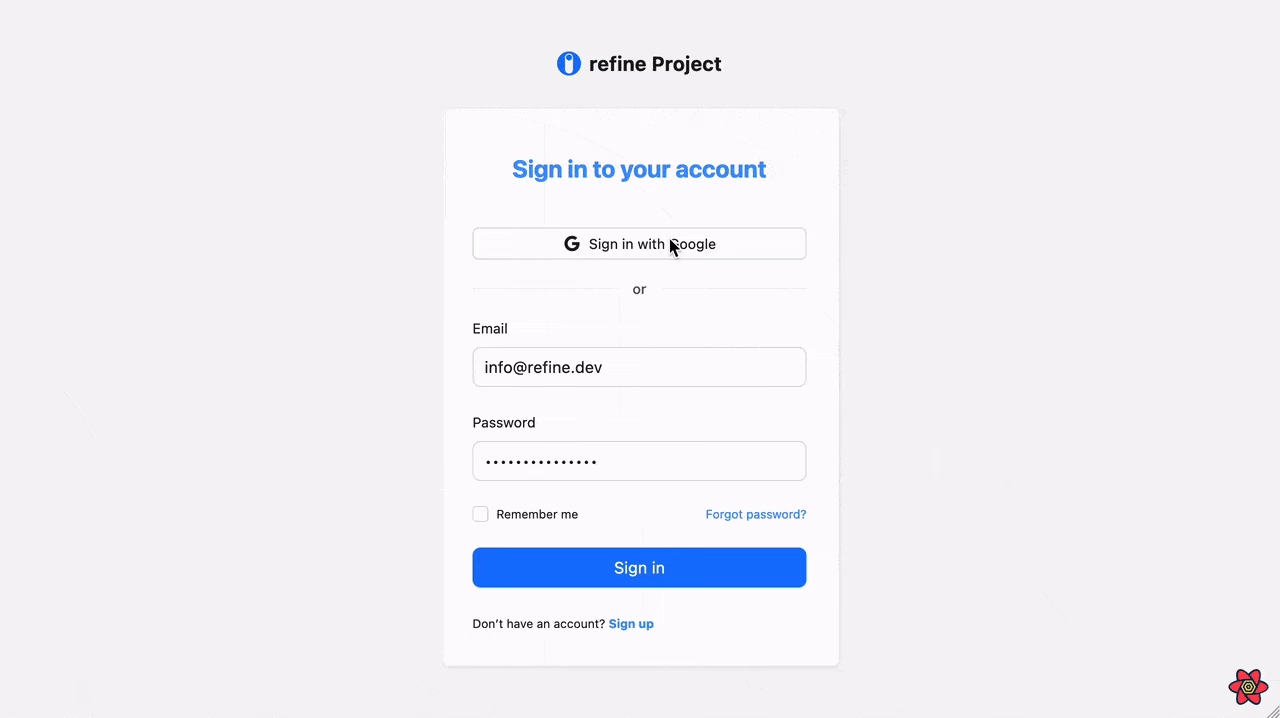
After adding the resources, the app will look like:
Normally, Refine shows a default login page when authProvider and resources properties are passed to <Refine /> component. However, our login screen is slightly different from the default one.
This premade and ready to use Login screen consist AuthPage and authProvider concepts behind the scenes:
Let's check out the Authentication property:
import { Refine, Authenticated } from "@refinedev/core";
import { AuthPage, RefineThemes, ThemedLayout } from "@refinedev/antd";
import routerProvider, {
  NavigateToResource,
  CatchAllNavigate,
} from "@refinedev/react-router";

import { BrowserRouter, Routes, Route, Outlet } from "react-router";
import { ConfigProvider } from "antd";
import authProvider from "./authProvider";

function App() {
  return (
    <BrowserRouter>
      <ConfigProvider theme={RefineThemes.Blue}>
        <Refine
          routerProvider={routerProvider}
          authProvider={authProvider}
          //...
        >
          <Routes>
            <Route
              element={
                <Authenticated fallback={<CatchAllNavigate to="/login" />}>
                  <ThemedLayout>
                    <Outlet />
                  </ThemedLayout>
                </Authenticated>
              }
            >
              <Route path="/posts" element={<div>dummy list page</div>} />
            </Route>
            <Route
              element={
                <Authenticated fallback={<Outlet />}>
                  <NavigateToResource />
                </Authenticated>
              }
            >
              <Route path="/login" element={<AuthPage />} />
              <Route path="/register" element={<AuthPage type="register" />} />
              <Route
                path="/forgot-password"
                element={<AuthPage type="forgotPassword" />}
              />
              <Route
                path="/update-password"
                element={<AuthPage type="updatePassword" />}
              />
            </Route>
          </Routes>
        </Refine>
      </ConfigProvider>
    </BrowserRouter>
  );
}
The AuthPage component returns ready-to-use authentication pages for login, register, update, and forgot password actions.
This is where authProvider comes into play.
Remember the Understanding the Auth Provider section? We mentioned login, register,, forgotPassword, and updatePassword functions that use Supabase Auth API methods internally in the authProvider.ts file. These methods automatically bind to <AuthPage> components by Refine to perform authentication operations.
 flow
flowWe'll show how to implement third party logins in the next sections.
Refer to AuthPage docs for more information →
Sign in the app with followings credentials:
- email: info@refine.dev
- password: refine-supabase
We have successfully logged in to the app. After then ListPage and CreatePage pages created. When the Create button is clicked, the CreatePage component will render.
Thanks to refine-supabase data provider, we can now start creating new records for the Supabase Database by just filling the form.
Social Logins
We'll show how to add Google Login option to the app.
Social login feature can be activated by setting provider property of the <AuthPage> component.
import { AuthPage } from "@refinedev/antd";
import { GoogleOutlined } from "@ant-design/icons";

const App: React.FC = () => {
    return (
        <Refine>
            <Routes>
                <Route
                    path="/login"
                    element={
                        <AuthPage
                            type="login"
                            providers={[
                                {
                                    name: "google",
                                    label: "Sign in with Google",
                                    icon:
                                        <GoogleOutlined
                                            style={{
                                                fontSize: 18,
                                                lineHeight: 0,
                                            }}
                                        />
                                },
                            ]}
                        />
                    }
                />
            </Routes>
            {/* ... */}
        </Refine>
    );
};

export default App;
This will add a new Google login button to the login page. After the user successfully logs in, the app will redirect back to the app.
Enable Google Auth on Supabase
Head over to app.supabase.com and sign in to your Supabase account. Next, go to Authentication -> Settings to configure the Auth providers.
You will find the Google Auth option in the Auth providers section; enable it and set your Google Credentials.
Refer to Supabase docs for more information about Credentials →
 supabaseConfig
Here is the result:
 socialLogin
Let's recap what we have done so far
So far, we have implemented the followings:
- We have reviewed Supabase Client and data provider concepts. We've seen benefits of using Refine and how it can handle complex setups for us.
- We have talked about the
authProviderconcept and how it works with Supabase Auth API. We also see the advantages of Refine's built-in authentication support. - We have added CRUD pages to make the app interact with Supabase API. We've seen how the
resourcesproperty works and how it connects the pages with the API. - We have seen how the
Authenticationcomponent works and how it overrides the default login page with theAuthPagecomponent. We've seen howAuthPagecomponent usesauthProvidermethods internally. - We have seen how authorization handling in Refine app by understanding the logic behind of
authProvider, and<AuthPage>component.
Refine provides solutions for critical parts of the complete CRUD app requirements. It saves development time and effort by providing ready-to-use components and features.
Supabase Realtime Support
Refine has a built-in support for Supabase Realtime. It means that when you create, update, or delete a record, the changes will be reflected in the app in real-time.
Required Supabase Realtime setup is already done in the @refinedev/supabase` data provider.
You can check the Supabase Realtime integration in the data provider source code →
We only need to register Refine's Supabase Live Provider to the liveProvider property to enable real-time support.
import { Refine } from "@refinedev/core";
import { liveProvider } from "@refinedev/supabase";
import { supabaseClient } from "utility";

/* ... */

function App() {
  return (
    <Refine
      liveProvider={liveProvider(supabaseClient)}
      options={{ liveMode: "auto" }}
      /* ... */
    >
      {/* ... */}
    </Refine>
  );
}
For live features to work automatically, we set liveMode: "auto" in the options prop.
Let see how real-time feature works in the app
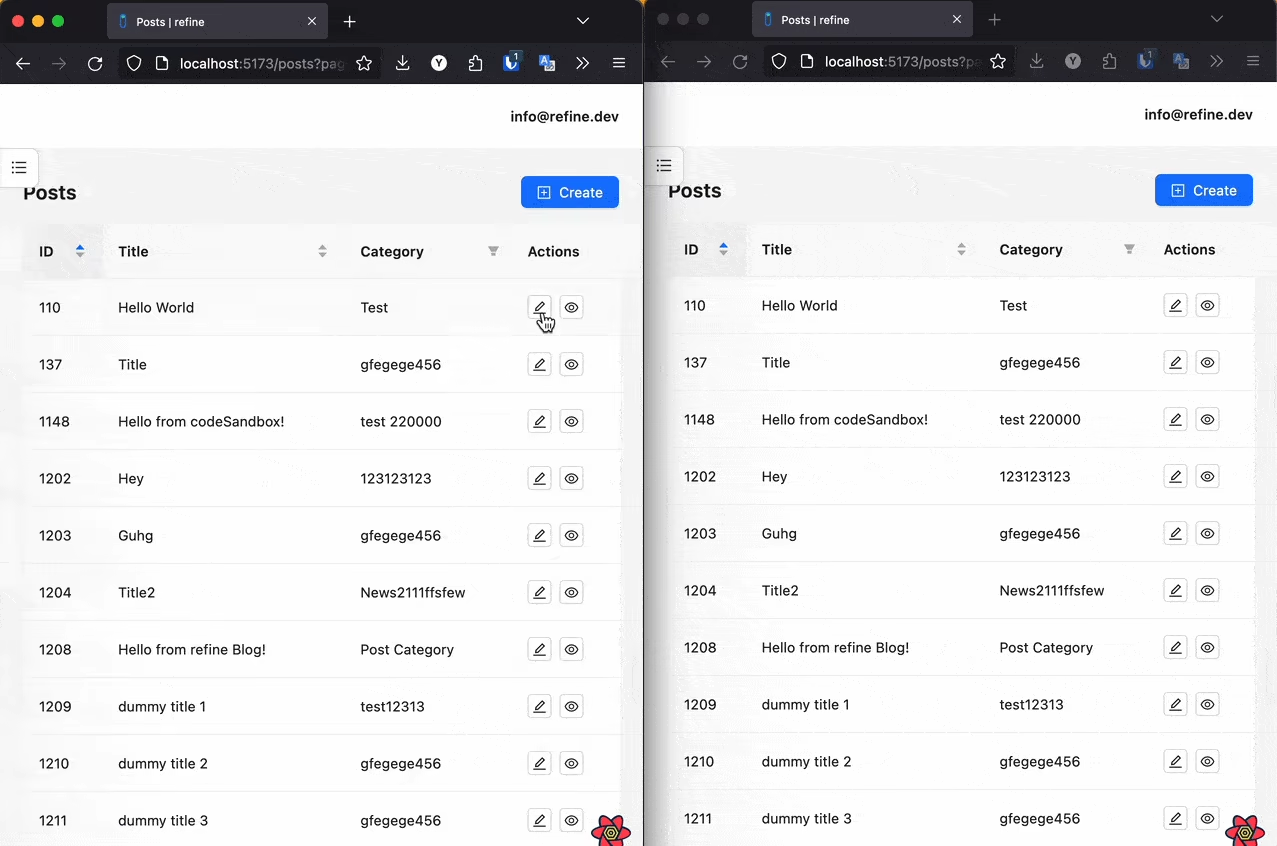 realTime
TIP
Refine offers out-of-the-box live provider support:
- Ably → Source Code - Demo
- Supabase → Source Code
- Appwrite → Source Code
- Hasura → Source Code
Using meta to pass values to data provider
The meta property is used to pass additional information that can be read by data provider methods.
We'll show an example of getting relational data from different tables on Supabase API using meta property.
Take a look at the useTable hook in List page we created on the previous sections.
select - Getting selected fields
By default, the data provider query methods use the * value for the select property, while the mutation methods do not use the select property. You can pass the select property in the meta object to override this behavior.
For example, if you want to get only the title and content fields from the posts table instead of all fields, you can override the "*" value by passing the select property in the meta as shown below:
useList({
  resource: "posts",
  meta: {
    select: "title, content",
  },
});
Also, since mutation methods do not use the select property by default, you can pass the select property in the meta object to get the selected fields.
const { mutate } = useCreate();

mutate({
  resource: "posts",
  values: {
    title: "Hello World",
    content: "Lorem ipsum dolor sit amet",
  },
  meta: {
    select: "title, content",
  },
});
select - Handling one-to-many relationship
We pass a select value in meta object to perform relational database operation in Supabase data provider. The data provider methods are using Supabase select property internally.
In this way, we can get the title data from the categories table and display it on the List page.
For example, for posts -> categories relationship, we can get the title data from the categories table and display it on the List page.
const { tableProps } = useTable<IPost>({
  resource: "posts",
  meta: {
    select: "*, categories(title)",
  },
});
useList, useOne, useMany hooks are using Supabase select property internally. So you can pass parameters to the Supbase select method using meta property.
select - Handling many-to-many relationships
For example, for movies <-> categories_movies <-> categories many-to-many relationship, we can get the categories data of a user using meta property.
const { tableProps } = useTable<IUser>({
  resource: "movies",
  meta: {
    select: "*, categories!inner(name)",
  },
});
idColumnName - using custom primary key
meta id property is used to match the column name of the primary key(in case the column name is different than "id") in your Supabase data table to the column name you have assigned.
Refine's useMany hook accepts meta property and uses getMany method of data provider.
useMany({
  resource: "posts",
  ids: [1, 2],
});
By default, it searches for posts in the id column of the data table.
With passing id parameter to the meta property, we can change the column name to the post_id that will be searched for the ids.
useMany({
  resource: "posts",
  ids: [1, 2],
  meta: {
    idColumnName: "post_id",
  },
});
Now it searches for posts in the post_id column of the data table instead of id column.
schema - using custom schema
By default, it uses the given schema from supabase client. You can pass the schema property in the meta object to override this behavior.
This property is also passed to the live provider and can be used in all data hooks
const tableProps = useTable<IUser>({
  resource: "posts",
  meta: {
    schema: "foo",
  },
});
Deep Filtering
Deep filtering is filtering on a relation's fields.
It gets the posts where the title of the categories is "Beginning". Also the inner fields of the categories can be reached with dot notation.
const { tableProps } = useTable({
  resource: "posts",
  filters: {
    initial: [
      { field: "categories.title", operator: "eq", value: "Beginning" },
    ],
  },
  meta: {
    select: "*, categories!inner(title)",
  },
});
CAUTION
If you filter based on a table from an inner join, you will need to use .select('*, mytable!inner(*)') within Supabase.
getList - performance
By default, the data provider getList method returns the exact count of rows. Depending on the table size, this can slow down the request. You can request estimations of the total count by passing the count property in the meta as shown below:
useList({
  resource: "posts",
  meta: {
    count: "estimated",
  },
});
By default the exact count is used.
Refer to the PostgREST docs for more information about the count property →
FAQ
How can I use Supabase Realtime with relational queries?
We use meta.select property to fetch relational data from foreign tables in Supabase. However, Supabase client doesn't have Supabase Realtime support for the relational data changes. To handle this, we need to manually subscribe and refetch the data when a change occurs in the related table.
import { useTable, useSubscription } from "@refinedev/core";

export const PostList = () => {
  const table = useTable({
    meta: {
      select: "*, categories(title)",
    },
  });

  useSubscription({
    channel: "categories",
    types: ["*"],
    onLiveEvent: () => {
      table.tableQuery.refetch();
    },
  });

  return <>{/* ... */}</>;
};
Example
npm create refine-app@latest -- --example data-provider-supabase
- Introduction
- Project Setup
- Establishing Supabase connection
- Initialize Supabase client
- Register Supabase data provider
- Understanding the Auth Provider
- Adding CRUD pages
- Adding a List page
- Adding a Create page
- Adding an Edit page
- Adding Interfaces and Normalize file
- Adding Resources
- Understanding the Login screen
- This premade and ready to use Login screen consist
AuthPageandauthProviderconcepts behind the scenes: - Social Logins
- Enable Google Auth on Supabase
- Let's recap what we have done so far
- Supabase Realtime Support
- Let see how real-time feature works in the app
- Using
metato pass values to data provider select- Getting selected fieldsselect- Handling one-to-many relationshipselect- Handling many-to-many relationshipsidColumnName- using custom primary keyschema- using custom schema- Deep Filtering
getList- performance- FAQ
- How can I use Supabase Realtime with relational queries?
- Example