Development
Refine offers improved developer experience by providing a set of tools to help you develop your application. These tools will help you from creating a new project to developing, customizing and debugging your application. This guide will introduce you to these tools and how to use them.
Creating a New Project
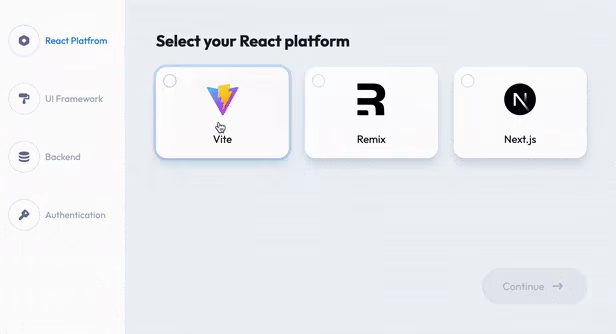
Refine provides an app scaffolding tool which is available both as browser-based and as command-line interface. Both of the tools will provide you set of options to choose from to create your project.
- The platform you want to use (Vite, Next.js or Remix)
- The UI library of your choice (Ant Design, Material UI, Chakra UI, Mantine or none)
- The data provider you want to use (REST, Supabase, Strapi, NestJS, Appwrite, Airtable and Hasura)
- The authentication provider you want to use (Google Auth, Keycloak, Auth0, Supabase, Appwrite, Strapi, Custom or none)
To use the browser-based scaffolding tool, you can visit refine.dev and select the options you want to use for your project. After you are done with the options, you can click on the Create Project button to download your project.
To use the command-line interface, you can simply run the following command in your terminal:
- npm
- pnpm
- yarn
npm create refine-app@latest -- my-refine-app
pnpm create refine-app@latest my-refine-app
yarn create refine-app@latest my-refine-app
Only supports yarn@1 version.
After running the command, you will be prompted to select the options you want to use for your project. After you are done with the options, the CLI will create your project in the my-refine-app directory.
Using CLI
Refine offers a command-line interface to help you with your app's development. The CLI provides a set of commands to help you with running your app, creating new resources and taking care of the boilerplate code for you, creating providers with templates to get you started to implement your own providers with ease, updating your app's dependencies easily, exporting components and providers from Refine packages to your app to let you customize them just like you would do with your own components and providers, and and get you notified about the announcements from the Refine team.
To learn more about the @refinedev/cli package, check out the CLI documentation.
Installation
CLI will be included in the apps created with the scaffolders by default. If you want to use the CLI in your existing project, you can install it by running the following command in your terminal:
- npm
- yarn
- pnpm
npm
npm i @refinedev/cli
yarn
yarn add @refinedev/cli
pnpm
pnpm add @refinedev/cli
Usage
After installing the CLI, its recommended to update your scripts and add refine command to your package.json file:
{
  "scripts": {
    "refine": "refine"
  }
}
This command will help you use CLI command easily. You can run the following command to see the available commands:
npm run refine -- --help
It's recommended to use Refine's runners to run your development server. They will use the appropriate commands for your app's platform and also provide you with some additional features such as running the devtools (if installed) along with your app, checking for updates and notifying you about them, and notifying you about the announcements from the Refine team.
- Vite
- Next.js
- Remix
Vite
{
    "scripts": {
-        "dev": "vite",
-        "build": "vite build",
-        "start": "vite preview"
    }
+        "dev": "refine dev",
+        "build": "refine build",
+        "start": "refine start"
    }
}
Next.js
{
    "scripts": {
-        "dev": "next dev",
-        "build": "next build",
-        "start": "next start"
    }
+        "dev": "refine dev",
+        "build": "refine build",
+        "start": "refine start"
    }
}
Remix
{
    "scripts": {
-        "dev": "remix dev",
-        "build": "remix build",
-        "start": "remix-serve build"
    }
+        "dev": "refine dev",
+        "build": "refine build",
+        "start": "refine start"
    }
}
Using swizzle
This command allows you to export components and providers from Refine packages to your app to let you customize them just like you would do with your own components and providers.
Why is it called swizzling?
The term comes from Objective-C and Swift-UI: method swizzling is the process of changing the implementation of an existing selector (method).
For Refine, component swizzling means providing an alternative component that will be used instead of the default one.
You can think of it as Monkey Patching for React components, which allows you to change the default implementation. Gatsby has a similar feature called theme shadowing.
Thanks to the Docusaurus team for inspiring us for this feature.
Do I need to use swizzle?
Refine packages provide data providers, UI frameworks, and components that make it easy to build a project. Most these are customizable and can be used as is. However, sometimes you may want to customize it as if you created it yourself. This is where swizzling comes in. Most of Refine packages provide a swizzle command that ejects the files to your project. You can then customize them as you wish.
swizzleis a one-way operation. Once you swizzle a component or provider, you'll be responsible for keeping it up to date and fixing any issues that arise from the changes you've made.Exports of the packages will not be updated automatically. You will need to replace the default elements with the elements you have swizzled manually.
You can always switch back to the default implementations by updating your imports.
Using add
This command will help you add new resources and providers to your app. It will take care of the boilerplate code for you and provide a good starting point for you to implement your own pages and providers.
npm run refine add <auth, live, data, access-control, notification, i18n, audit-log, resource>
resource: To create a new resource and its CRUD pages.auth: To create a new authentication provider.live: To create a new live provider.data: To create a new data provider.access-control: To create a new access control provider.notification: To create a new notification provider.i18n: To create a new i18n provider.audit-log: To create a new audit log provider.
Using Devtools
Refine provides a devtools package to help you with your app's development. Devtools will help you monitor your app's queries and mutations, inspect queries made by your components and update your dependencies with a single click.
Devtools will only work in development mode. In production it will not be included in your app's bundle and will not have any effect on your app's performance.
Installation
To install devtools, you can use the following commands:
- Using CLI
- Manual
Using CLI
CLI has a command to install devtools and set it up for you:
npm run refine devtools init
Manual
npm i @refinedev/devtools
Usage
The following steps is handled by the CLI command automatically. If you've used the CLI command to install devtools, you can skip this section.
To use devtools, you'll need to wrap your component with the DevtoolsProvider component and if you're going to show it in the UI, you can add DevtoolsPanel component inside your app.
import { Refine } from "@refinedev/core";
import { DevtoolsPanel, DevtoolsProvider } from "@refinedev/devtools";

const App = () => {
  return (
    <DevtoolsProvider
      // If you're running devtools server on a different port or a domain, you can set the URL manually.
      // Note that, custom domains and ports are only available in the Enterprise Edition.
      // url="http://localhost:5001"
    >
      <Refine
      // ...
      >
        {/* ... */}
        <DevtoolsPanel />
      </Refine>
    </DevtoolsProvider>
  );
};
Running Devtools Server
Devtools will boot up a server to operate both on your app and have control over your project's source code to provide you with the best experience. If you're using @refinedev/cli's refine dev command, it will automatically start the devtools server for you if you have @refinedev/devtools installed.
If you want to start devtools server manually, you can use the following command:
refine devtools start
If you're running the devtools manually, you can disable the automatic start of the devtools server by passing --devtools=false flag to the refine dev command.
As an alternative, you can also install the @refinedev/devtools-server package and use refine-devtools command to start the server.
Required Ports
Devtools server will run on port 5001 by default. Devtools will serve HTTP and WebSocket connections on this port. If you want to change the port, you can set the REFINE_DEVTOOLS_PORT environment variable to the desired port number.
Refine Devtools running on ports other than "5001" is only available in the Enterprise Edition. If you're using the Community Edition, Refine Devtools will not work if the port is changed. Checkout Refine Devtools in Enterprise Edition for more information.
Using Inferencer
@refinedev/inferencer is a package that provides a way to automatically generate views for resources based on the data structure. The aim is to reduce the amount of time spent on creating views for resources by generating the code automatically that can be customized easily.
- Ant Design
- Material UI
- Chakra UI
- Mantine
- Headless
Installation
To install inferencer, you can use the following commands:
- npm
- yarn
- pnpm
npm
npm i @refinedev/inferencer
yarn
yarn add @refinedev/inferencer
pnpm
pnpm add @refinedev/inferencer
Usage
Inferencer package provides components for each UI implementation with subpaths (eg: @refinedev/inferencer/antd) that is used to generate views dynamically by using the response of your data provider. You can use these components to generate views for your resources.
import { AntdInferencer } from "@refinedev/inferencer/antd";

const PostList = () => {
  return <AntdInferencer resource="posts" action="list" />;
};
The generated views will be previewed in your app and a modal will be shown to you to copy the code.
The code generated by the Inferencer may not cover all the cases for your app but it will provide you with a good starting point and reduce the amount of time you spend on development.
Documentation and Community
All the features of Refine and its packages are well documented and you can find the appropriate documentation for your needs. If you have any questions or need help with your app's development, you can join our Discord server and ask your questions there. You can also join our Discussions page to discuss your ideas and questions with the community.